Front Desk Quick-Start — OneBOSS (keep this at your desk)
*Your one-hour essentials for go-live week (June 14). This is the canonical desk handout — it supersedes the old standalone agenda (frontdesk-1hr-agenda.md). For the full how-to, see the Front Desk Guide (03) and the Quick-Reference Cards (07).*
🟢 June 14: all new work happens in OneBOSS. TPS stays open read-only for old history (back to 2004) — you don't book, check out, or change anything in TPS anymore. 💡 You already do all of this at the front desk; OneBOSS just gives each job a clearer home and color-codes the whole day for you. You can't break anything you can't undo. Mis-click? Use Revert. Stuck? Call Jessica.
1. Get in & read the Schedule
- Log in: person icon (top-right) → Log in as… → your name. (Confirm the real login on training day.)
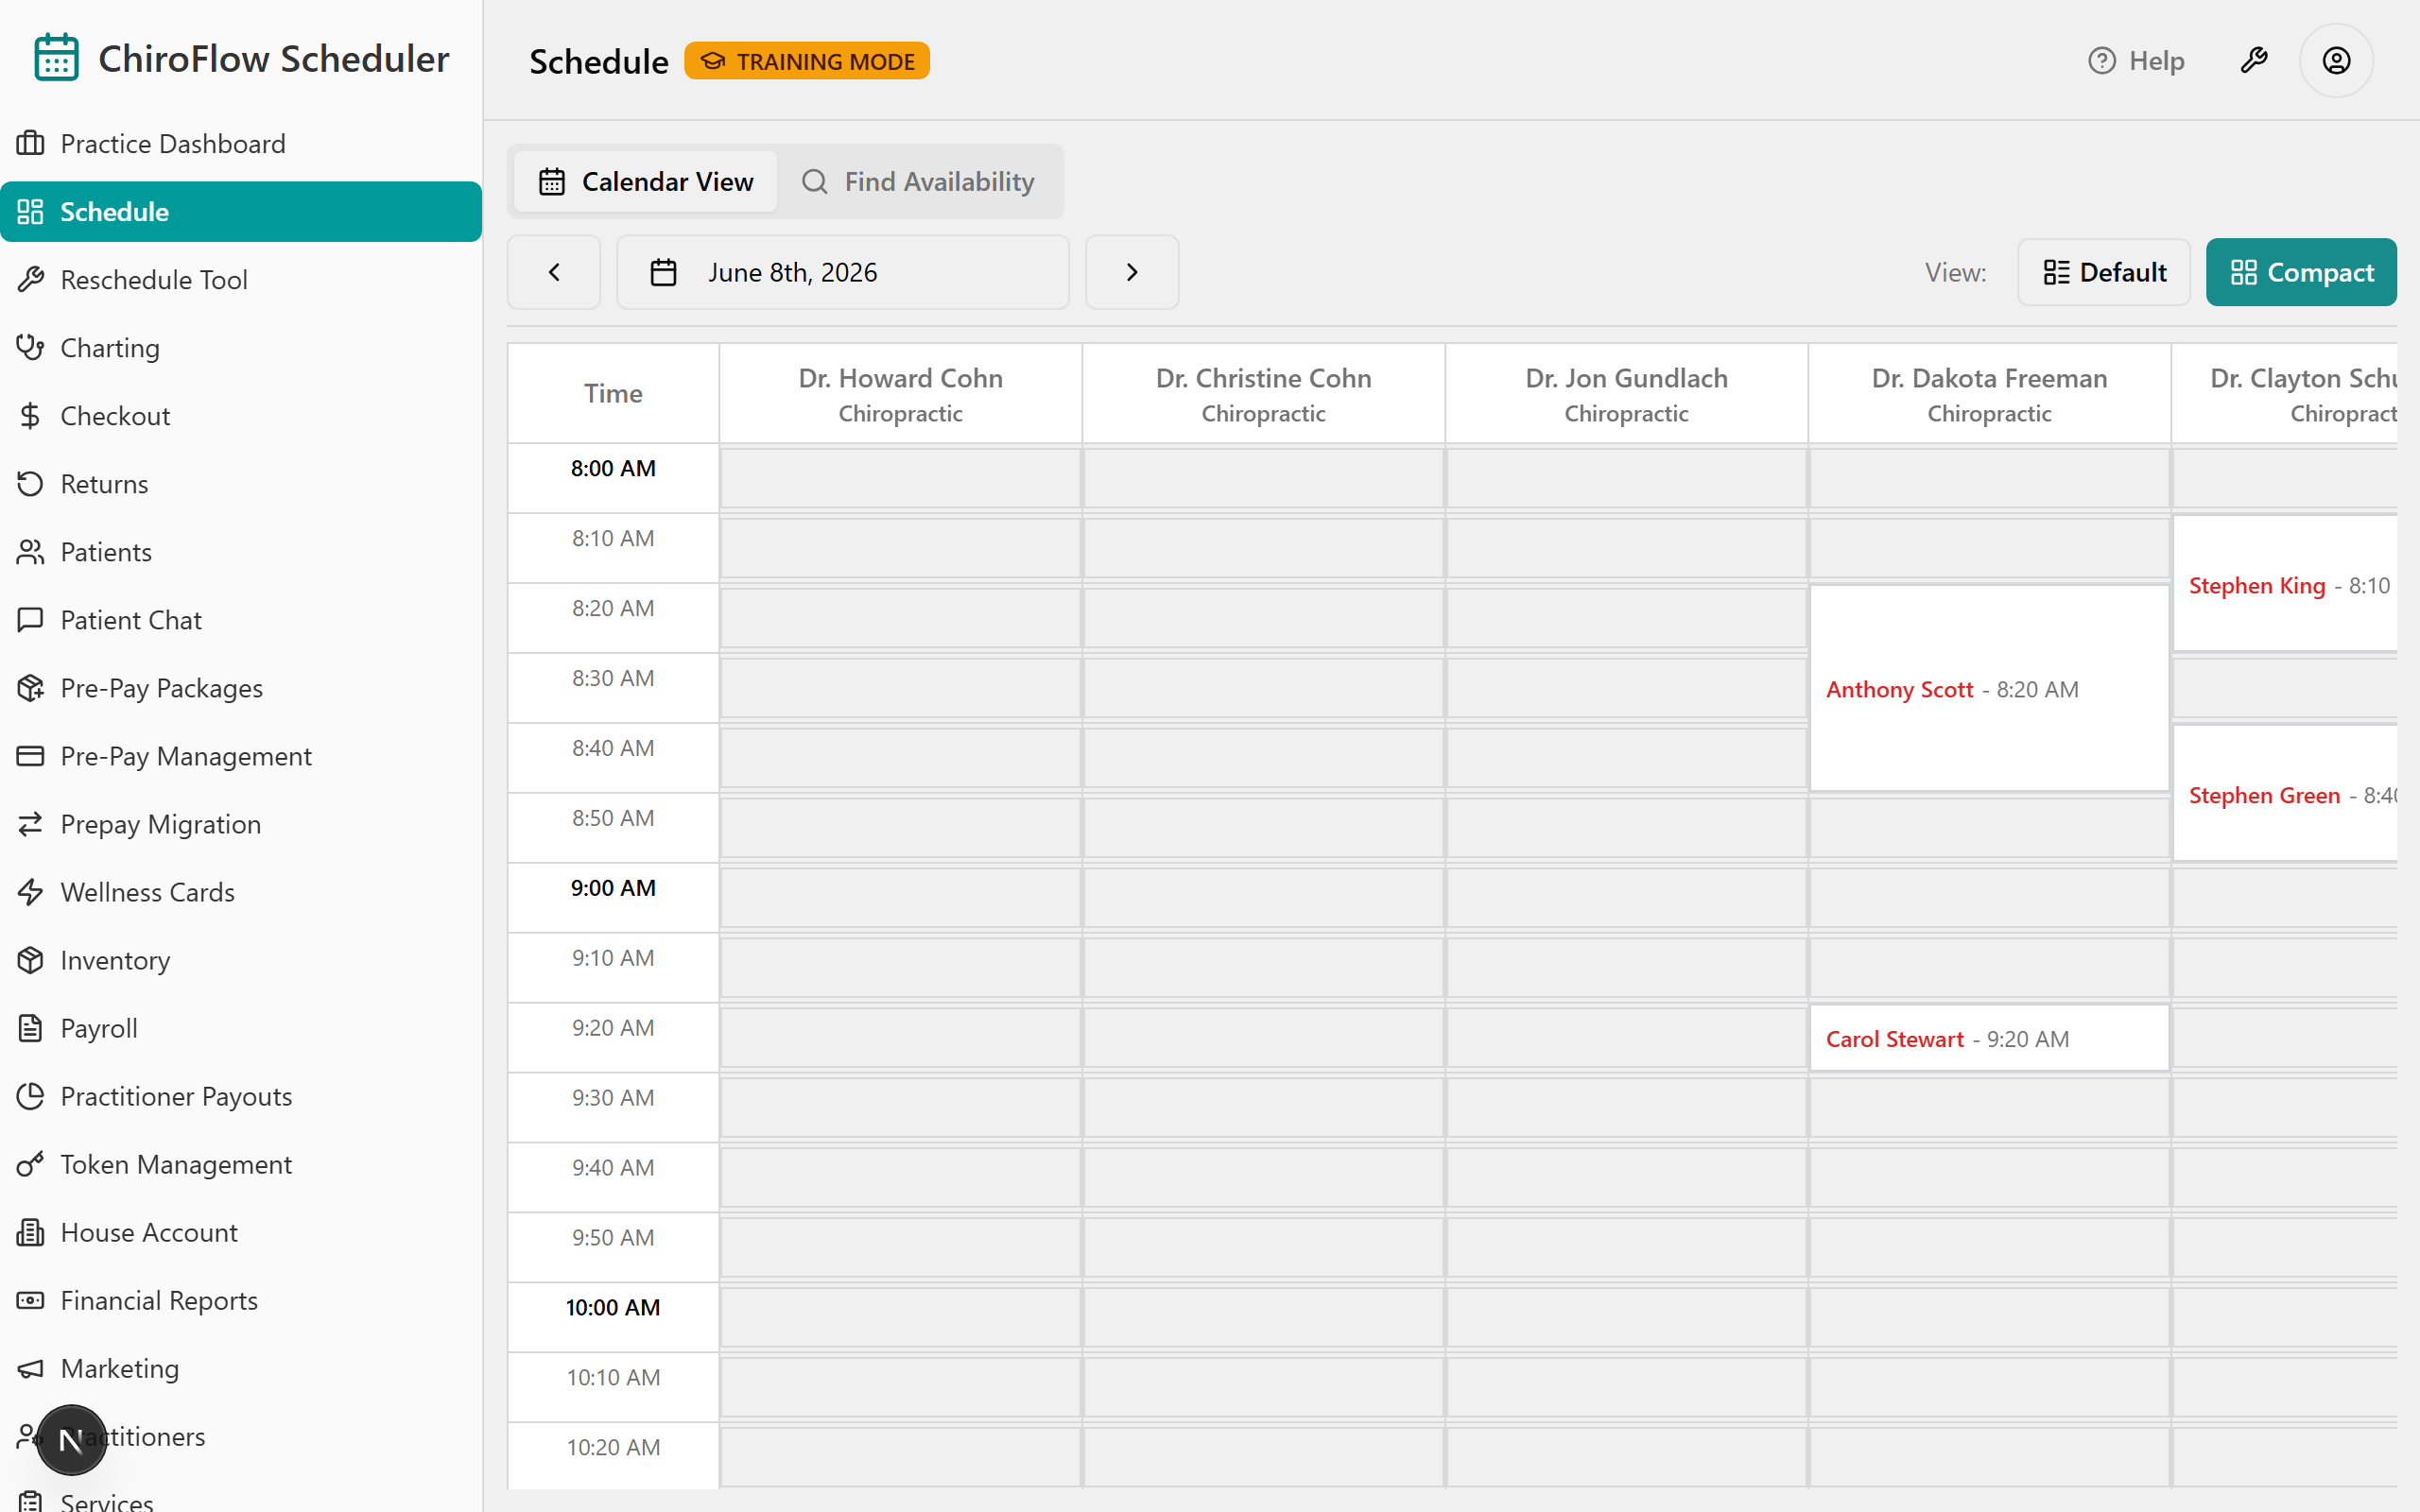
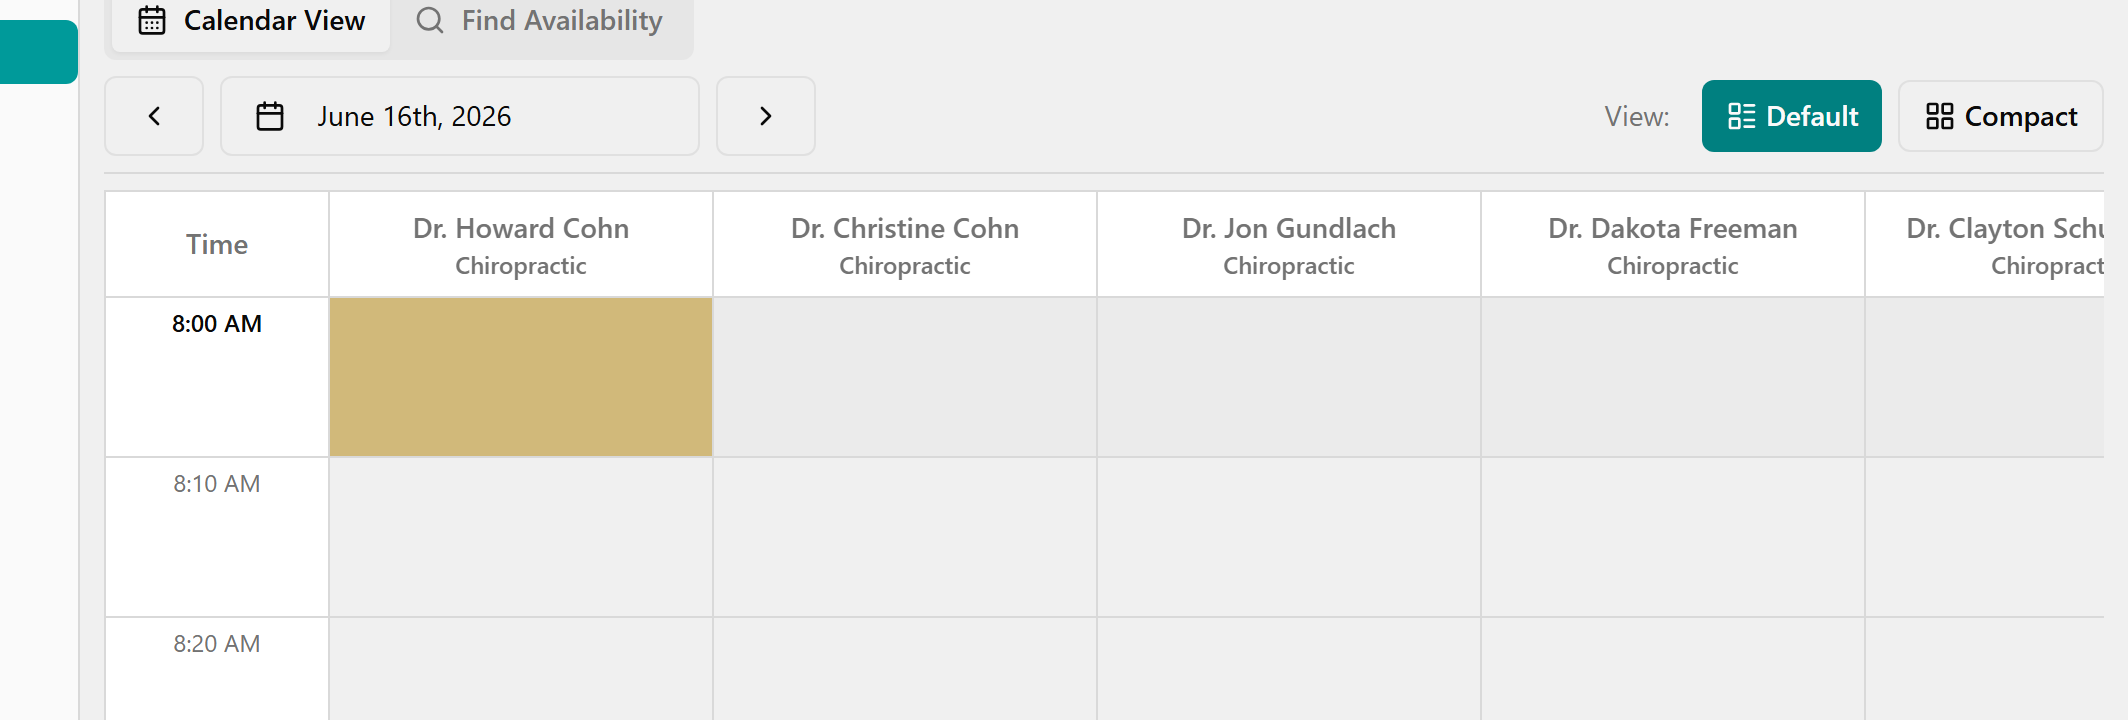
- Schedule (top of the left menu) is the OneBOSS home page (route
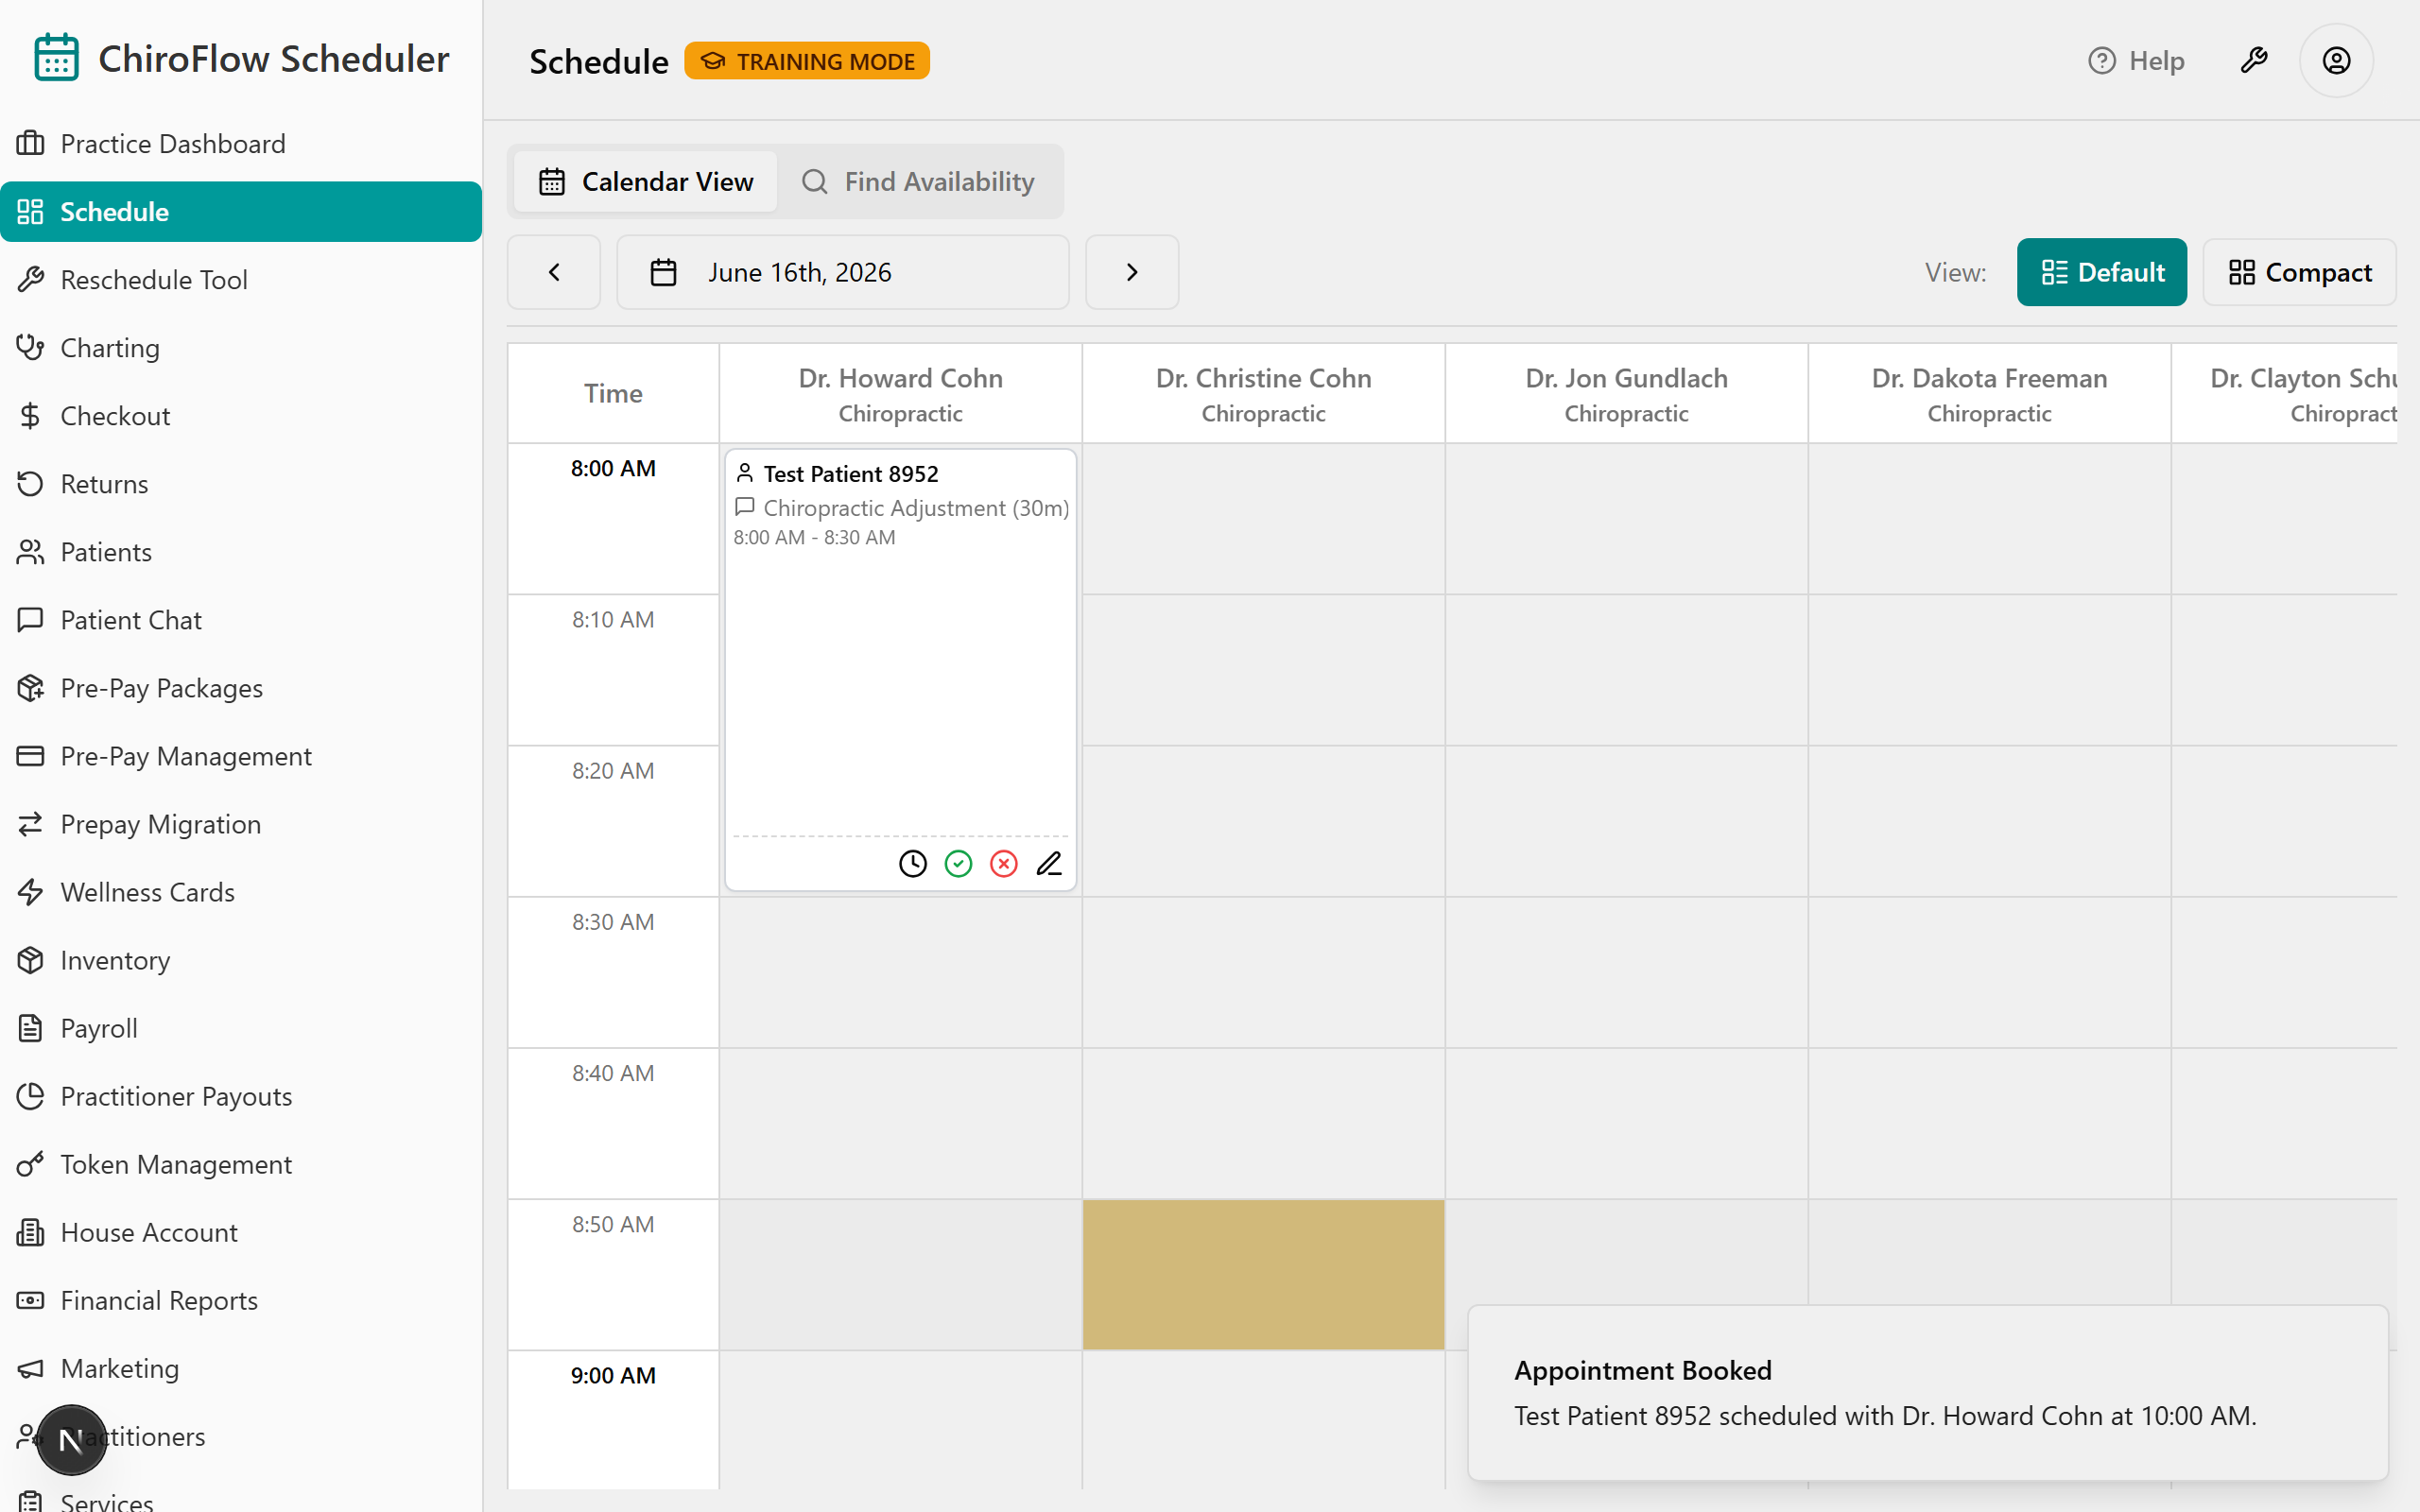
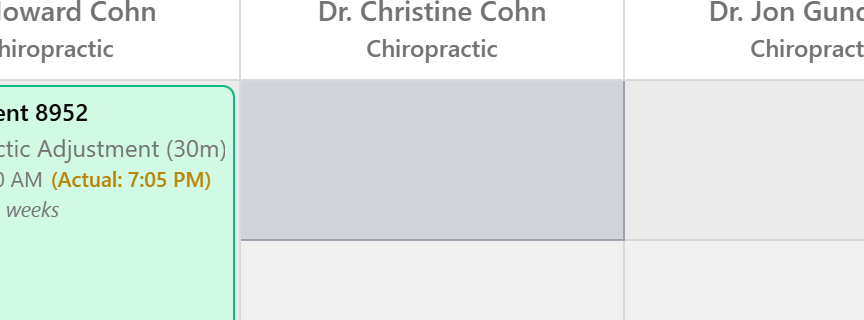
/) and your home base — the same as flipping open the appointment book in TPS. - Read the grid: left column = Time in 10-minute rows (about 8 AM–6 PM), each column = one practitioner, and each card shows the patient name, the service and its length (e.g. 20m), and the time. The grid loads in clinic time no matter your computer's time zone.

Card colors — read the whole day at a glance:
- White = scheduled (booked, not here yet). A white card whose name alone turns red is a past-start-time nudge, not a status change.
- Pink = checked in (arrived). Pink stays pink until payment is actually taken.
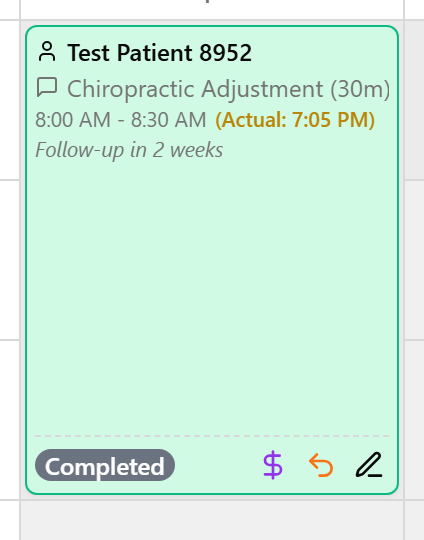
- Muted green = completed AND paid (done).
- Red = running late, or payment overdue.
Change the day: click ‹ to go back a day or › to go forward; or click the date button in the middle of the toolbar and pick a day from the calendar.

- Views (top-right of the toolbar): Default shows larger cards with on-card action buttons — use this everyday. Compact is a denser grid you act on by right-clicking a card or slot.
📎 Depth: 03-front-desk-guide §Schedule.
2. Check a patient in / Mark Late / Revert
- On today's Schedule, find the patient's white card in the right practitioner's column.
- Check in: click the green check-circle Check In button on the card (Compact view: right-click → Check In). Shortcut: double-click a white card to check in instantly.
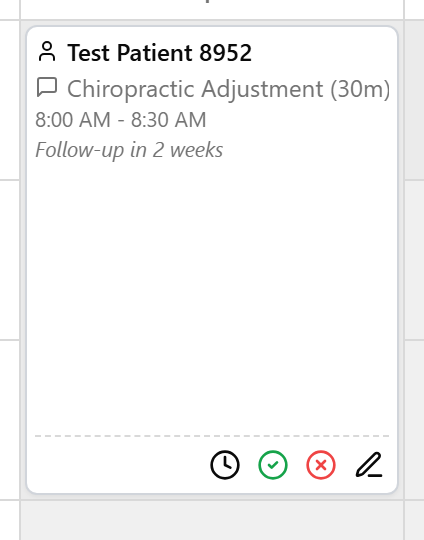
- The card turns pink — arrival time is stamped. Pink stays pink until payment is taken.
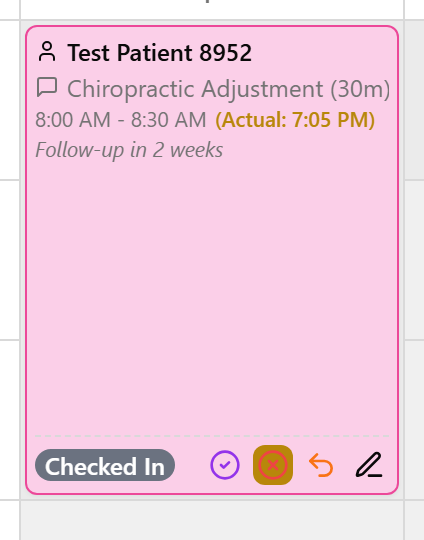
- Running late? On the white card, click the clock icon (Compact: right-click → Mark Late), type the minutes in Late (minutes), then click Confirm Late.
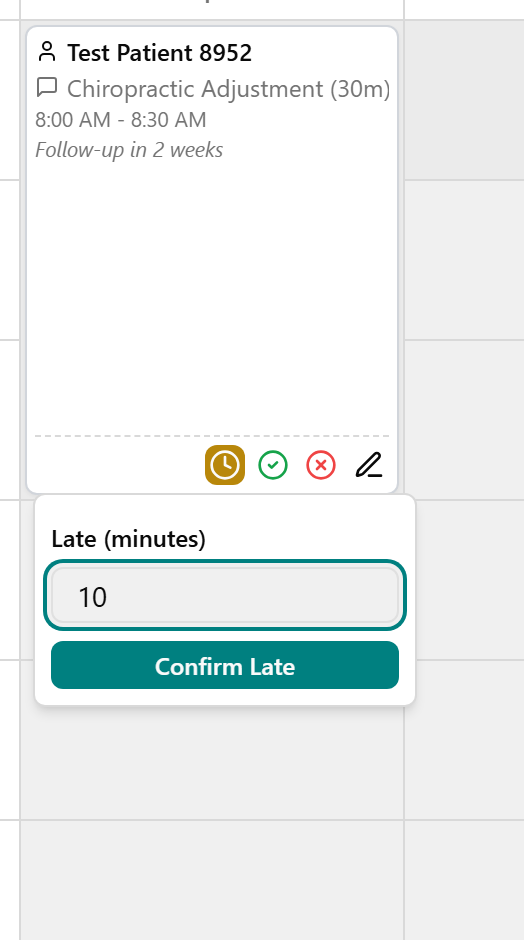
- The card turns red to flag running-late so you can spot it.
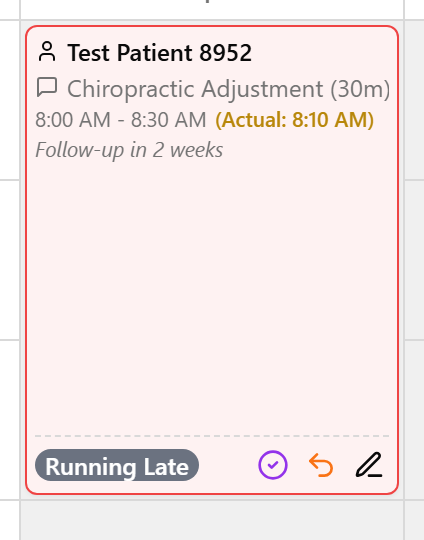
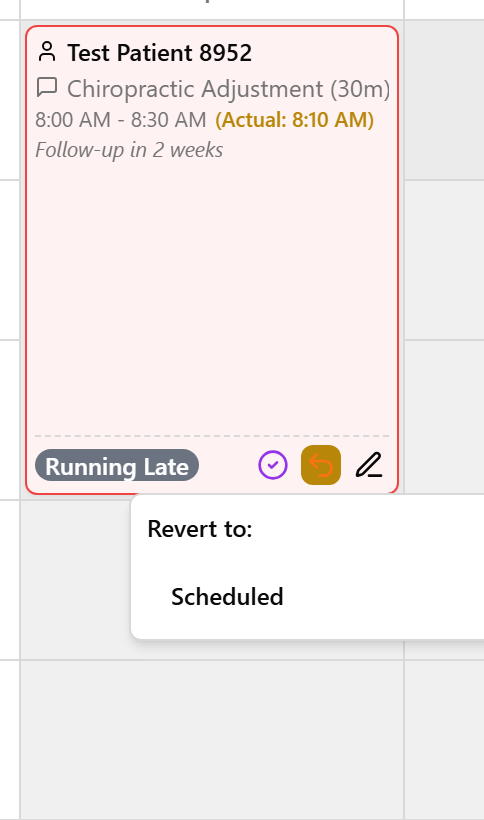
- Fix a wrong status: on a checked-in, late, or completed card click the orange undo (curved-arrow) icon (Compact: right-click) to open the Revert menu, then pick the earlier status to go back to.
📎 Depth: 03-front-desk-guide §Check-in.
3. Book an appointment
- Use ‹ / › or the date button to land on the day you want, then find an empty (white) slot in the right practitioner's column.
- Click the slot. The Quick Book Appointment window opens (practitioner and time shown at the top).
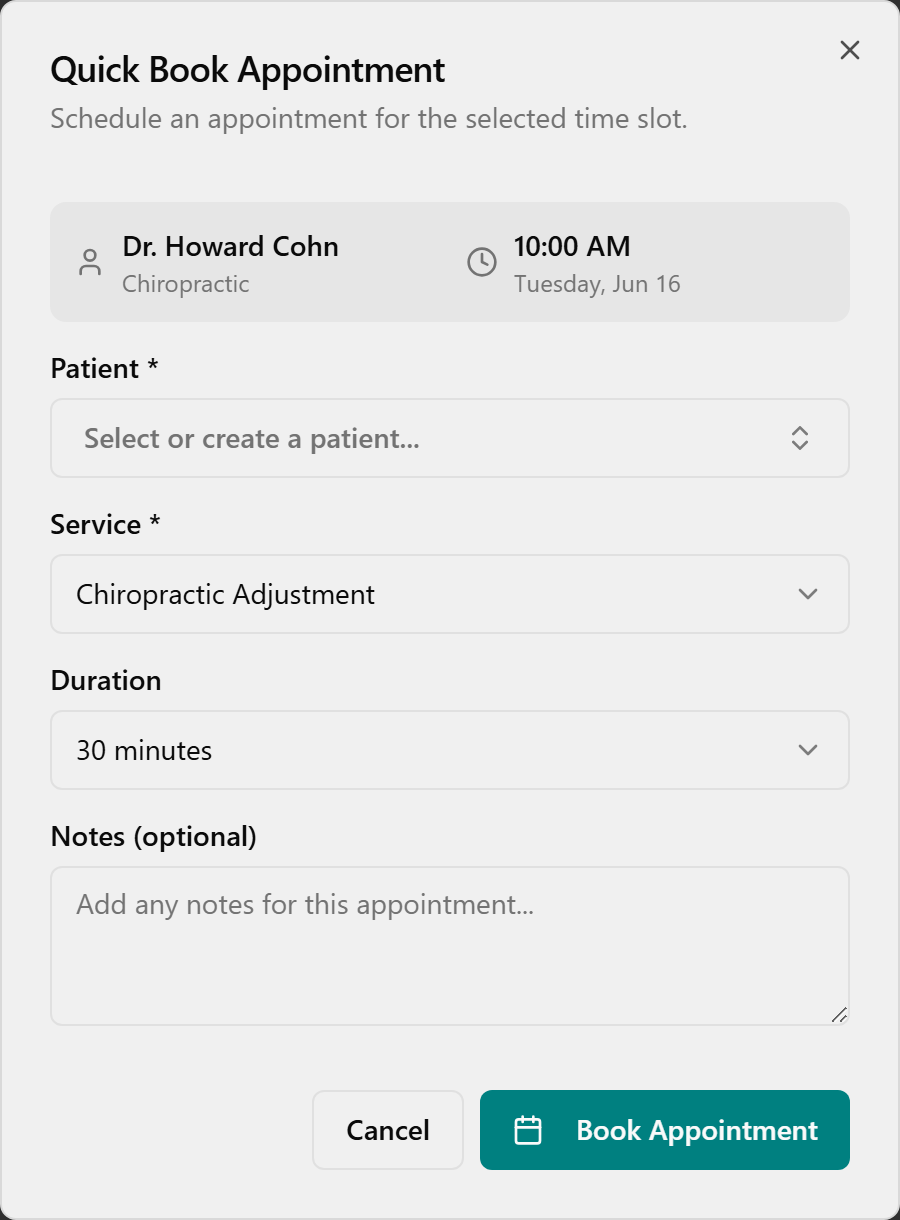
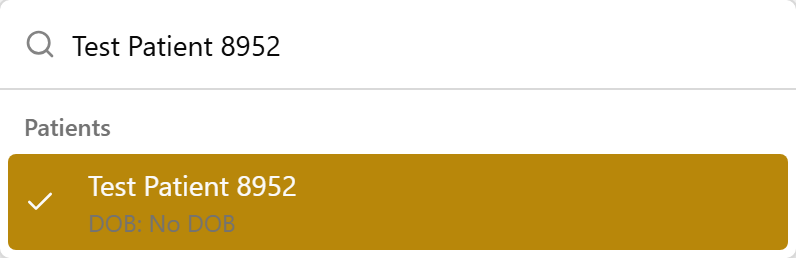
- Click the Patient box and pick a patient (or type to search).
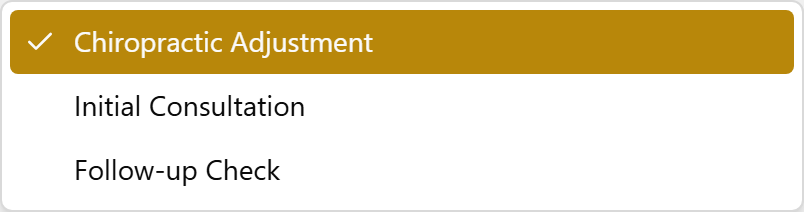
- Under Service, choose the visit's service — only services this practitioner offers are listed.
- Pick a Duration, add anything useful to Notes (optional), then click Book Appointment.
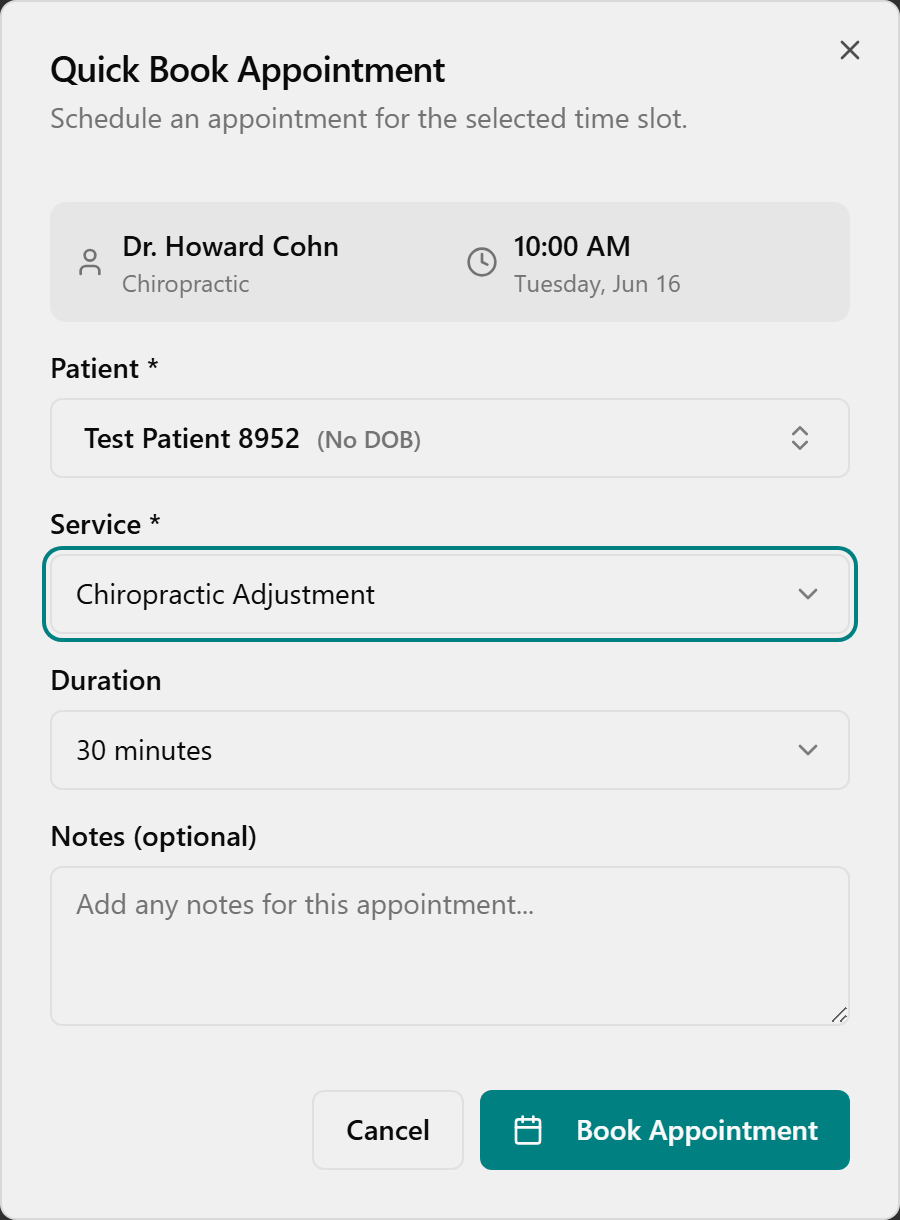
- The appointment shows as a card in the slot and a green Appointment Booked message appears in the corner.
⚠️ No drag-to-move. To move one appointment, cancel it and re-book the new slot. There's no separate No-Show button — Cancel is how you clear a slot.
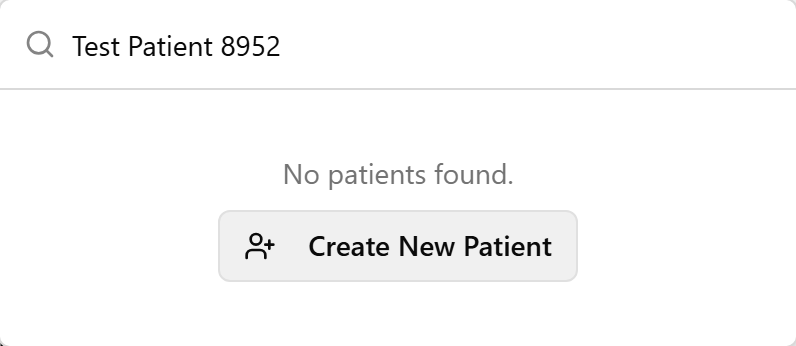
Add a new patient while booking
- In Quick Book Appointment, click Patient, type the new person's name; if they aren't found, click Create New Patient.
- In the Quick Add Patient dialog, fill in Name (required), plus Date of Birth and Phone Number if you have them.
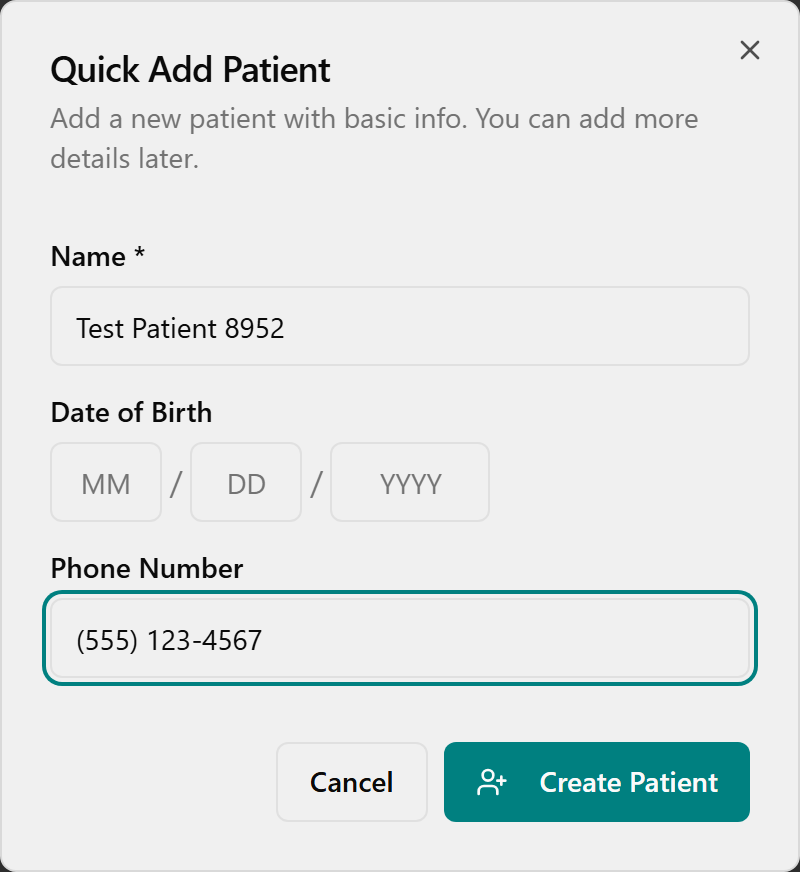
- Click Create Patient — the new patient is created and auto-selected, so you stay in the same booking.
Find an opening across several days
- Click the Find Availability tab at the top of the page (Admin and Front Desk only).
- In Find Available Appointments, choose a Patient (required to book), optionally a Service, a Practitioner and Duration, and set the From Date / To Date.
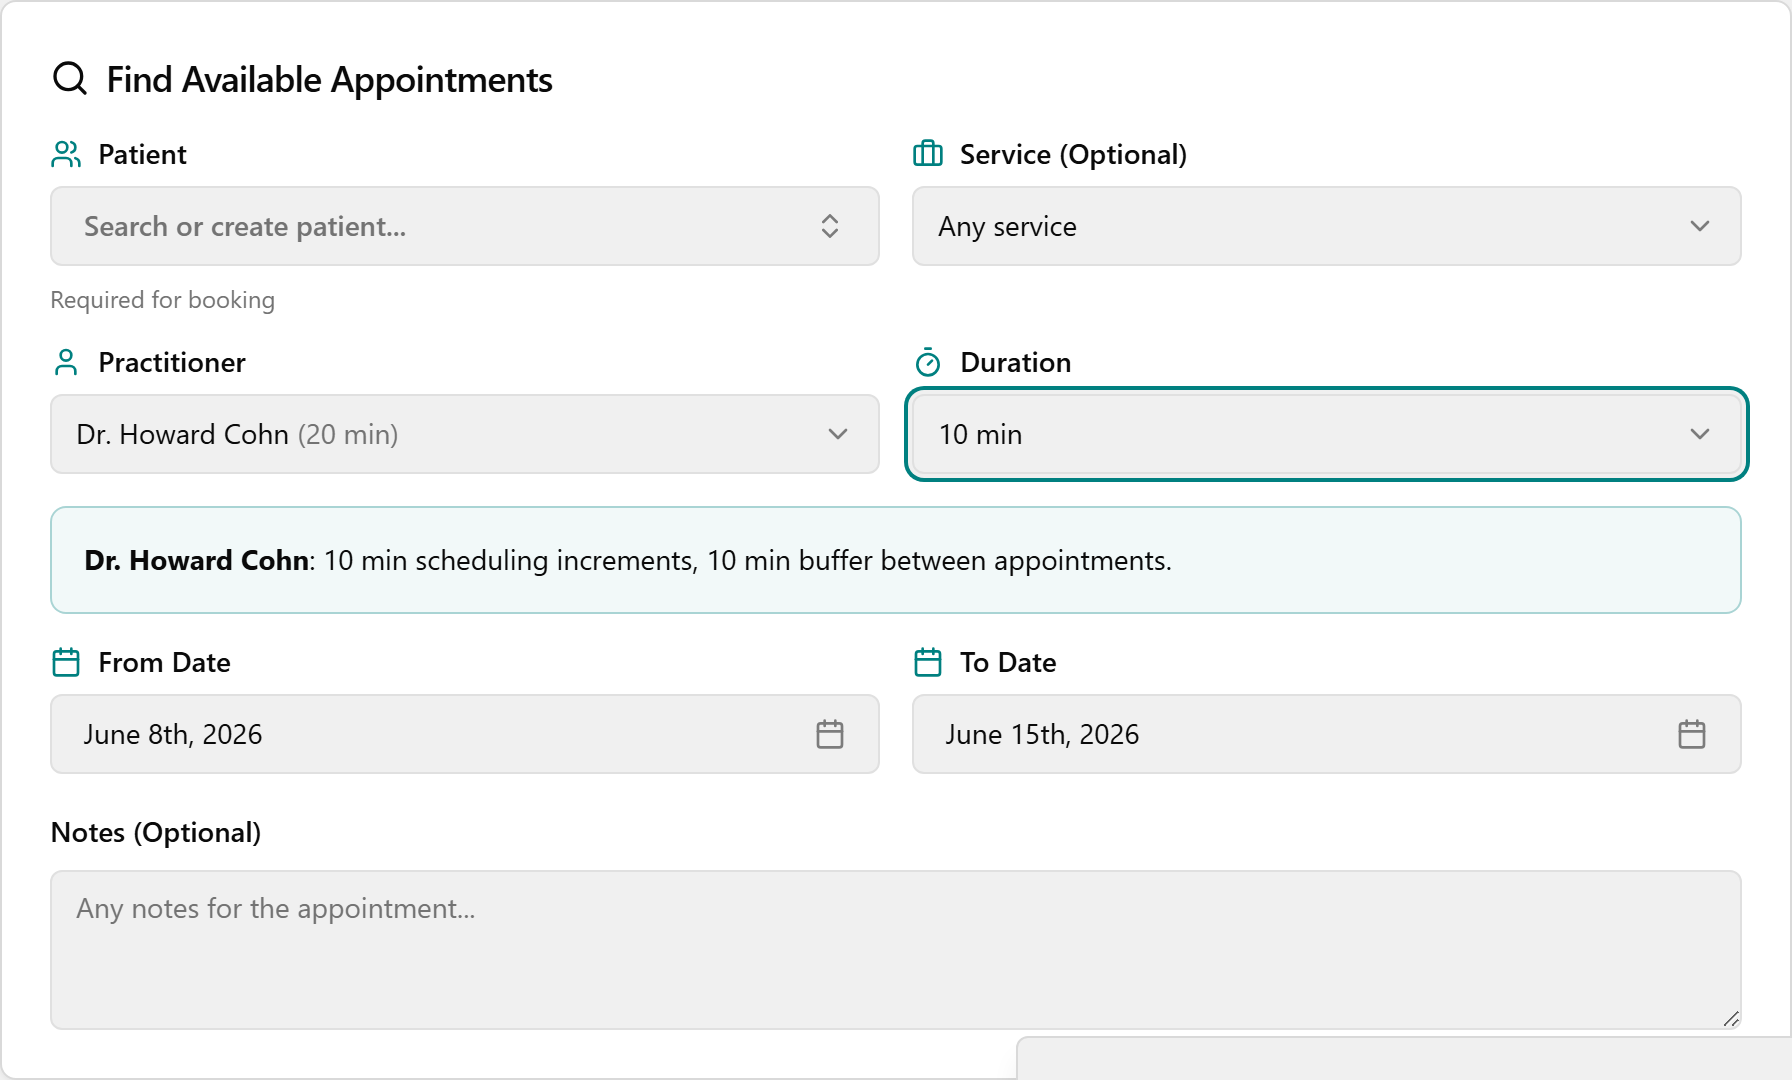
- It searches automatically (no Search button). Under Available Slots, use ‹ / › to move day by day, then click a time button to book it instantly.

- Need an exact time? Scroll to Manual Override (Specific Time), expand it, confirm a Patient and Practitioner above, pick a Date, type a Time, and click Book Manually. (Books the exact time even if it isn't normally open, so it can create a conflict.)

Buffer / Notes / Cancel
- Buffer (break): right-click an empty slot. In Default view it drops a 10-minute buffer immediately; in Compact view choose Add 10-min Buffer. Remove it by clicking the gray block ("Buffer Block - Click to remove").
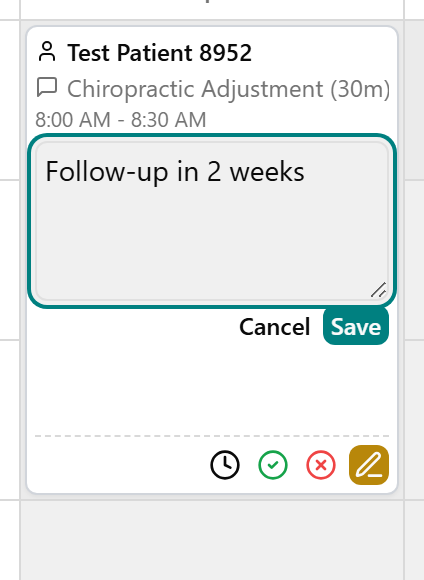
- Note: in Default view click the pencil icon on a card (Compact: right-click → Add Notes / Edit Notes), type the note, then click Save.

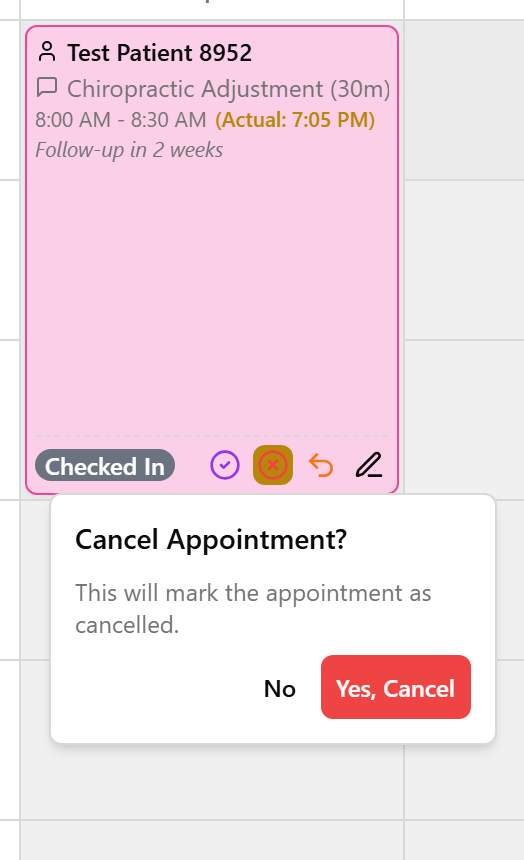
- Cancel: in Default view click the red X-circle Cancel Appointment icon (Compact: right-click → Cancel Appointment), then click Yes, Cancel in the confirmation. The appointment leaves the calendar.
📎 Depth: 03-front-desk-guide §Booking and §Find Availability.
4. ⭐ Checkout & take payment (the big one)
This is the money moment — your TPS instincts carry straight over. OneBOSS just gives it one clean screen that does the math for you.
- On a pink (checked-in) card, double-click it → OneBOSS marks the visit Complete and opens Patient Checkout in one move. (Prefer two steps? Click the purple check-circle Complete icon so the card turns green, then click the purple dollar-sign Check Out icon.)
*More than one visit today? Finish all of them first — checkout opens combined (a Consolidated Checkout with Complete Checkout ([n] appointments)).*
- Read the Charge Summary — the price is auto-calculated and may briefly show Calculating….
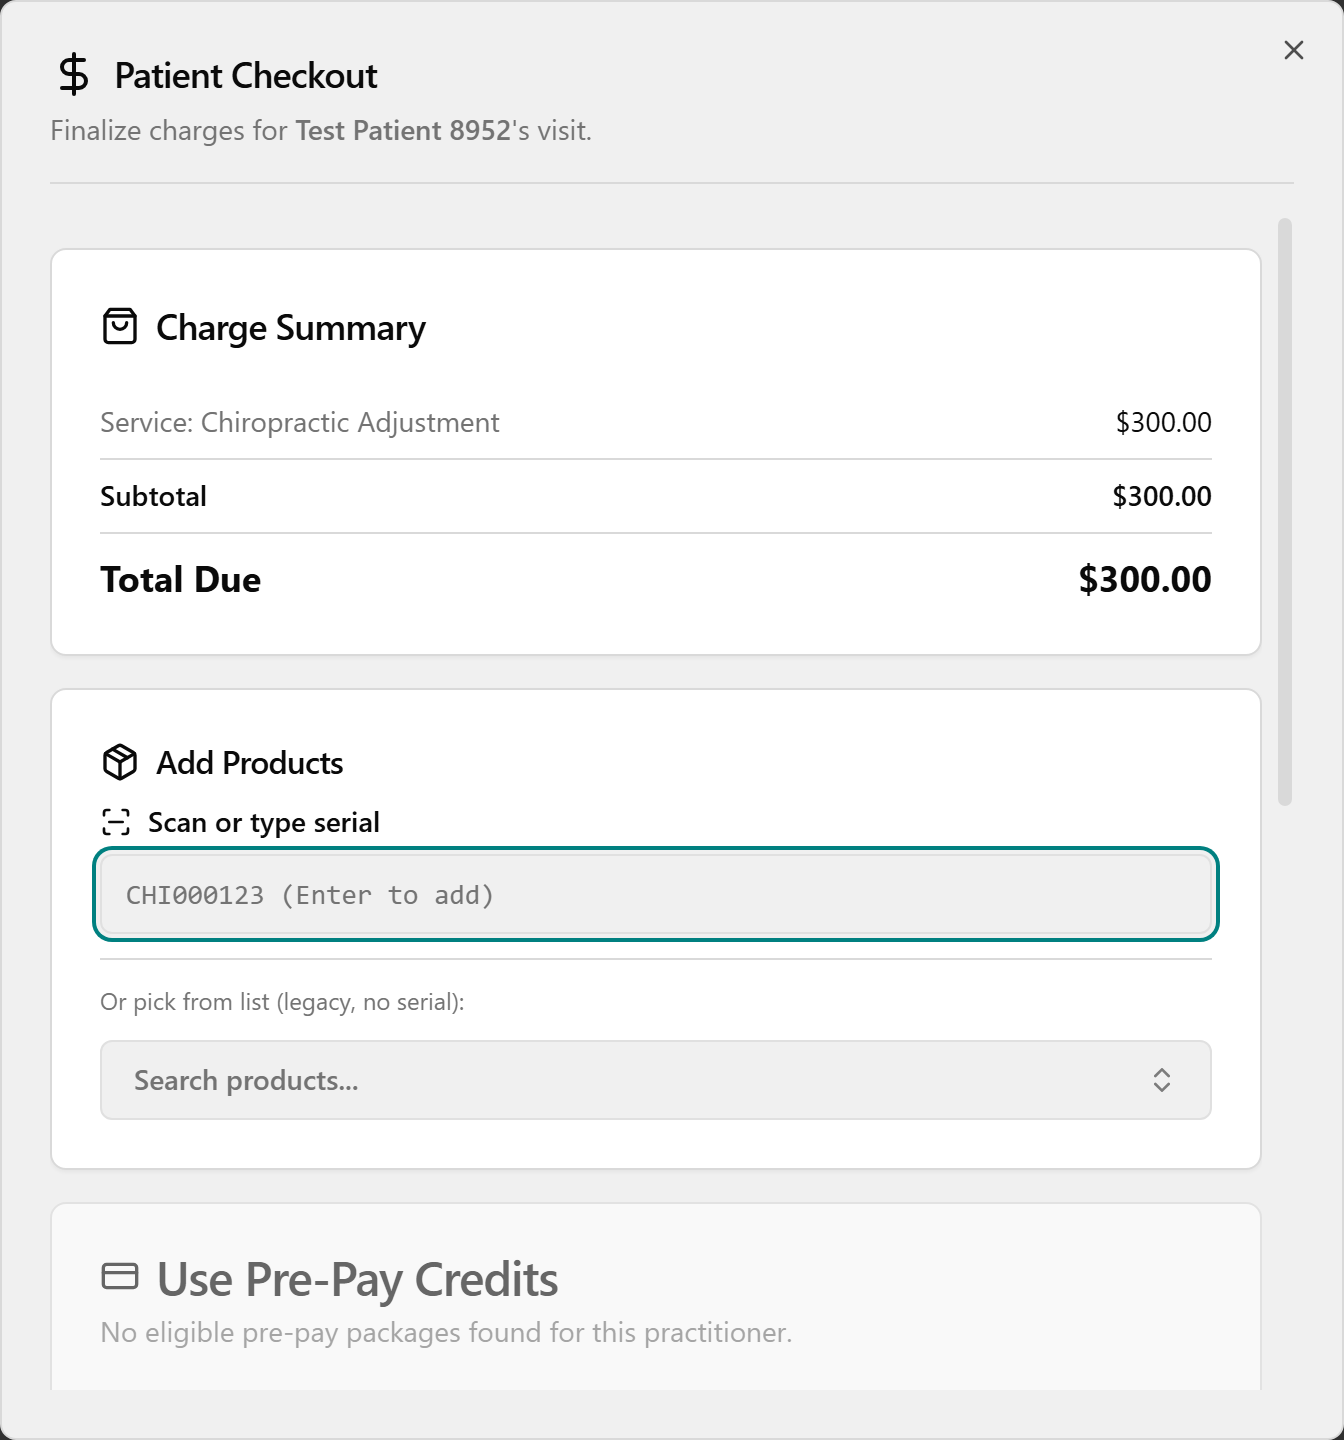
Add a supplement (optional): in Add Products, click Scan or type serial, scan the bottle's barcode or type the serial (e.g. "CHI000123") and press Enter — one scan = one bottle. No barcode? Click Search products..., pick the item, and use – / + to set quantity. Remove an item with the X on its chip.
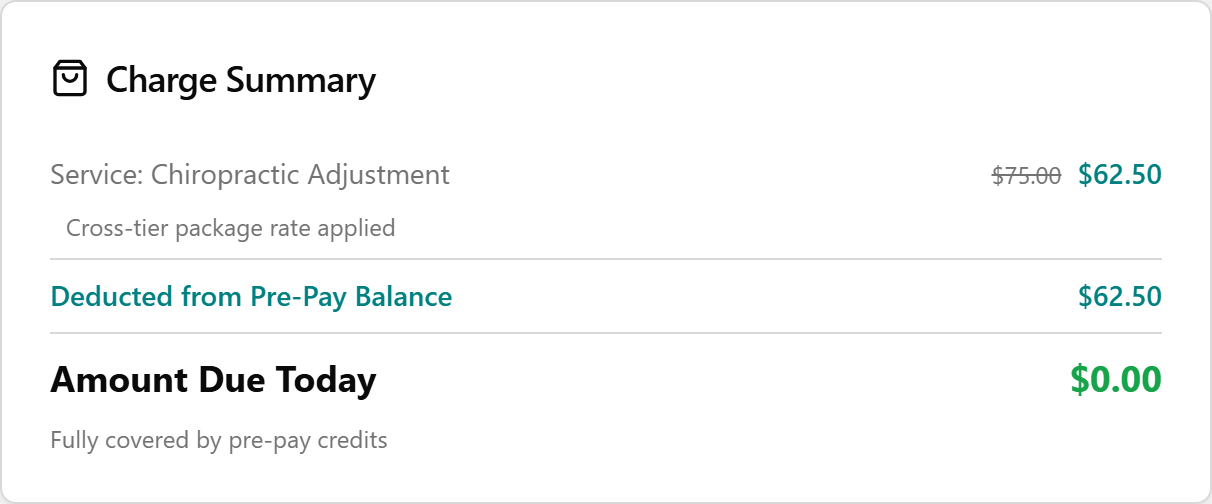
Apply any credit first, then collect the rest:
- Pre-Pay package — in Use Pre-Pay Credits, click the package. It covers the visit + supplements, so Amount Due Today shows $0.00 ("Fully covered by pre-pay credits").
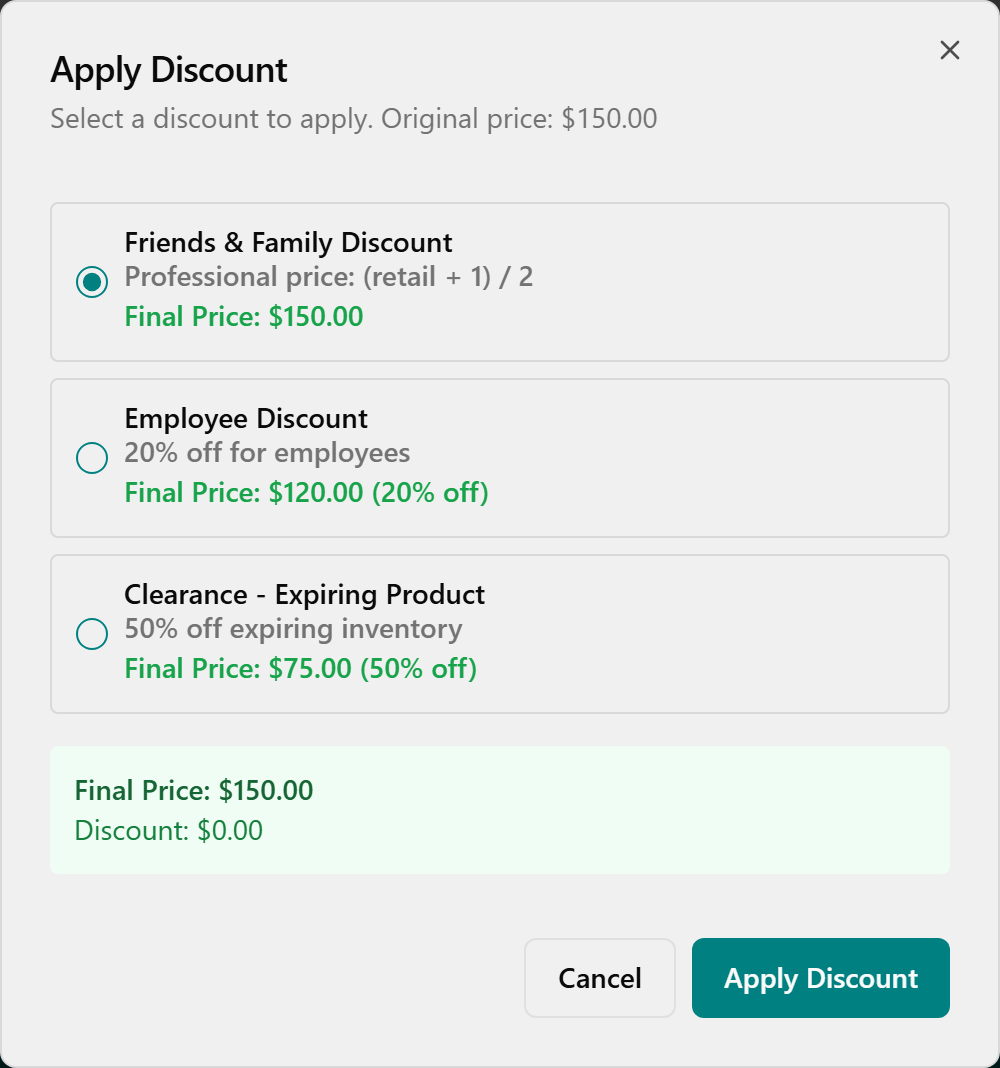
- Discount / CHI Cash — for a discount, click Apply Discount, pick one in the Apply Discount dialog (each shows its Final Price), and click Apply Discount. For store credit, click Use CHI Cash in the CHI Cash Credit card, enter an Amount to Use, and click Apply. Each applied credit shows as a green line in the Charge Summary.
- Card — in Payment Method (watch the Terminal Online / Offline indicator), click Card, then Pay with Card (amount). At Present card on terminal, have the patient tap/insert/swipe. Success shows Payment Approved (card type, last 4, auth code); failure shows Try Again. For Cash or Check, choose that instead and collect the amount.
Click Complete Checkout and wait for Checkout Complete. For card payments the button stays disabled ("Pay at Terminal First") until the terminal approves.
⚠️ A card only turns green/completed once payment has actually processed. Unpaid = still pink.
Payment types — quick table
| Pay type | When | How |
|---|---|---|
| Pre-Pay (package wallet) | Patient bought a package (Care $75 / Care $100 / Massage / Acupuncture / Wellness) | Use Pre-Pay Credits → pick the package → covers visit + supplements → $0.00 due. All-or-nothing on one ticket — it covers everything and hides the discount/CHI Cash/Payment Method cards. |
| CHI Cash | Patient has store credit | Use CHI Cash → enter Amount to Use → Apply. Apply it first; pay any remainder with a Payment Method. |
| Discount | Friends/family, promos | Apply Discount → pick one (each shows Final Price) → Apply Discount. |
| Card / Cash / Check | Normal payment | In Payment Method pick Card → Pay with Card (amount) → terminal; or Cash / Check and collect the balance. |
| Split | More than one method | Apply CHI Cash / Pre-Pay first, then a Payment Method for the rest. (Saves as "Split" on the record.) |
⚠️ Avoid Record as Card (no terminal) — let the real terminal approve the payment.
Same screen from the Checkout page
You can also reach the same Patient Checkout dialog from the Checkout page (left menu): stay on the Ready for Checkout tab, find the patient's row (use Search patients...), and click Checkout at the end of the row. A patient appears here only after the visit is marked completed. The payment steps are identical.

Void or return a past sale (within 30 days)
On the Checkout History tab, find the row. Click the red Void button (only on same-day terminal Credit Card payments) and confirm in Void Card Payment?, or click the orange Return button to open Process Product Return (covered in §6).
📎 Depth: 03-front-desk-guide §Checkout · 07-quick-reference-cards Card 2 "Checkout Payment Types."
5. Pre-Pay packages — sell, share, look up
Everything front desk does with packages lives on the Pre-Pay Management page (left menu) — a separate screen from checkout. (Defining the catalog, prices, and bonus cash is an Admin task on the Pre-Pay Packages page.) Your patients' existing prepay balances already migrated, so day one looks populated.
Sell a package
- Open Pre-Pay Management → click New Purchase (top-right). The Purchase Pre-Pay Package dialog opens.
- (Optional) use Filter by Category (Care $75, Care $100, Massage Therapy, Acupuncture, Wellness Therapy), then under Select Package click the package card you want — price auto-fills.
- Open Purchaser (Patient) and choose who's paying — they're added to the authorized list automatically and can't be removed.
- Leave Expiration Period as-is (greyed out / read-only — the package sets it).
- (Optional) under Authorized Users, type in Search patients to add... and click a family member to let them spend from this package too.
- Click Complete Purchase. The package is active immediately and now appears at checkout under Use Pre-Pay Credits.
⚠️ Complete Purchase stays disabled until you've picked a package, a purchaser, AND at least one authorized user — that's normal, not a bug. Pre-pay packages are non-refundable.
Find a patient's balance
Type part of the name in Search patient..., then click the row to expand it and read the package table (Package, Category, Balance, Status, Authorized). Read Balance for what's left (hover to see how much is used); hover the Authorized badge to see everyone allowed to use it. Packages are grouped under the purchaser, even when shared.
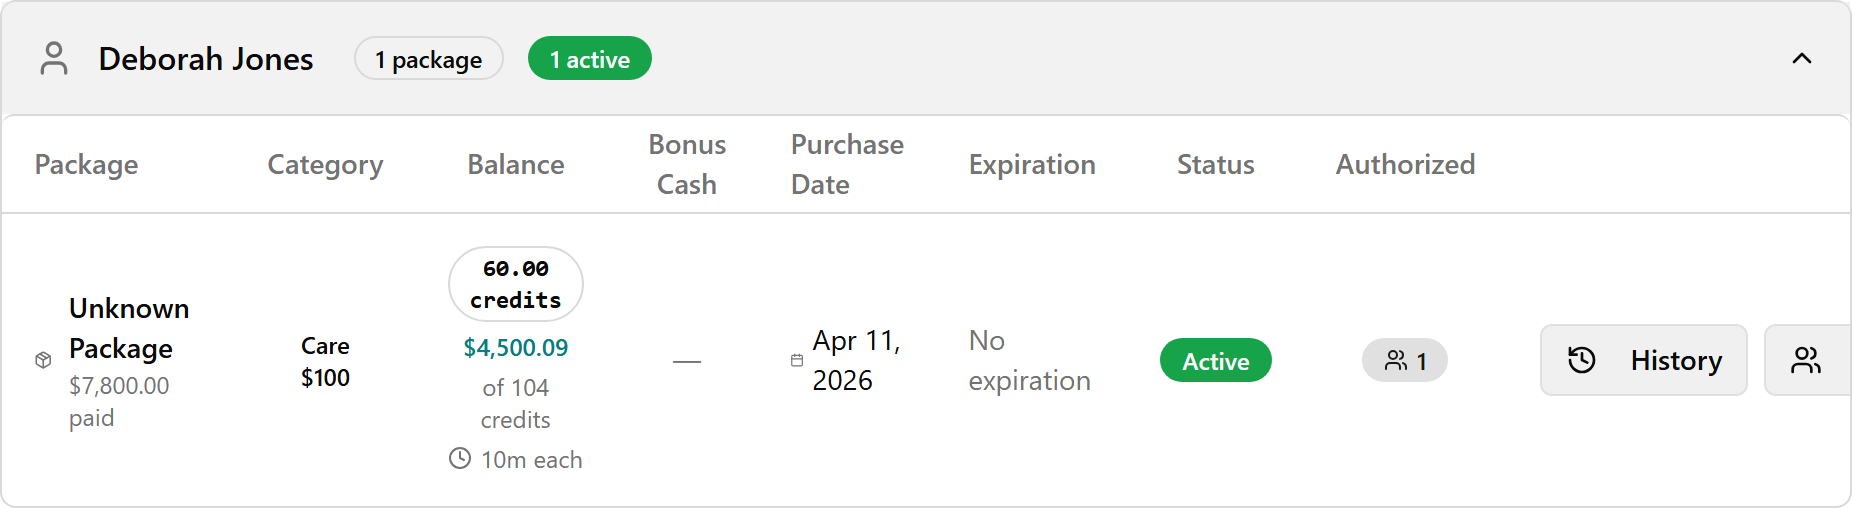
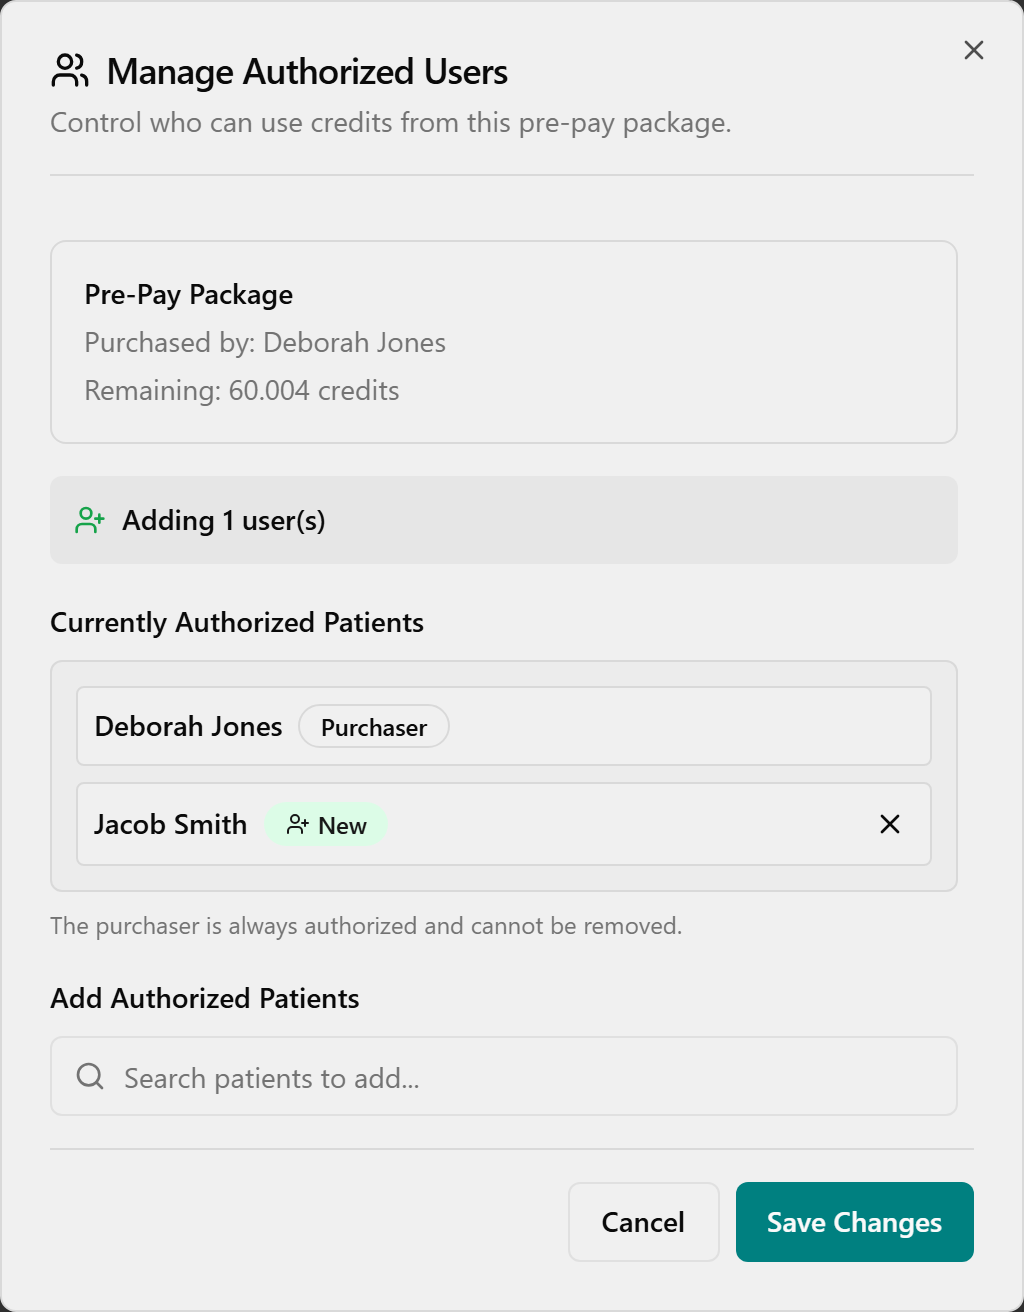
Share / manage who can spend it
With the row expanded, click Manage Users to open Manage Authorized Users. To add someone, type in Search patients to add... and click them (green New badge); to remove, click the X by their name (the Purchaser can't be removed). Click Save Changes.
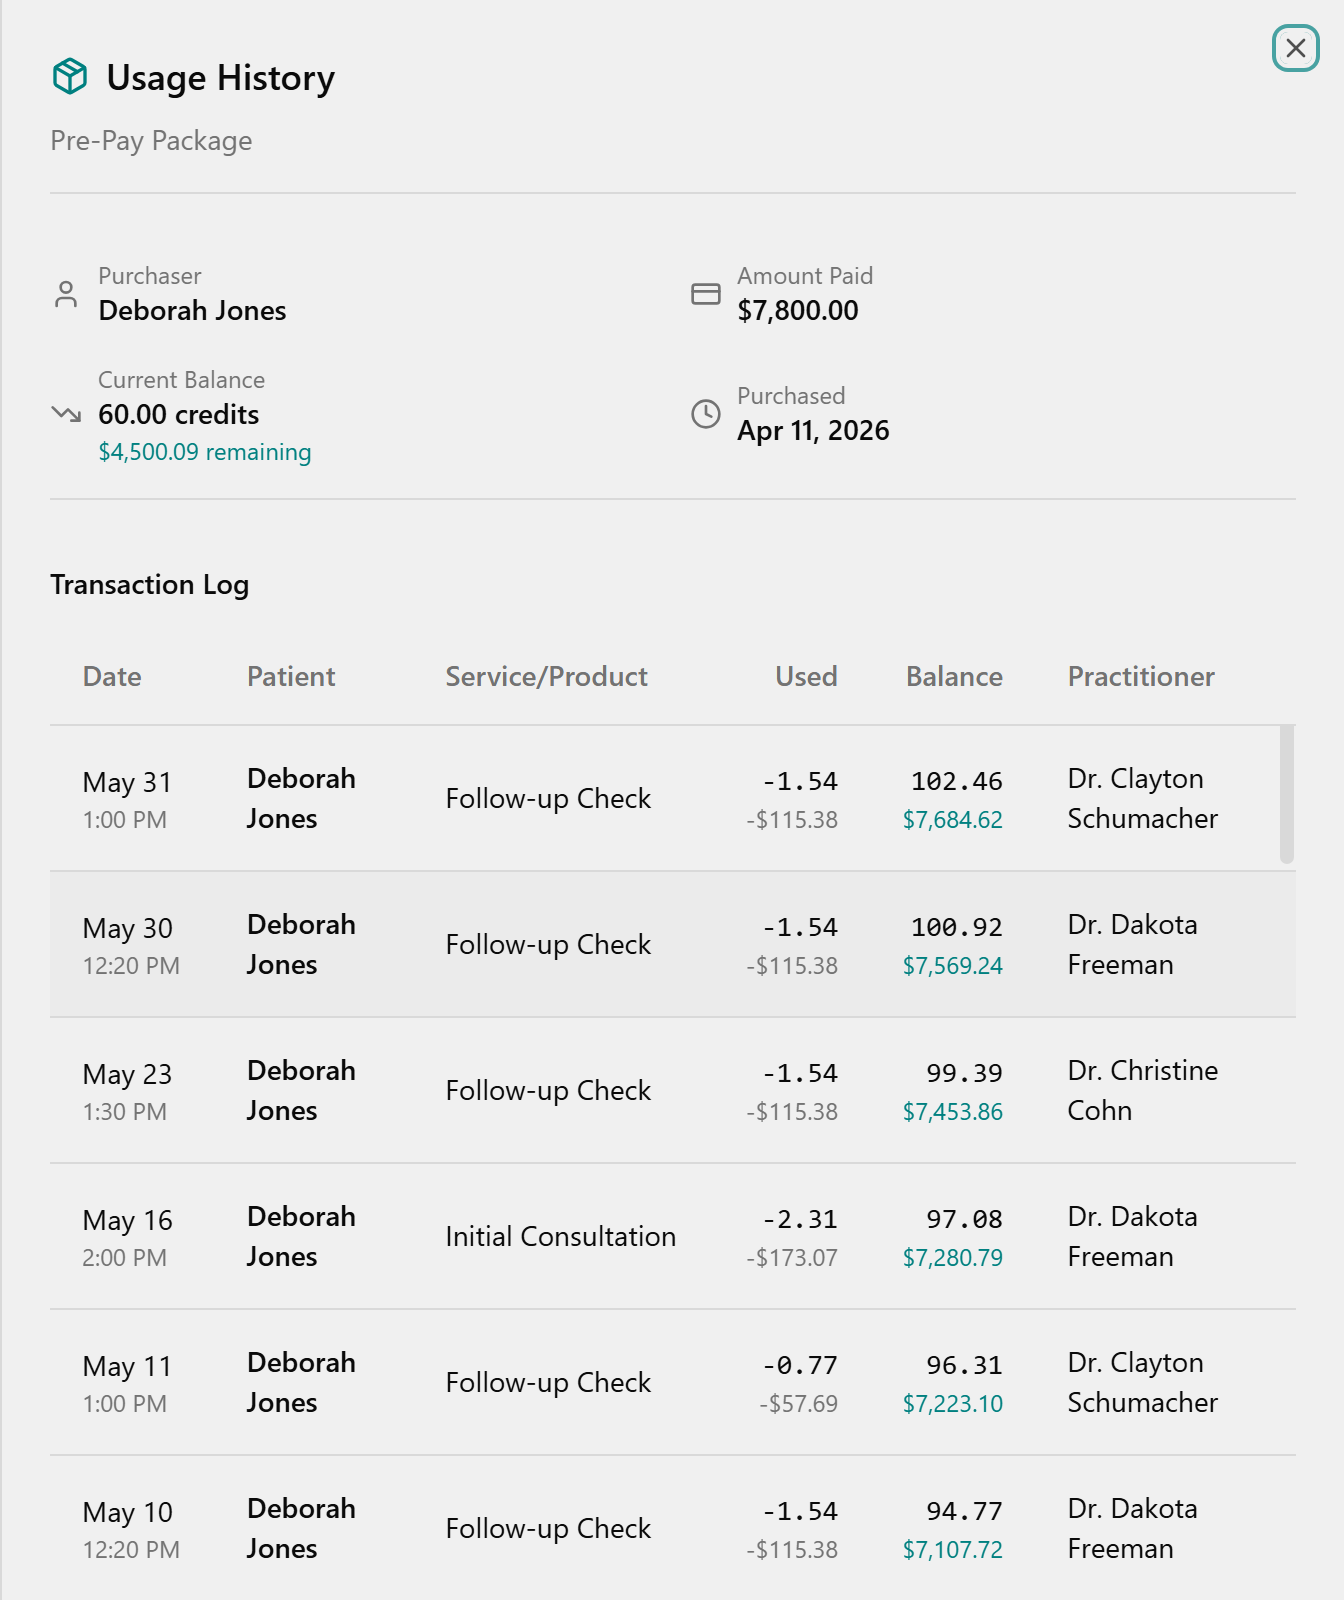
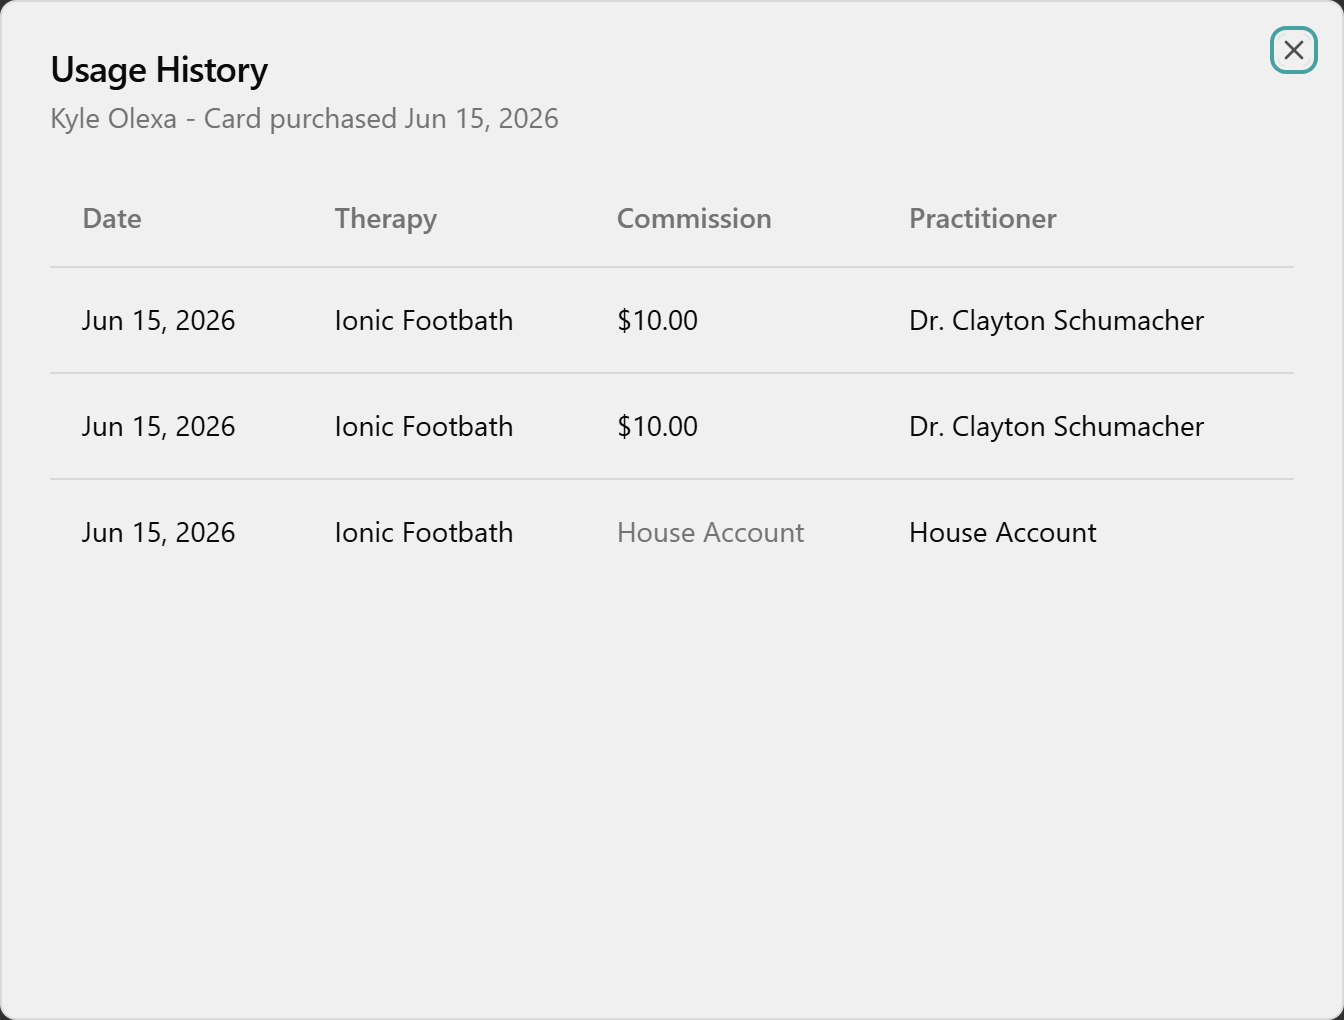
View usage history
With the row expanded, click History in the Actions column. The Usage History panel slides in from the right — review the Purchaser, Amount Paid, Current Balance, and Purchased summary cards, then read each draw in the Transaction Log (Date, Patient, Service/Product, Used, Balance, Practitioner).
💡 No top-up button. When a package runs low, just sell another with New Purchase — each package is tracked separately and they stack under the patient. Spending is done at Checkout under Use Pre-Pay Credits (all-or-nothing), not here.
📎 Depth: 03-front-desk-guide §Checkout · 07-cards.
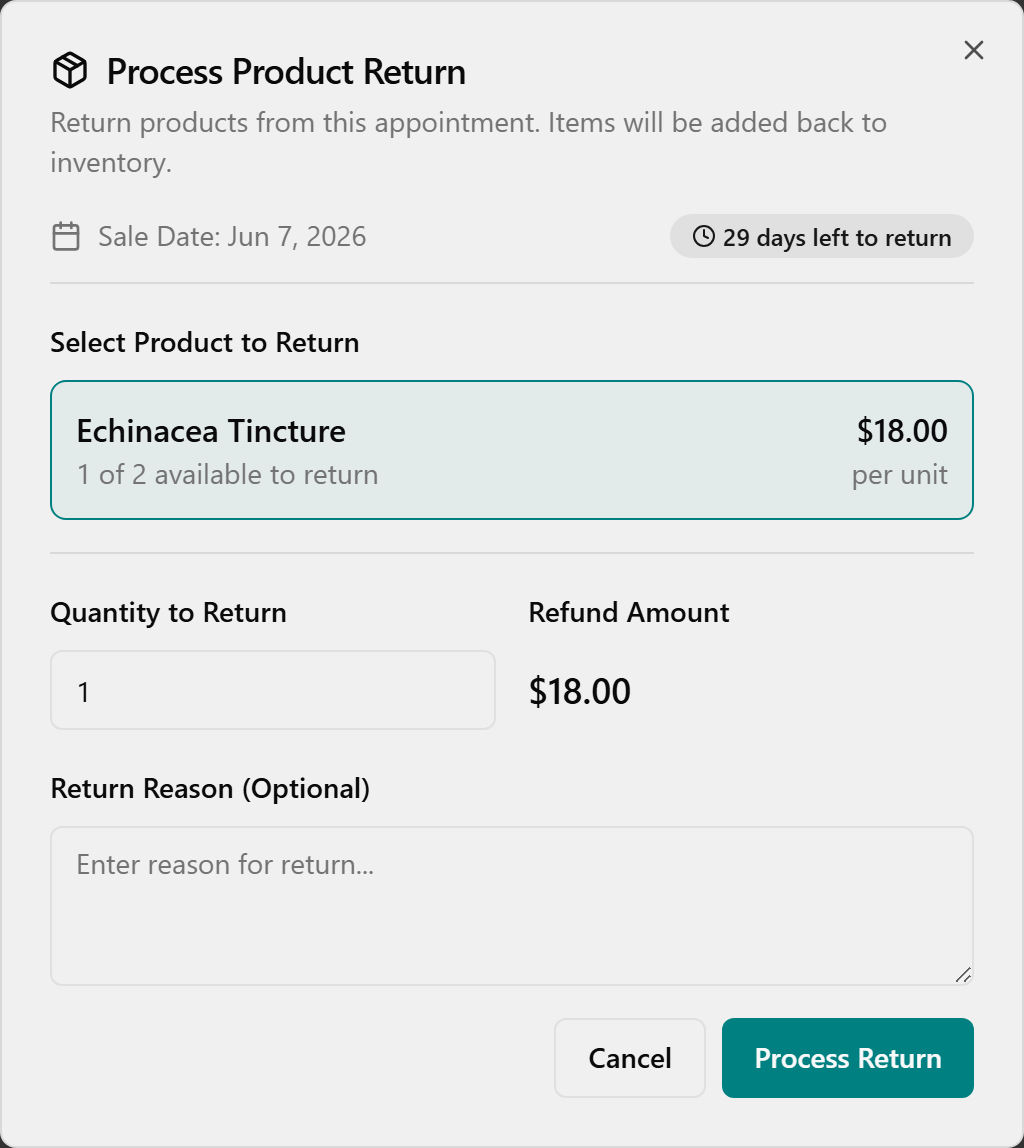
6. Process a return (within 30 days)
Returns refund a product bought in the last 30 days and put resellable stock back on the shelf — the system finds the sale, refunds, restocks, and fixes commission for you.
- Open Returns (left menu) → stay on the Process New Return tab (it opens by default). (Or scan the bottle with Scan to Return.)
- Find the patient's sale in the table, or type a name into Search by patient....
- Confirm the Time Left badge shows the return is still inside the 30-day window.
- Click Process Return on that row to open the Process Product Return dialog.
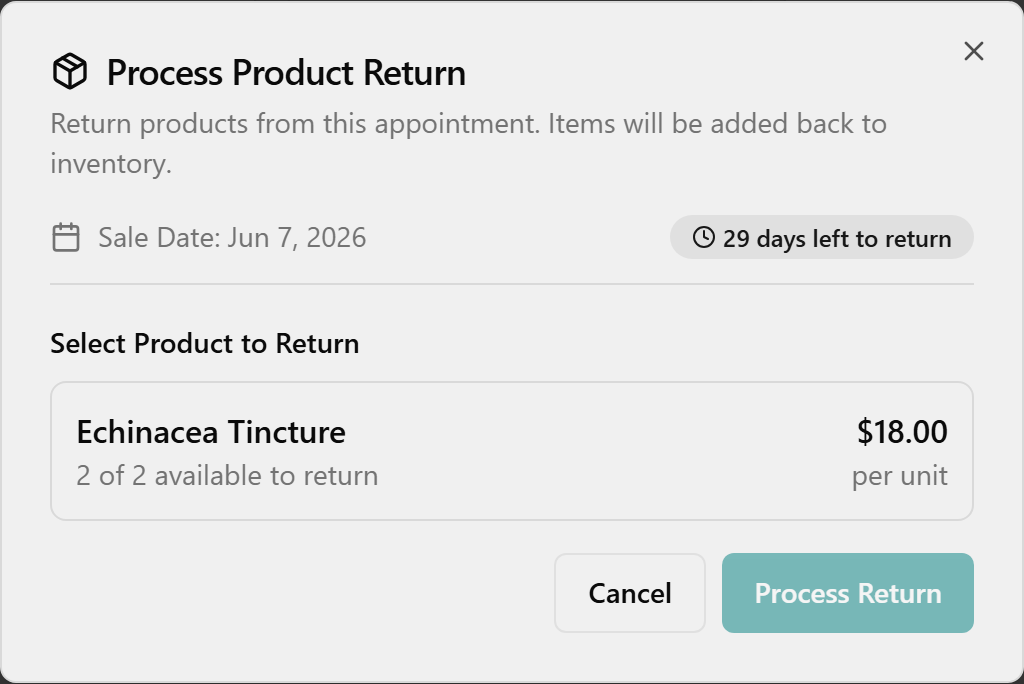
- Under Select Product to Return, click the product. Set Quantity to Return (the Refund Amount updates automatically). Add an optional Return Reason. For a card sale, leave Refund to card checked; cash sales show no checkbox.
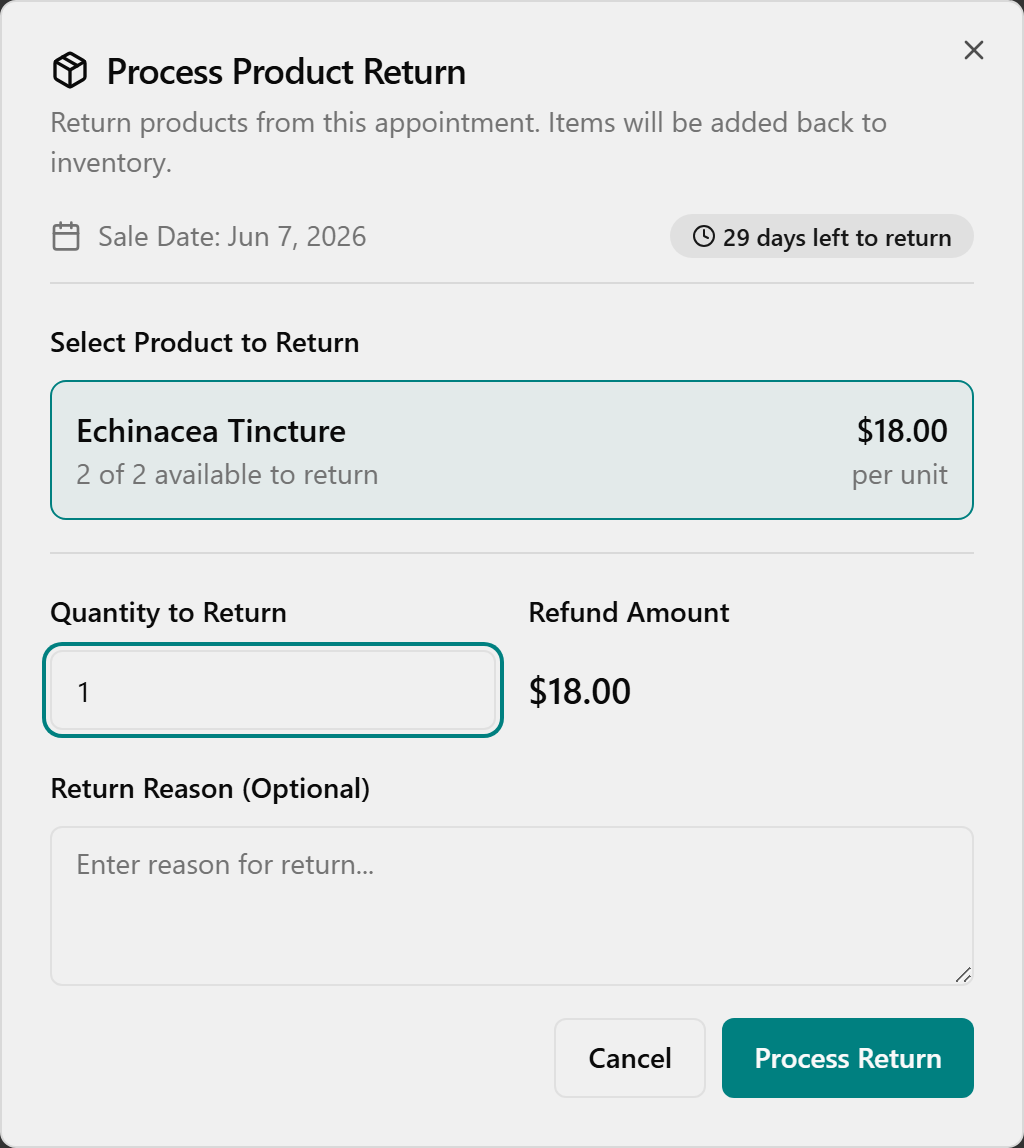
- Double-check the product and quantity (there is no undo), then click Process Return.
- Wait for the green Return Processed toast confirming the count and "Inventory has been updated."

Same dialog from Checkout → Checkout History via the orange Return button. (After a void/return from the Checkout page, reload the page to see the updated row; the Returns-page tables refresh on their own.)
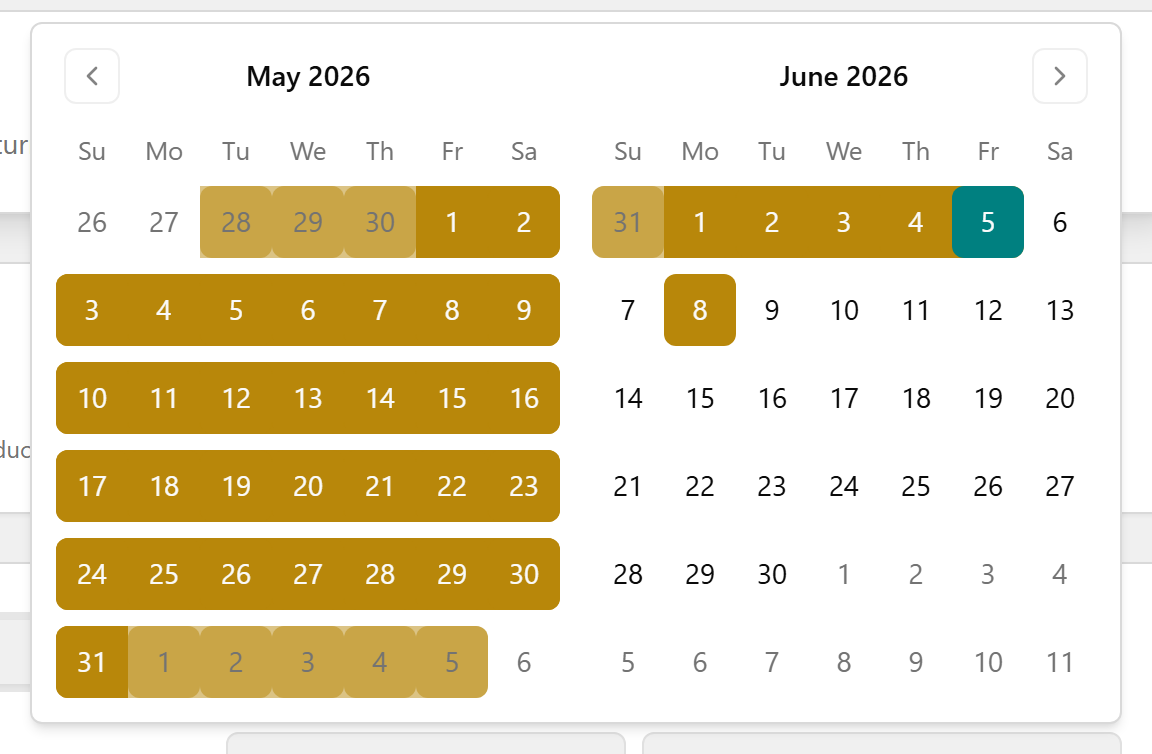
Review past returns: click the Return History tab — each refund and any commission Clawback (in orange) is listed. Search with Search by patient... (also matches practitioner and product names).

To look further back, click the date button (top-right of Return History), then click the start date and end date in the calendar. The table and all four summary cards update.
⚠️ Past 30 days the sale drops off the list and the return is blocked — those older returns stay in TPS (read-only history back to 2004).
📎 Depth: 03-front-desk-guide §Returns · refund/void detail in 09-faq.
7. Wellness Cards — the digital punch card
A Wellness Card is the digital replacement for the old paper punch card: a fixed 10 wellness-therapy sessions for $500 ($50 each). Everything here is on the Wellness Cards page (left menu). Every card is the same fixed package, so there's nothing to price or edit.
Sell a card
- On the Wellness Cards page, stay on the Wellness Cards tab, then click New Wellness Card (top-right).
- In Purchase Wellness Card, open the Patient dropdown (Select patient...) and choose the patient. The summary box shows the fixed package: Therapies included: 10, Price: $500, Value per therapy: $50 (read-only).
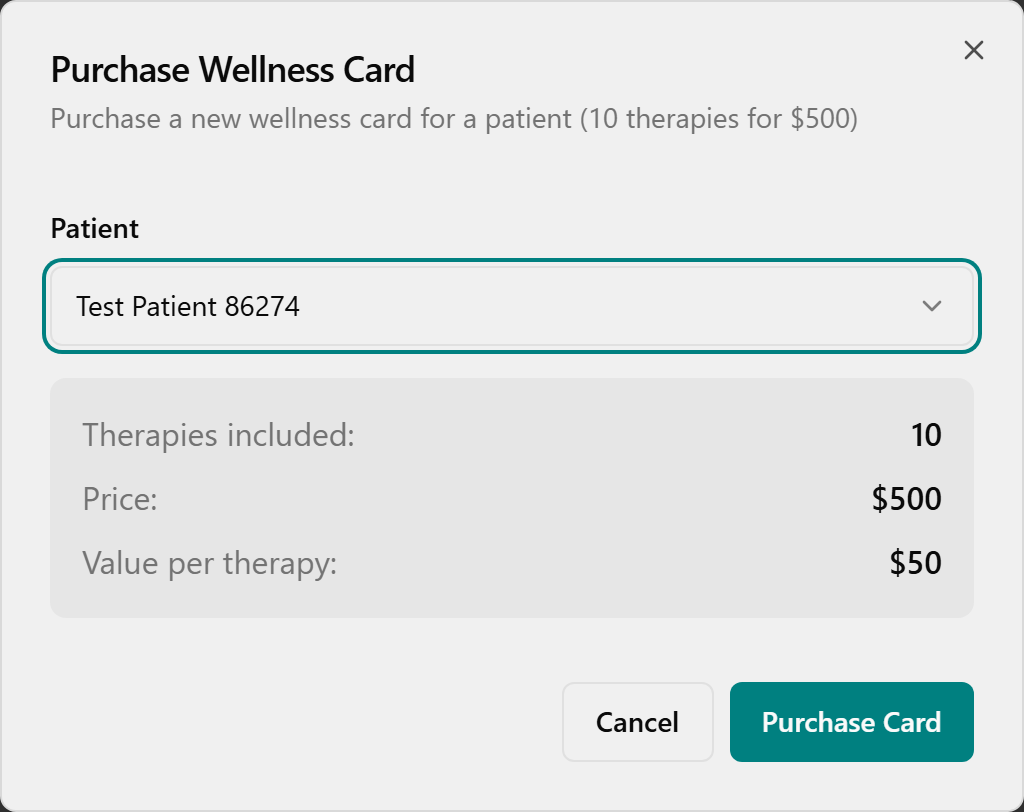
- Click Purchase Card (no patient picked → "Please select a patient"). Confirm the green Success toast "Wellness card purchased for [patient name]."

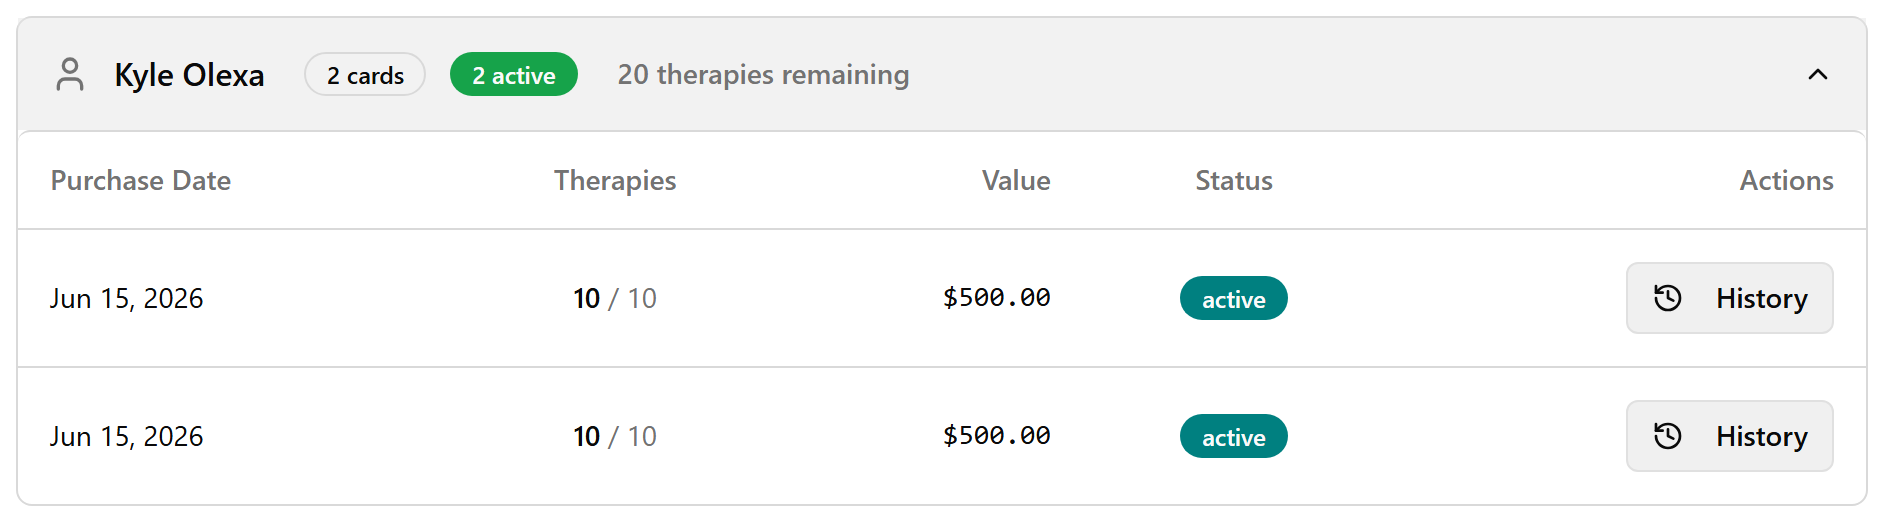
Find a patient's cards & balances
Type part of the name in Search patient... (the list filters instantly; X or Clear filters resets).

Click the row to expand it and read the cards table — Purchase Date, Therapies (remaining / total, e.g. "7 / 10"), Value (remaining dollars), and Status ("active" while therapies remain, "depleted" once used up — automatic, no manual edit). The Hide depleted toggle (top-right of Wellness Card Management) just changes what's shown.
View usage history
With the row expanded, click History in the Actions column. The Usage History dialog lists each redemption with Date, Therapy, Commission, and Practitioner. ("No usage history yet" on an unused card; "House Account" when no practitioner is attributed.)
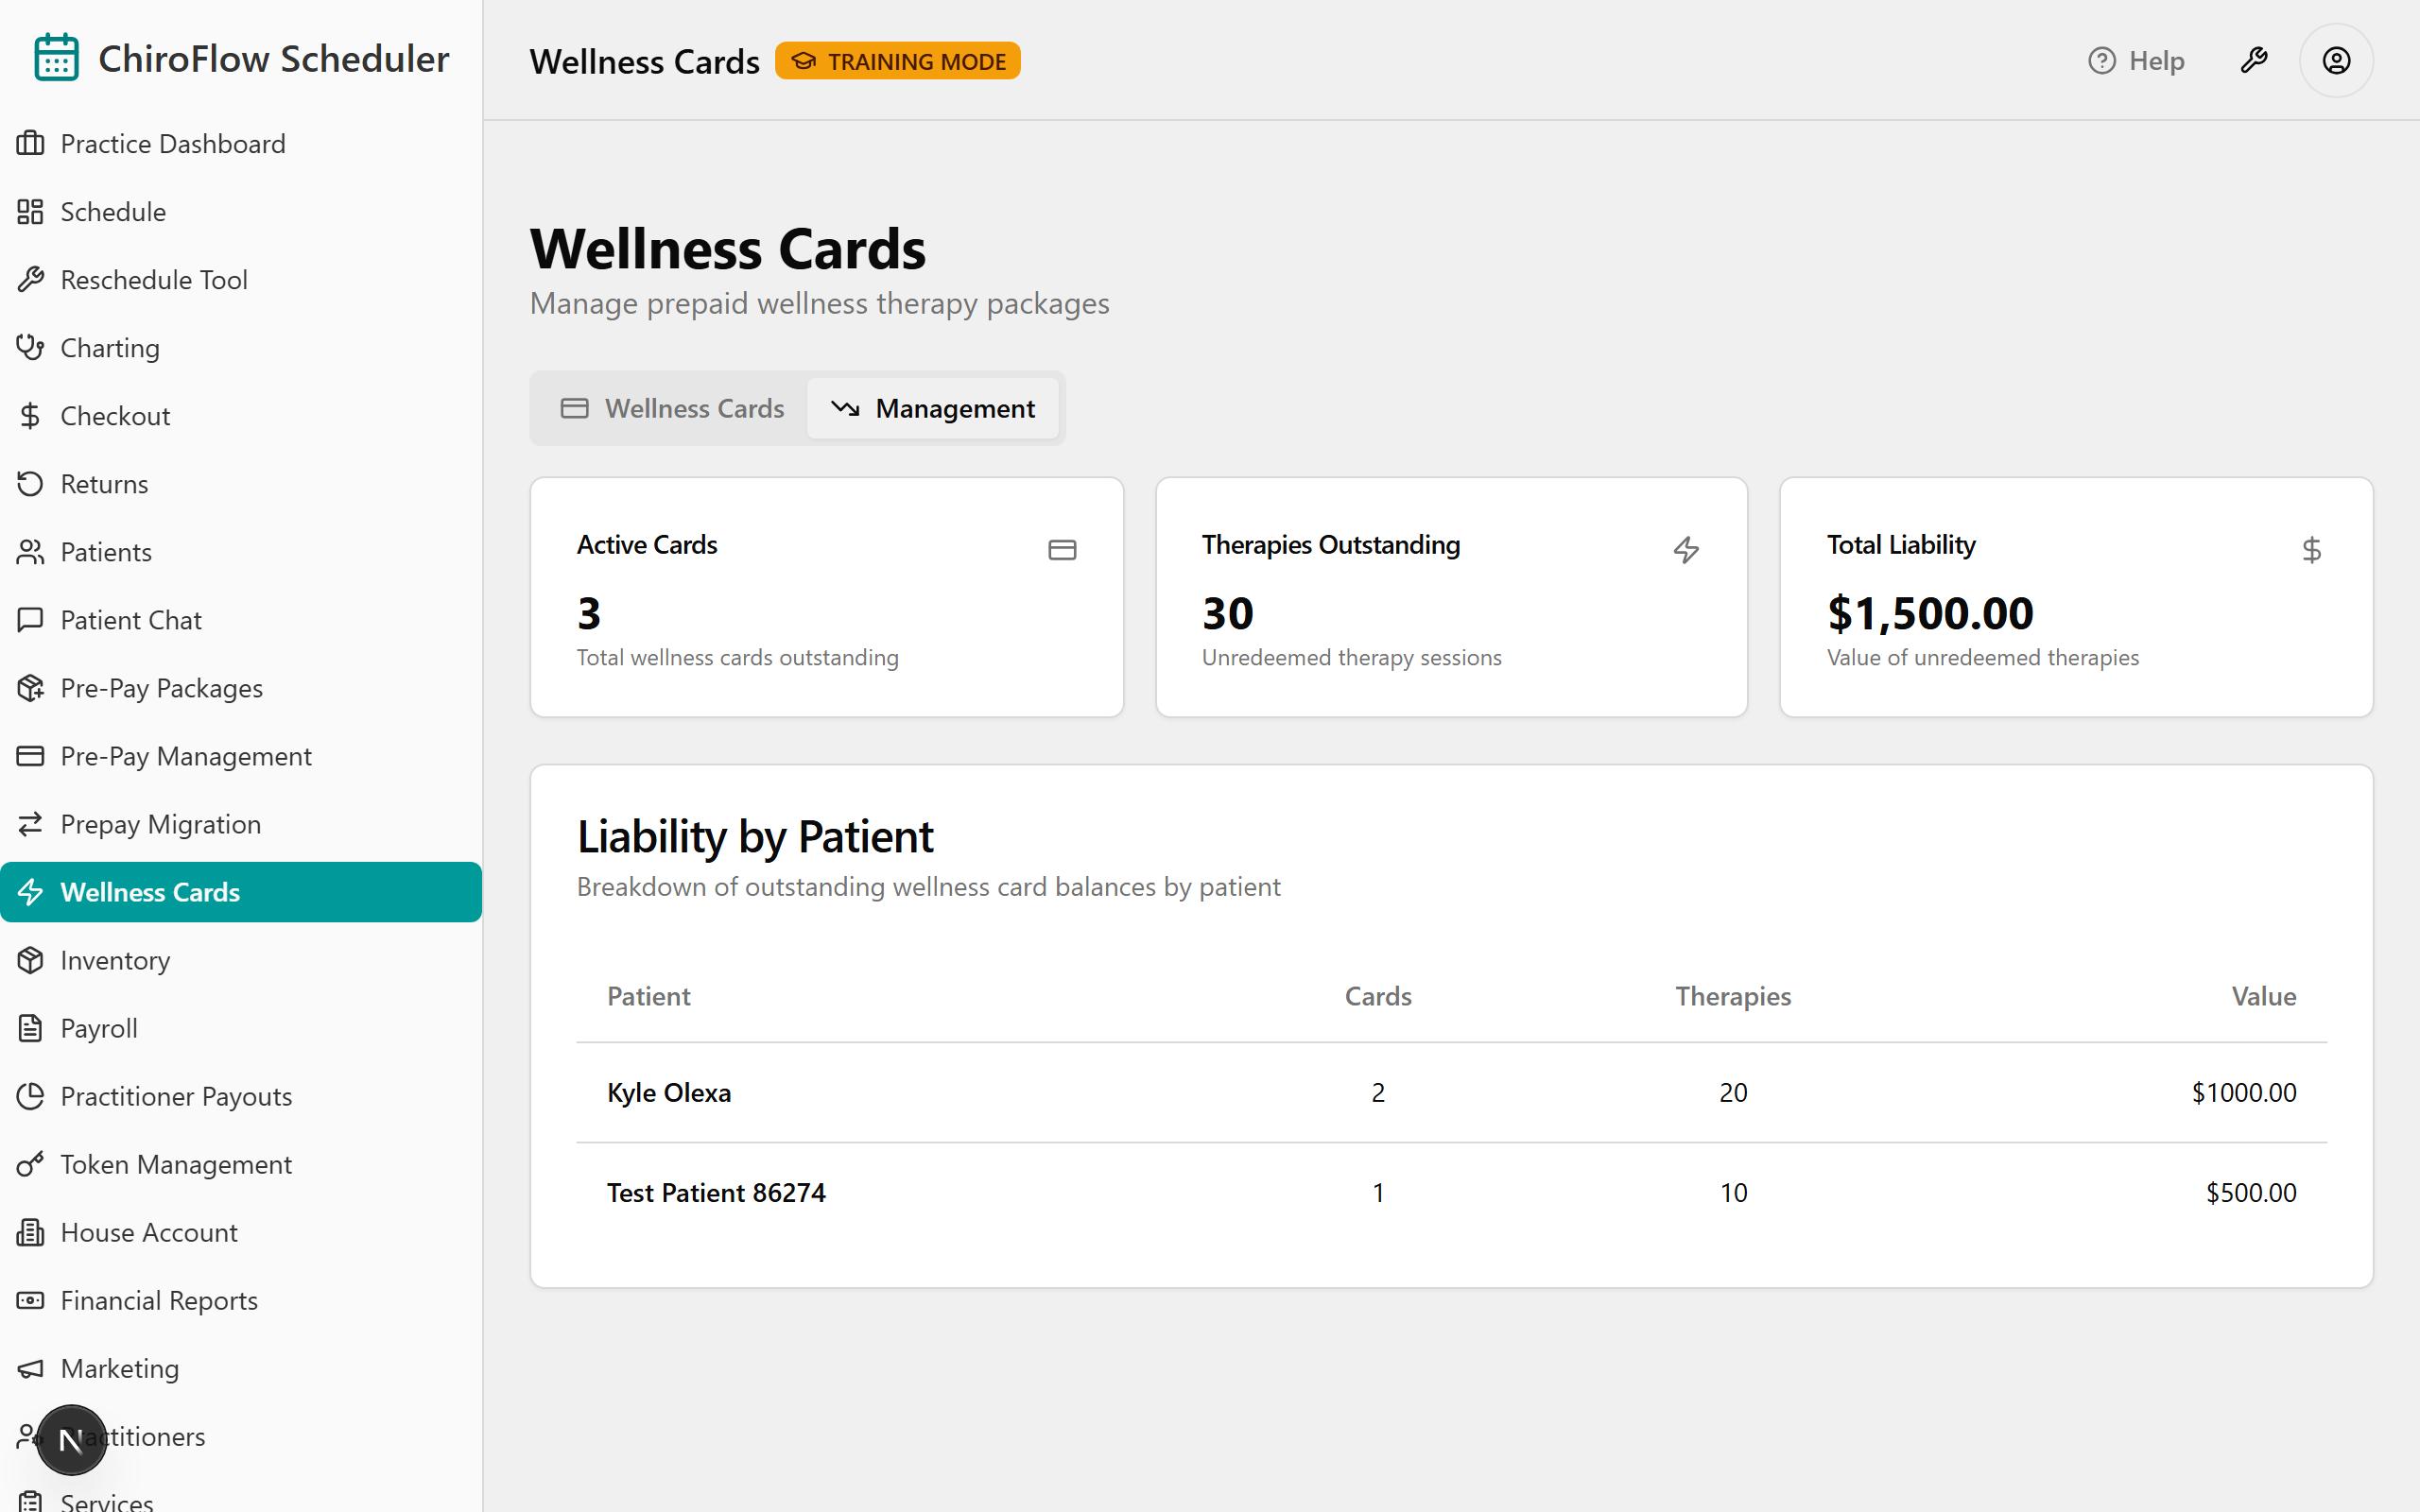
Review clinic liability
Click the Management tab for three tiles — Active Cards, Therapies Outstanding, Total Liability — and the Liability by Patient table (highest value first). No export button here.
💡 Redeeming happens at the register, not here. When you check out a therapy visit for a patient with an active card, a Wellness Card section appears in the checkout dialog (oldest card suggested first; or choose Pay without wellness card). Completing checkout deducts one therapy and the draw then shows in that card's History. A card covers the therapy line only — supplements are paid separately.
⚠️ Wellness Cards are not Pre-Pay packages: no category picker, no authorized users, no expiration choice — just the single fixed 10-for-$500 card.
📎 Depth: 03-front-desk-guide §7.5 (Redeem a Wellness Card) · 07-cards.
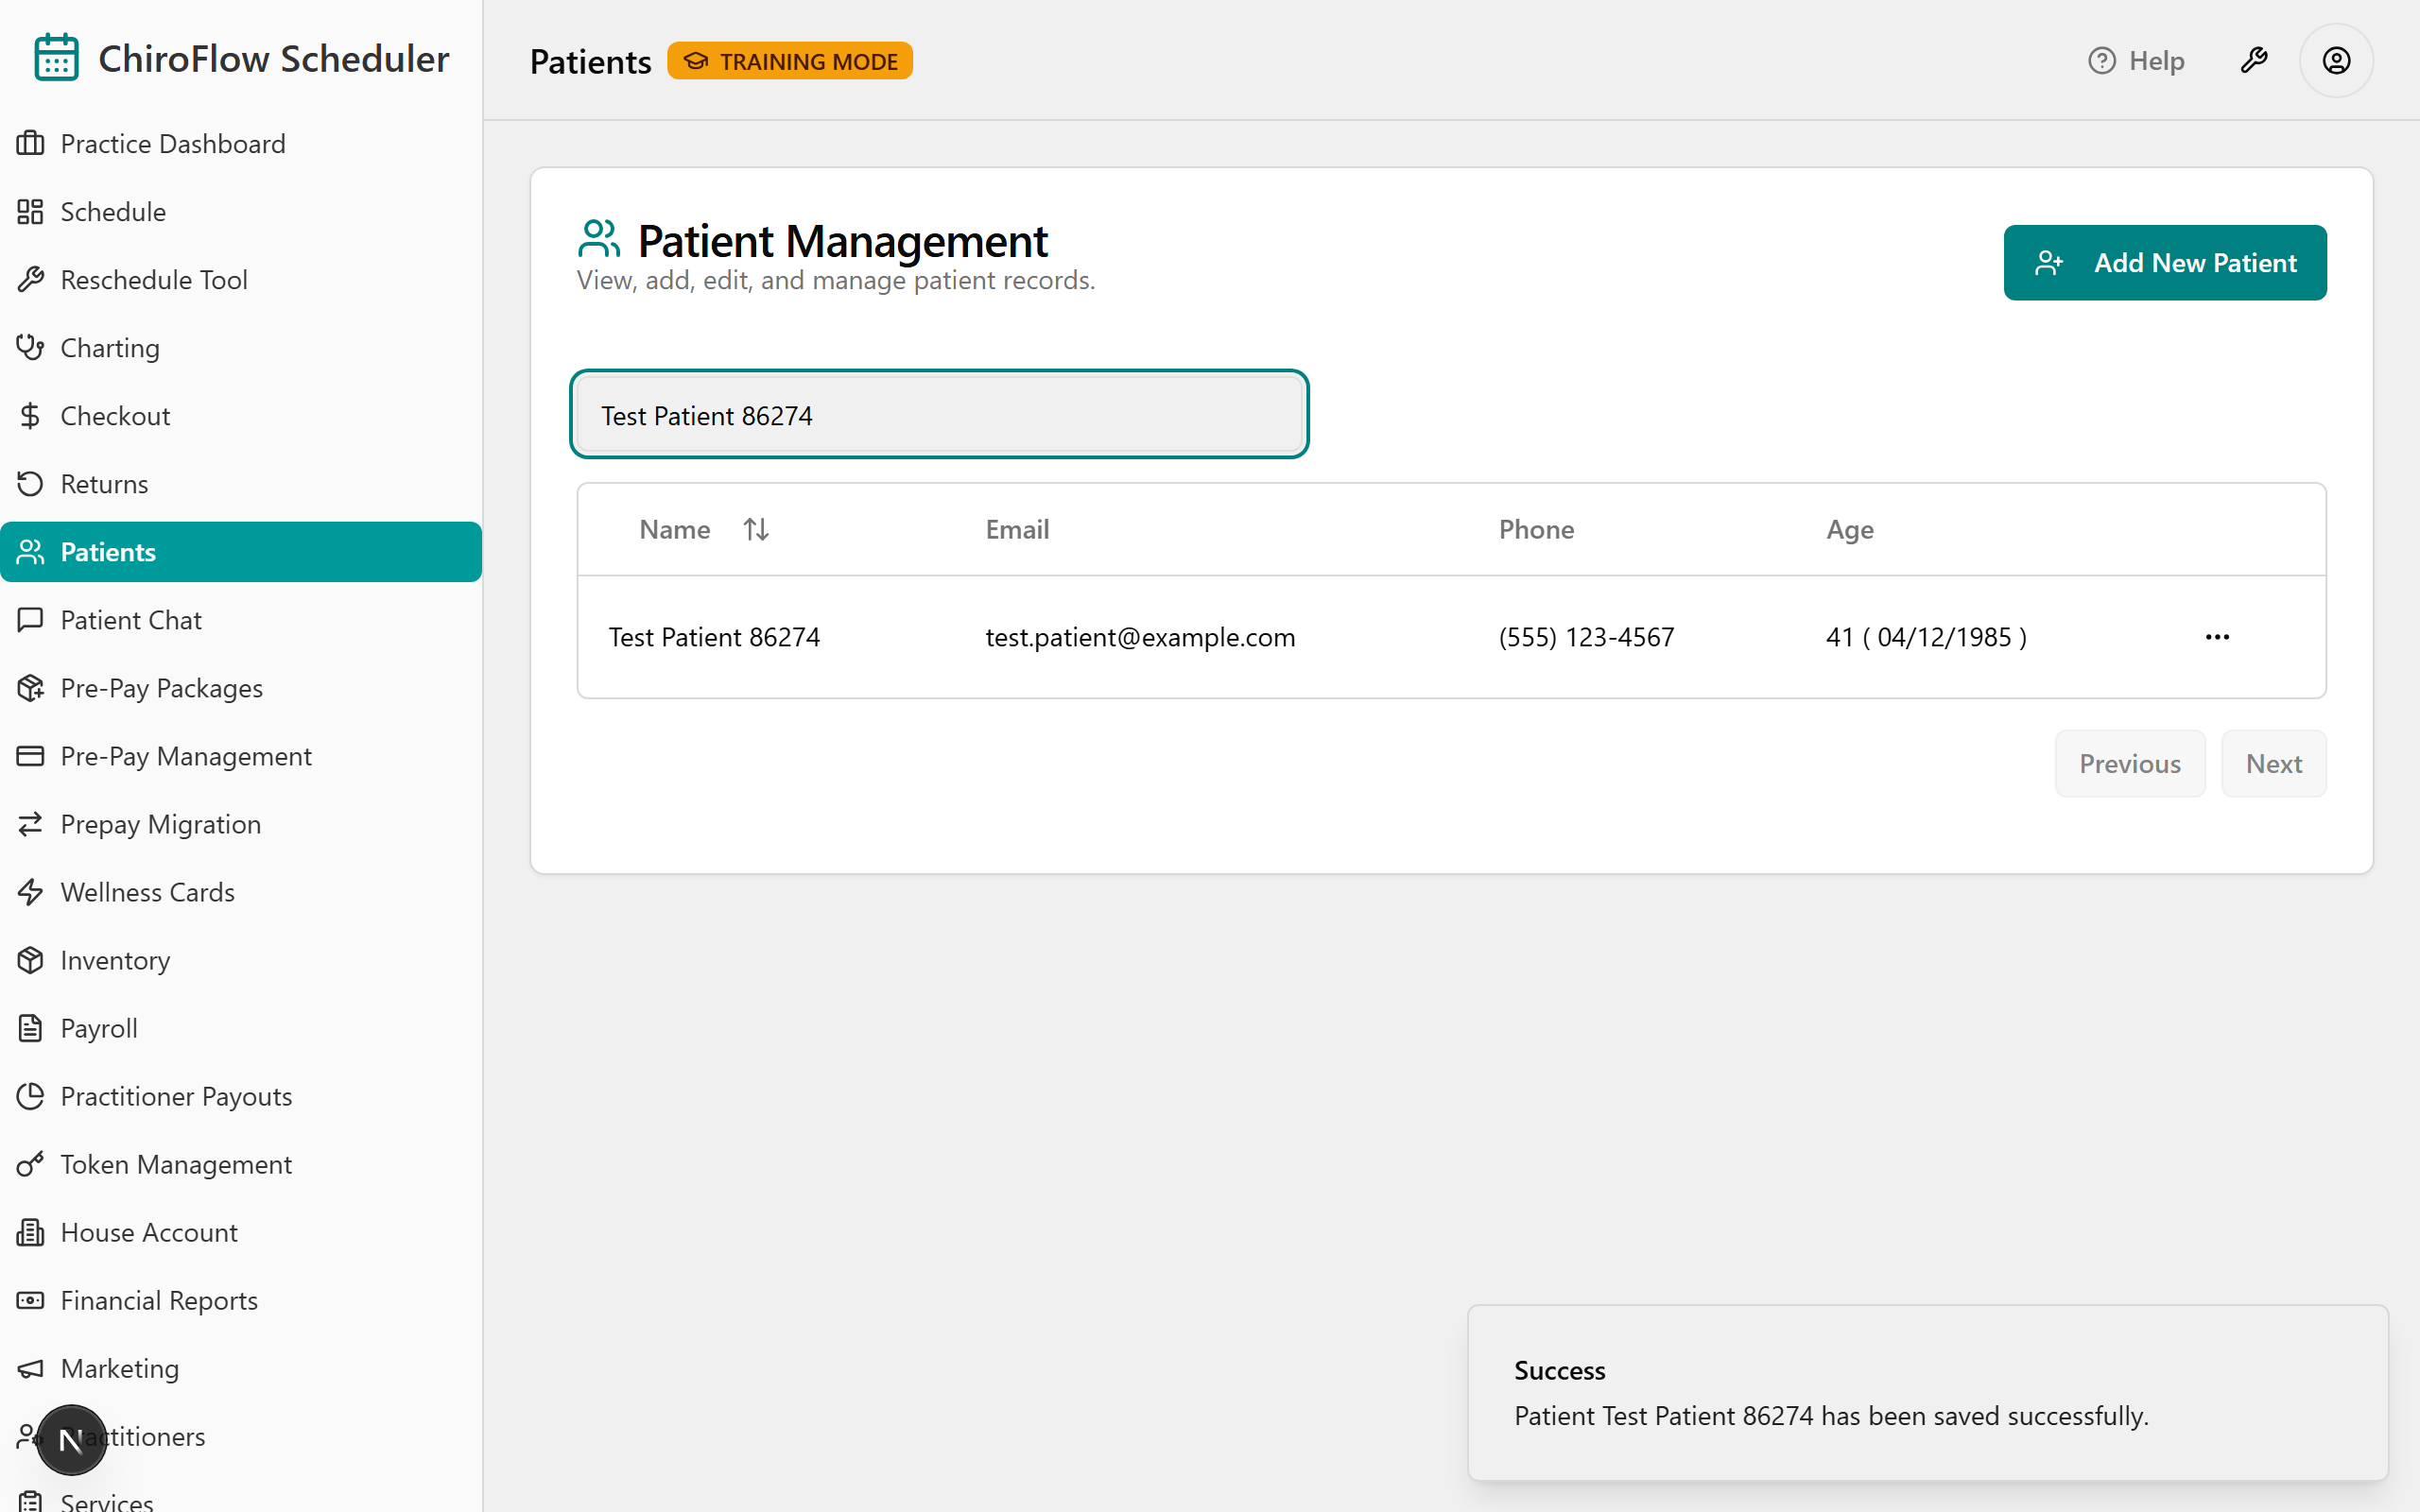
8. Find / add / edit a patient
The Patients page (left menu) is your clinic's master directory — your whole TPS list, migrated. The same search appears when you book and at checkout, so getting comfortable here pays off everywhere.
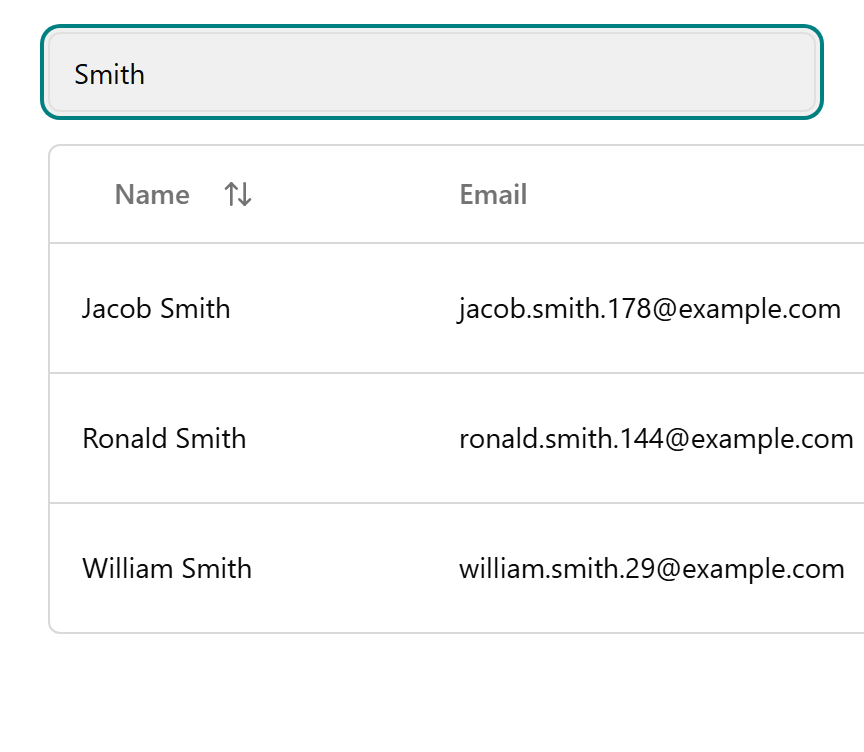
- Find: open Patients, click into Filter by name... and type any part of the name — the table narrows live. (Only the Name column is searchable — it won't match email or phone.) Clear the box for the full list; click the Name header to sort A–Z / Z–A; page with Previous / Next.
- Add: click Add New Patient (top-right) → Add New Patient dialog. Enter Legal Name (required, ≥2 chars); optionally Schedule Name, Email, Phone Number, Date of Birth (MM / DD / YYYY), Address, Notes, and Schedule Notes (Staff Only).
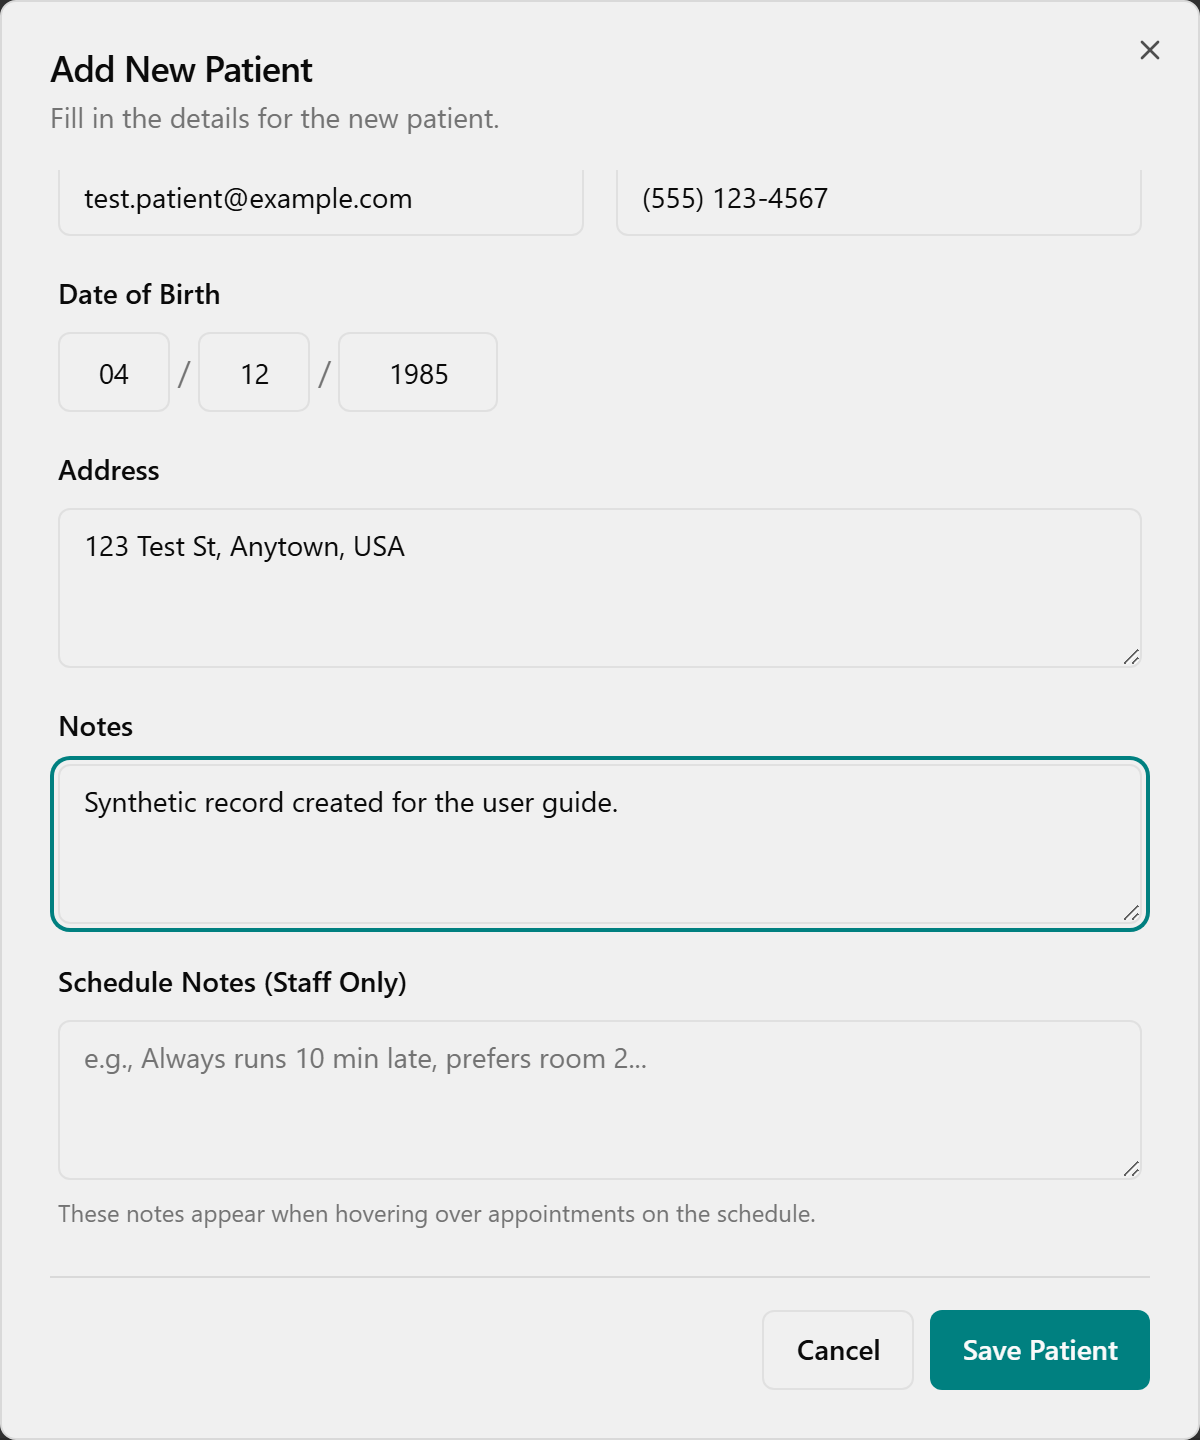
- Click Save Patient → toast "Patient [name] has been saved successfully." (Any Email entered must be valid, or you'll see "Invalid email address." — blank is fine.)
- Edit: click the three-dots (⋯) at the end of the row → Edit (pencil) → change any field → Save Patient.
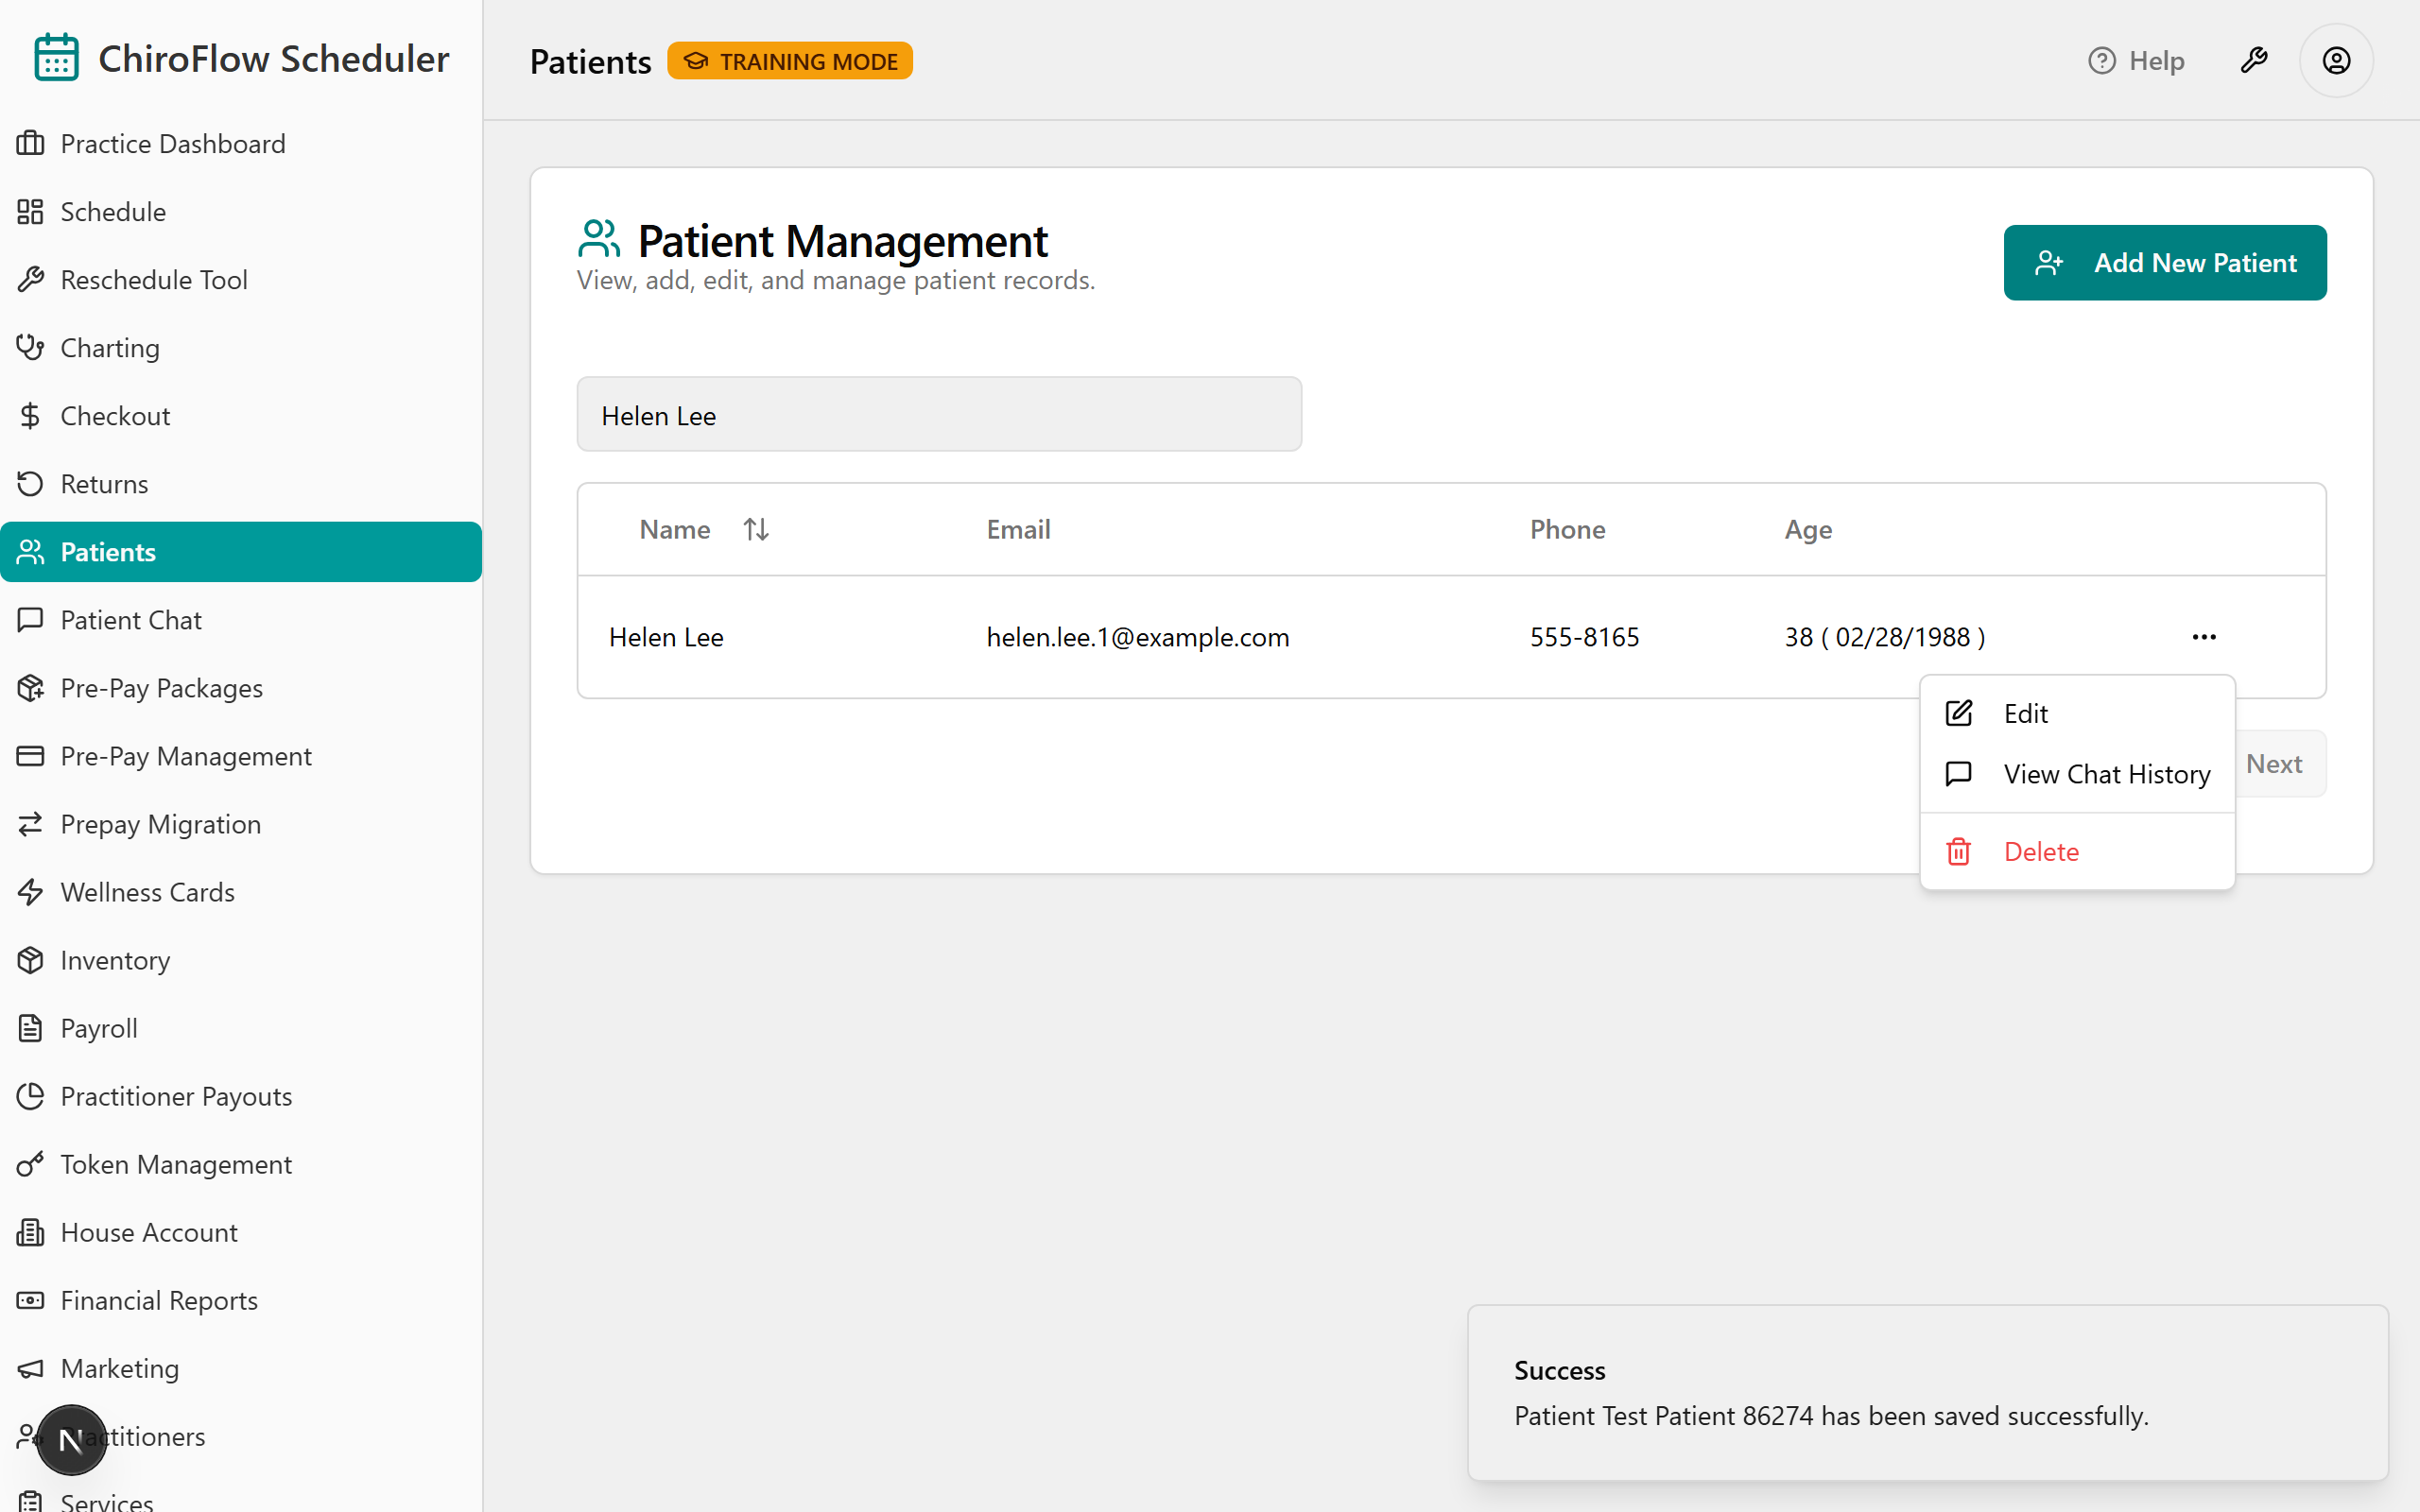
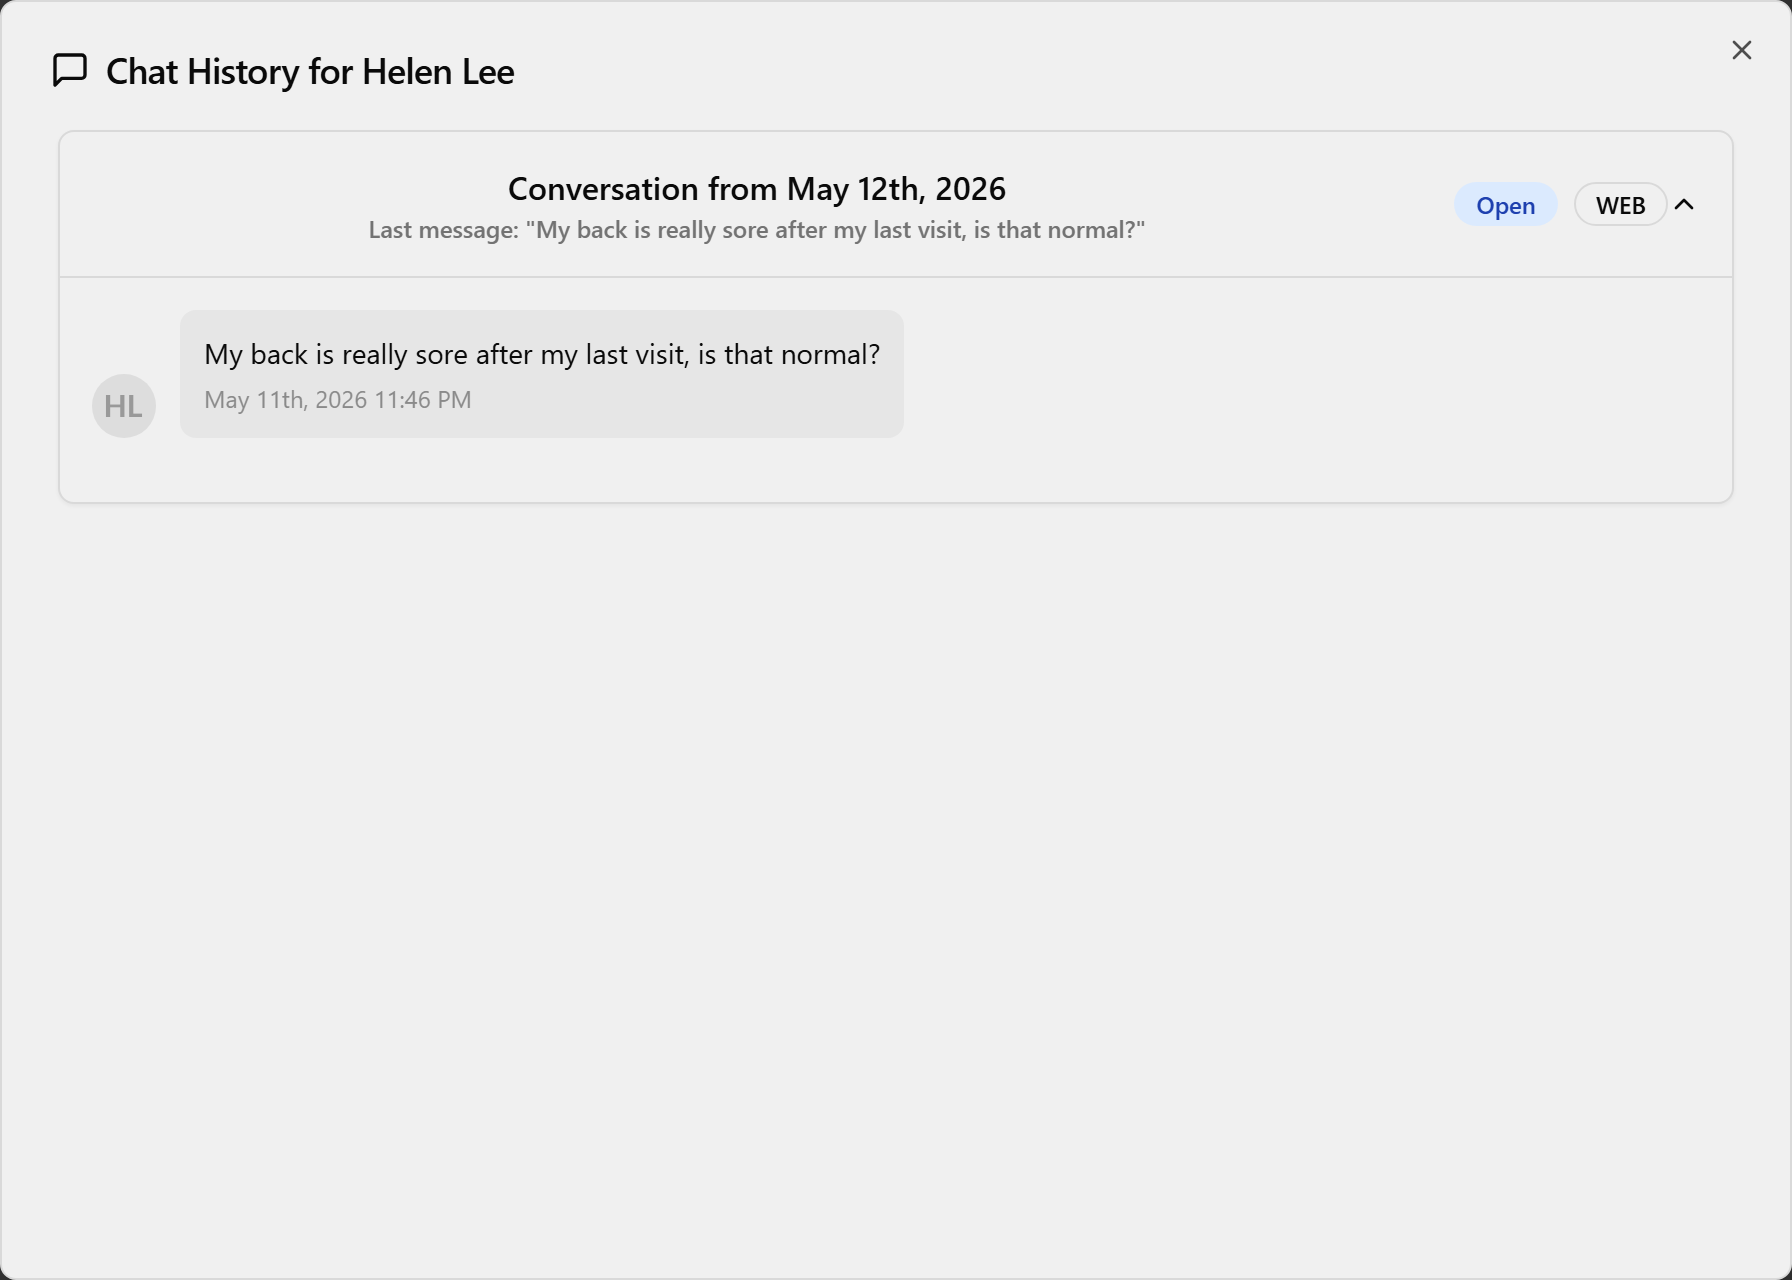
- View chat history: ⋯ → View Chat History (speech-bubble) opens Chat History for [patient name]; click a conversation to expand the thread (status + channel badges, timestamps). "No Chat History Found" if they've never messaged. (This page shows chat only — appointments and pre-pay live on their own pages.)
- Delete (permanent): ⋯ → Delete (red trash) → in Are you absolutely sure? click Continue (or Cancel). Toast "[name] has been removed from the system."
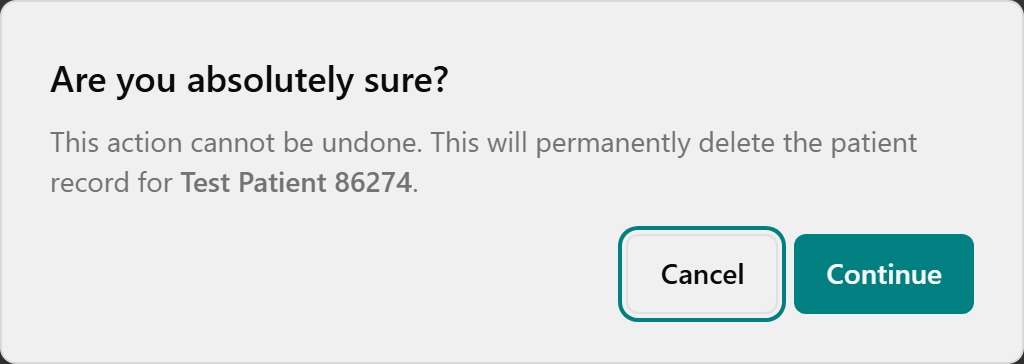
⚠️ Delete has no undo. Search before you create; when in doubt about removing someone, ask Jessica.
📎 Depth: 03-front-desk-guide §Patients.
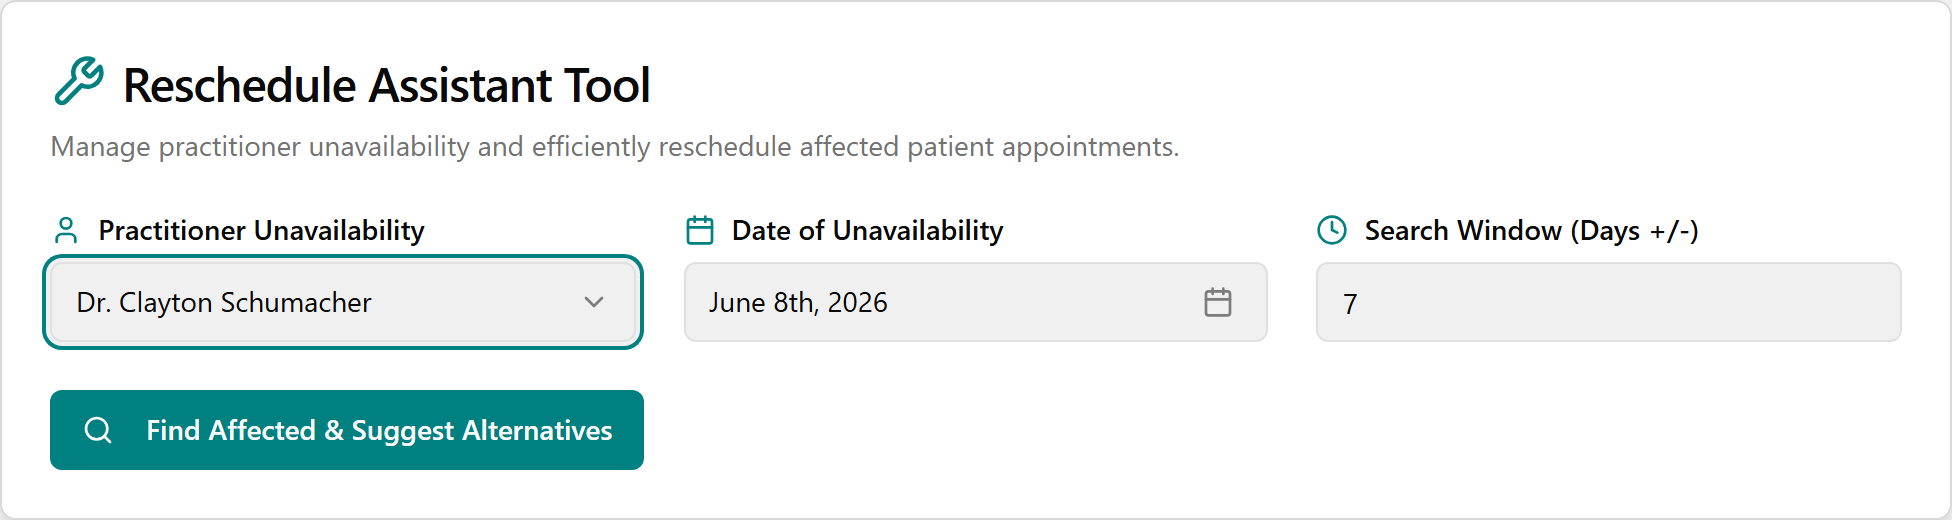
9. Reschedule Tool — only when a provider is out all day
This page is for one situation: a practitioner is out for a whole day and you need to move every patient booked with them. (To move a single appointment, cancel and re-book on the Schedule — there is no drag-to-move.) For the 1-hour session this is mention-only: know it's in the left menu and what it's for; learn the full flow in self-study.
- Open Reschedule Tool (left menu).
- Open Practitioner Unavailability and pick the practitioner who's out.
- Click Date of Unavailability and pick the day from the calendar.
- (Optional) adjust Search Window (Days +/-) (1–30; default 7).
- Click Find Affected & Suggest Alternatives (it reads "Searching & Suggesting…", then a "Search Complete" toast).
- Work the Rescheduling Action Queue (N Pending): click a row to read Original Appointment Details, phone the patient (confirming only saves the time — it does not notify them), click a Suggested Alternative Slot, and click Confirm Reschedule. Confirmed moves jump to Rescheduled Appointments (N); anyone with no slot lands in Failed/No Suggestions (N) for manual handling.
📎 Depth: 03-front-desk-guide §5 (Reschedule Tool).
When something goes wrong
| Situation | Do this |
|---|---|
| Clicked the wrong status | Open Revert (orange undo icon / right-click) → pick the right status |
| Booked the wrong slot | Cancel it (red X-circle → Yes, Cancel), book the correct slot |
| Need to move one appointment | Cancel + re-book — there's no drag-to-move |
| Patient still pink after payment | Payment hasn't processed — re-check the payment step; green = done & paid |
| Card won't approve | Click Try Again; check the Terminal Online/Offline indicator; don't use "Record as Card (no terminal)" |
| Complete Checkout is greyed out | For card payments it says "Pay at Terminal First" until the terminal approves — that's expected |
| Pre-Pay Complete Purchase greyed out | Needs a package + purchaser + at least one authorized user |
| Wrong return — undo it? | No undo on returns. Double-check product/quantity before clicking |
| Return is blocked | It's past the 30-day window — old returns stay in TPS (read-only) |
| "Where did my TPS ___ go?" | See the Crosswalk (06) and FAQ (09) |
| Need an old record from before go-live | Open TPS (read-only, history back to 2004) |
| Truly stuck on go-live week | Call Jessica / the support war-room (June 15–19) — see Go-Live plan (10) |
📎 Go deeper later: Front Desk Guide (03) = the full how-to · TPS→OneBOSS Crosswalk (06) = where your old TPS task lives now · Quick-Reference Cards (07) = printable cheat-sheets (incl. Cards/Payment Types) · FAQ (09) = common questions & fixes · Go-Live plan (10) = cutover & support war-room.