Front Desk — Trainer Run-of-Show (Canonical 60-Minute Guide)
Session: Front desk go-live training · Wed June 10, 2026 · in person, ~60–67 min Go-live / cutover: Sun June 14, 2026 · TPS stays read-only for old history (back to 2004) Audience: reception / front-desk staff — experienced TPS users, first exposure to OneBOSS Format: trainer demo on the projector with the group following along; a short guided rep during Checkout if a live OneBOSS instance + test data is in the room.
🎯 One-hour goal: every front-desk person can, on June 14, (1) read the Schedule and check a patient in, (2) book an appointment, (3) take a payment at checkout — every payment type, (4) sell a Pre-Pay package, and (5) know how to fix a mistake and who to call. Everything else is in the reference guides.
⚠️ Out of scope today: clinical charting / SOAP notes (goes live later this summer; doctors trained separately).
House tone all hour: "You already do this — here's the new place for it." Lead every habit-change with the TPS → OneBOSS reassurance, and keep repeating the safety net: "You can't break anything you can't undo. Mis-click? Revert. Stuck? Call Jessica."
At a glance (running clock)
| # | Segment | Time | Clock |
|---|---|---|---|
| 1 | Welcome — your skills transfer | 5 min | 0:00–0:05 |
| 2 | Read the Schedule + status colors | 8 min | 0:05–0:13 |
| 3 | Move a patient: Check In → Late → Revert | 8 min | 0:13–0:21 |
| 4 | Book, find a slot, move an appointment | 8 min | 0:21–0:29 |
| 5 | Find a patient + quick-add a new one | 4 min | 0:29–0:33 |
| 6 | ⭐ Checkout & Payments — the heart of the day | 18 min | 0:33–0:51 |
| 7 | Pre-Pay Packages — sell, share & manage ⏱ | 7 min | 0:51–0:58 |
| 8 | Wellness Cards + Returns | 5 min | 0:58–1:03 |
| 9 | Wrap — go-live, survival card, who to call | 4 min | 1:03–1:07 |
| Total (with Pre-Pay extension) | ≈67 min |
⏱ This runs a few minutes past the hour on purpose. Pre-Pay Packages (Segment 7) is a required daily task, so the session is planned at ≈67 min. If you must hold to 60, take the time from Segment 8 (Wellness/Returns) and the "name-only" items in Segment 4 — do not cut Segment 6 or 7.
🎯 Trainer rule of thumb: if you fall behind, protect Segments 2–3 (schedule/check-in), 6 (checkout), and 7 (pre-pay) — the daily must-haves. Segments 4 and 8 are the trim targets; Segment 9 is non-negotiable (4 min). See the full Cut-if-short priority list at the end.
Before the room fills (trainer prep — 10 min earlier)
- OneBOSS open on the projector, logged in as a Front Desk test user, landed on the Schedule screen so the role-gated left menu is correct. (Confirm the real production sign-in flow — don't over-promise the exact login screen.)
- Pre-seed a demo day with clearly-fake test patients: one white/scheduled, one checked-in (pink), one with a prepay wallet (already holds a package, for spending at checkout), one with a CHI Cash balance, one therapy patient with an active wellness card, and one patient with 2+ same-day visits (for the consolidated checkout mention). Ask Jessica to set these up.
- For Segment 7: have two related test patients ready (e.g. a parent + child) so you can sell a package to one and add the other as an Authorized User; pick one example package tier in advance and confirm the live package list/prices in Pre-Pay Management first.
- A test supplement bottle with a barcode (e.g. serial
CHI000123) + the scanner working at the station; receipt printer on. - Print the
FD-quickstart-handout(one per person) and the Front Desk + Checkout cards from07-cards(cardstock). - Have
03-front-desk-guideand09-faqopen in tabs for live lookups. - Fill in real phone numbers for Jessica, Kimberly, and the War Room on the Go-Live survival card (
10-go-live). - Walk the live build once and confirm the "(confirm in app)" items: production login; on-screen Default vs Compact wording; real discount names + which need manager override; how the patient gets proof of payment; the clear-an-unattended-slot path.
- Decide your stop-the-clock rule: if you reach 0:45 and haven't finished Checkout, cut Wellness/Returns/Reschedule to self-study and protect the checkout block.
The minute-by-minute
0:00–0:05 — Welcome & the one big message (5 min)
Objective: Lower anxiety. Confirm their TPS skill carries over, their data came across, and frame the whole hour as same work, clearer home.
Say: "Thank you for the years on TPS — you're great at it, and that exact skill is what we're giving a modern home today. This is not a feature tour; it's learning the new place for the things you already do. In one hour we'll cover the handful of things you need on Monday; everything else is in the printed guides. And the big reassurance: you can't break anything you can't undo."
- Say the date plainly: OneBOSS goes live Sunday, June 14. After that, all new work happens in OneBOSS.
- Your data already moved: the patient list, recent appointments, products, stock, and prepay balances were migrated — "day one, it already looks like your clinic." (Use approximate counts only if you've confirmed them against the final migration; don't quote hard numbers you haven't verified.)
- TPS stays read-only, indefinitely, back to 2004 — nobody loses history.
- One sentence on charting, then move on: "SOAP / charting comes later this summer; the doctors train separately; not today."
- Hand out the quick-start + cards now so they can annotate.
👉 Reference: parent-folder
02-system-overviewand06-crosswalkfor the "why / what-changed." Day-to-day point person on screen and in person: Jessica (Clinic Director).
0:05–0:13 — Read the Schedule + status colors (8 min)
Objective: Open the day, move between dates, switch views, read the grid, and read every appointment's status by color at a glance.
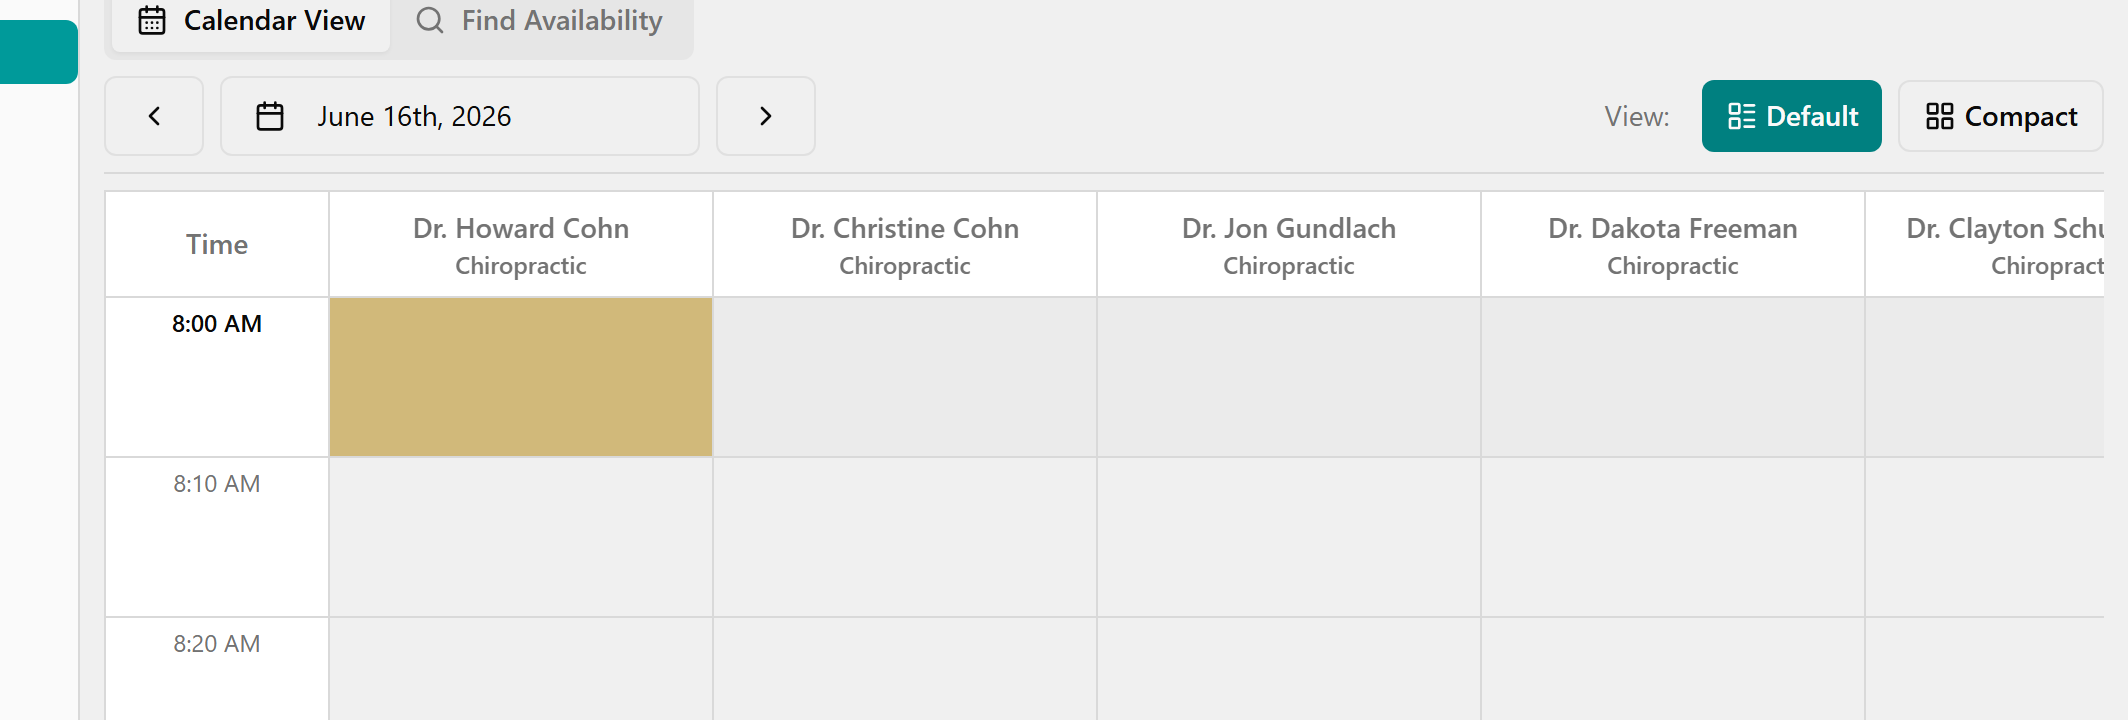
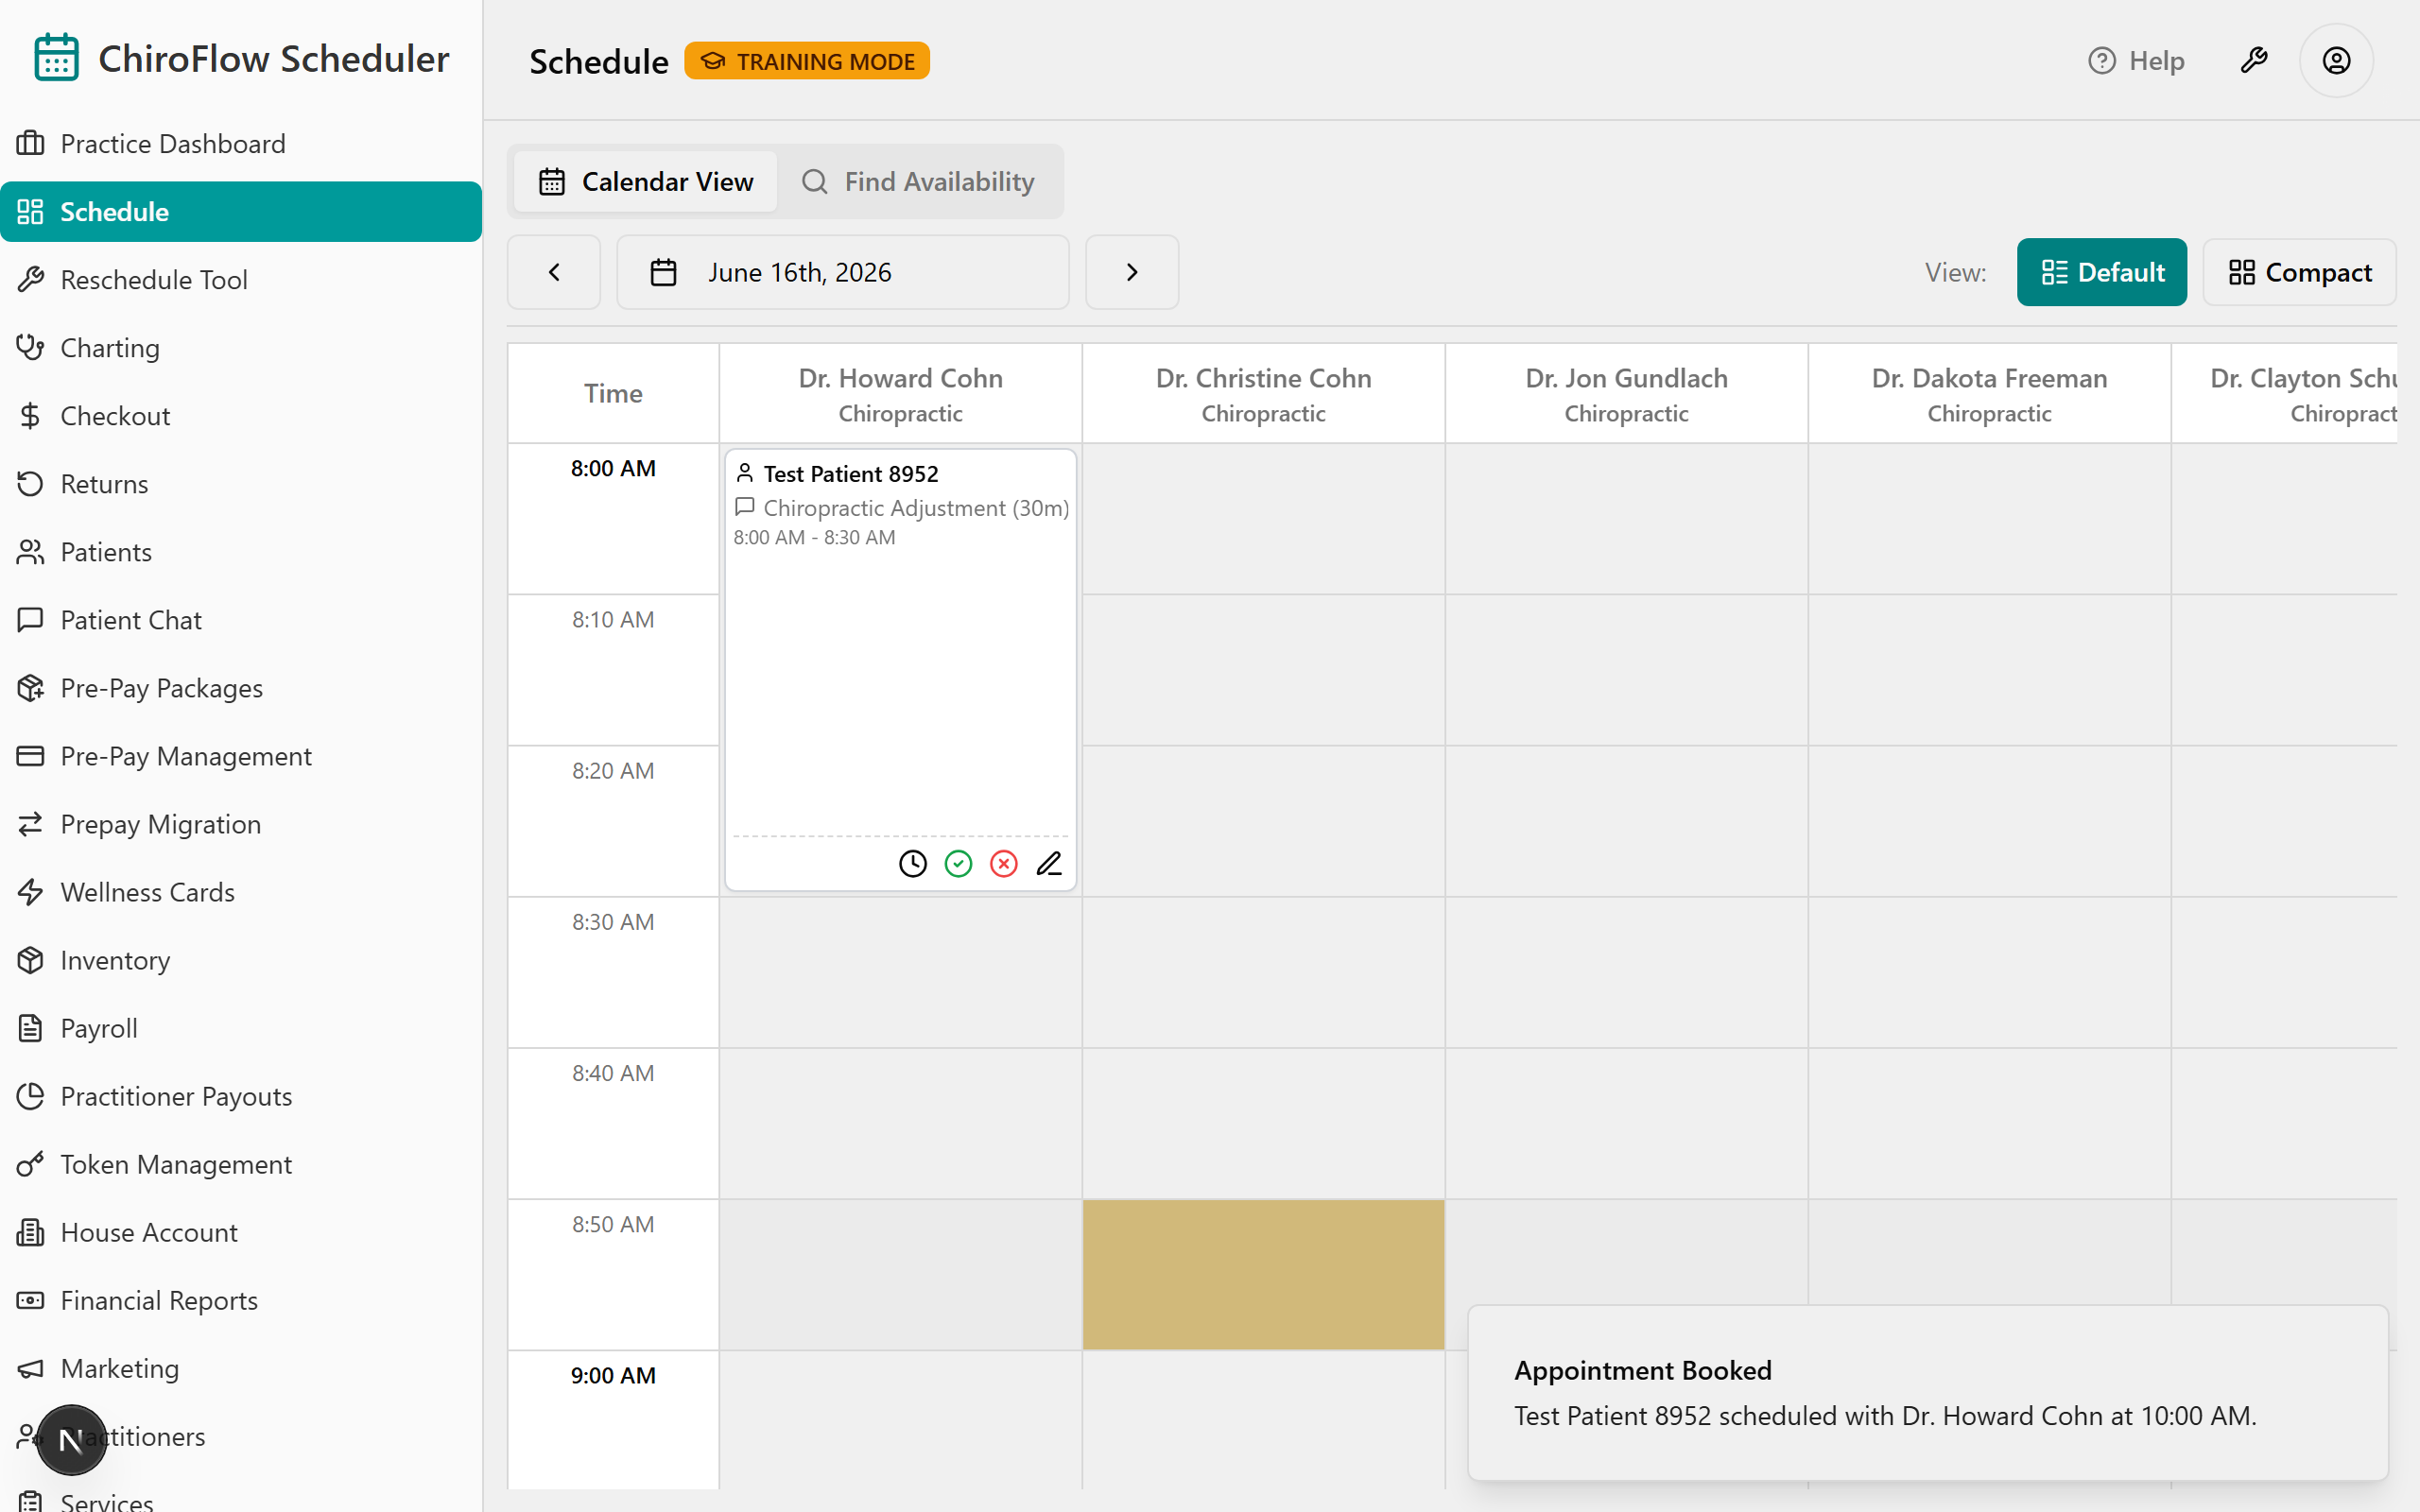
Demo step 1 — open the home base. Click Schedule at the top of the left menu — it's the OneBOSS home page (route /), the same as flipping open the appointment book in TPS.

Demo step 2 — read the grid. The left column = Time in 10-minute rows (about 8 AM–6 PM); each column = one practitioner (name + specialty); each card shows the patient name, the service and its length (e.g. 20m), and the time. The grid loads in clinic time regardless of the computer's time zone.
Demo step 3 — teach the four status colors cold, pointing at real cards:
- ⬜ White = Scheduled (booked, not here yet)
- 🩷 Pink = Checked in (arrived)
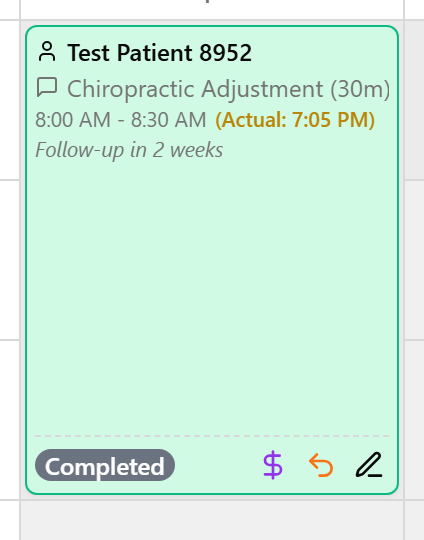
- 🟩 Green (muted/emerald) = Completed AND paid (done)
- 🟥 Red = Running late or payment overdue
Then point out a white card whose name alone turns red — that's a "past start time" nudge, not a status change. (Colors are code-confirmed: pink bg-pink-200, green bg-emerald-100, late/overdue bg-red-50. The hours/rows are approximate — confirm in app.)
💡 Say: "This is your appointment book — but the colors do the highlighting for you, so you read the whole day in one glance instead of flipping pages. And pink stays pink until payment is actually taken — green means done AND paid. There's no separate 'paid' color to chase."
Demo step 4 — move between days. In the toolbar, click ‹ to go back a day or › to go forward — the new "flip the appointment book."

To jump straight to a date, click the date button in the middle of the toolbar and pick the day in the calendar; the grid reloads.
Demo step 5 — show the views. Top-right, by the View: label, show the two buttons. Default gives larger cards with on-card action buttons — teach and demo on Default all hour.
Click Compact to show the denser grid you act on by right-clicking a card or slot (the on-card buttons move into the right-click menu). Mention it exists, then switch back to Default.
👉 Reference:
03-front-desk-guide §Schedule; the code-confirmed color key is infrontdesk-1hr-agenda §2.
0:13–0:21 — Check a patient in → Mark Late → Revert (8 min)
Objective: Advance a patient's status, mark a known delay, and undo any misclick — the everyday "patient arrives" loop on your home base.
Demo step 1 — find the white card. On today's Schedule, a scheduled, not-yet-arrived appointment shows as a white card in the right practitioner's column.
Demo step 2 — check them in. In Default view, click the green check-circle Check In button on the card. (In Compact, right-click → Check In. Shortcut: double-click a white card to check in instantly.)
The card turns pink and their arrival time is stamped. (Pink stays pink until payment is taken — there's no separate "arrived" color to chase.)
Demo step 3 — mark a known delay (acts on the still-white card). If a patient calls ahead, open the late control on the white card: in Default click the clock icon (in Compact, right-click → Mark Late). Type minutes in the Late (minutes) field, then click Confirm Late.
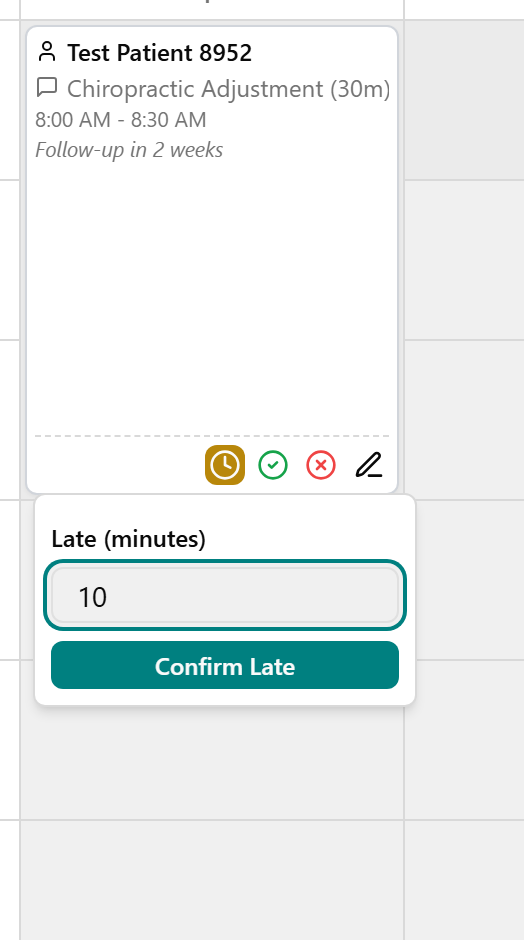
The card turns red so you can spot the running-late flag at a glance.
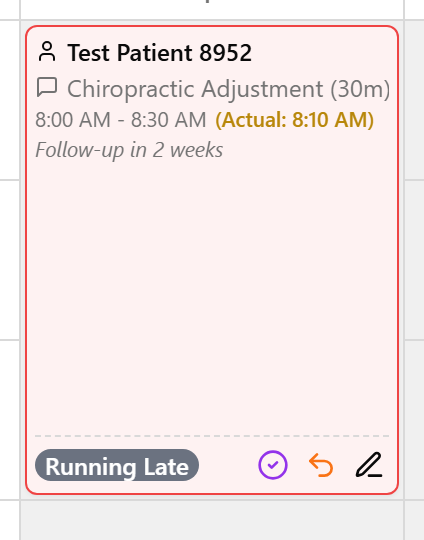
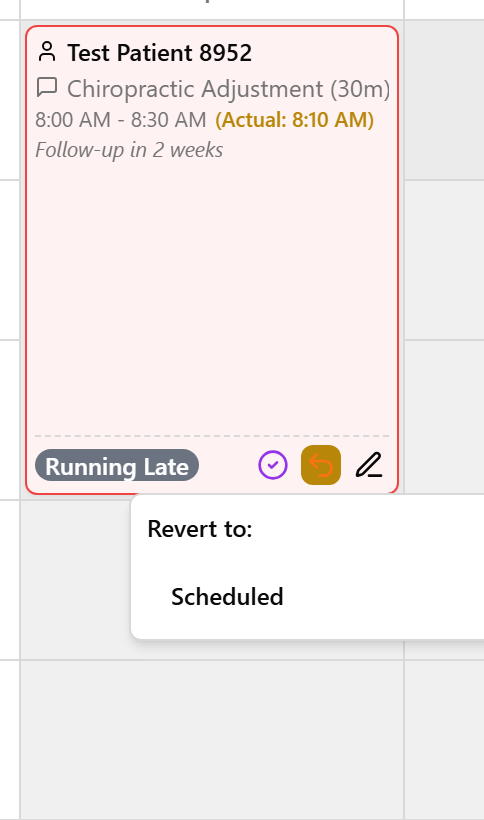
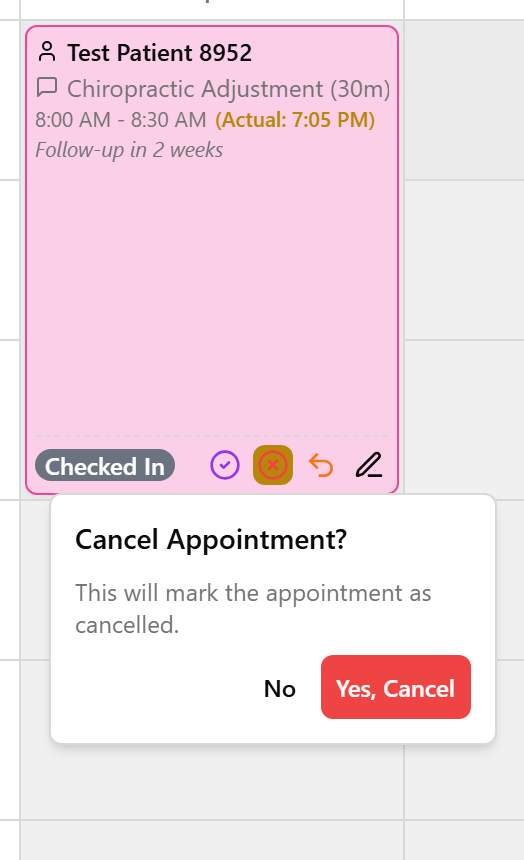
Demo step 4 — make a deliberate misclick, then undo it. On a checked-in, running-late, or completed card, open Revert: in Default click the orange undo (curved-arrow) icon (in Compact, right-click). The Revert menu opens with the earlier-status options (e.g. Checked In / Scheduled); pick one and the card walks back to that color.
💡 Say (this is the moment to normalize undo): "Everyone misclicks on day one — that's exactly what Revert is for. There's an undo here TPS never gave you, so relax and click around. Nobody can break the schedule."
(Confirm-live: the exact in-menu Revert wording and whether the Default-view late control is a clock icon vs. a labeled button on your training-day build.)
👉 Reference:
03-front-desk-guide §Check-in.
0:21–0:29 — Book, find a slot, move an appointment (8 min)
Objective: Book from an empty slot, quick-add a patient mid-booking, find the next opening, and know how to move one appointment.
Demo step 1 — book the everyday way. Land on the day with ‹ / › or the date button, then find an empty white slot in the practitioner's column you want.
Click the slot — the Quick Book Appointment window opens (practitioner and time shown at the top).
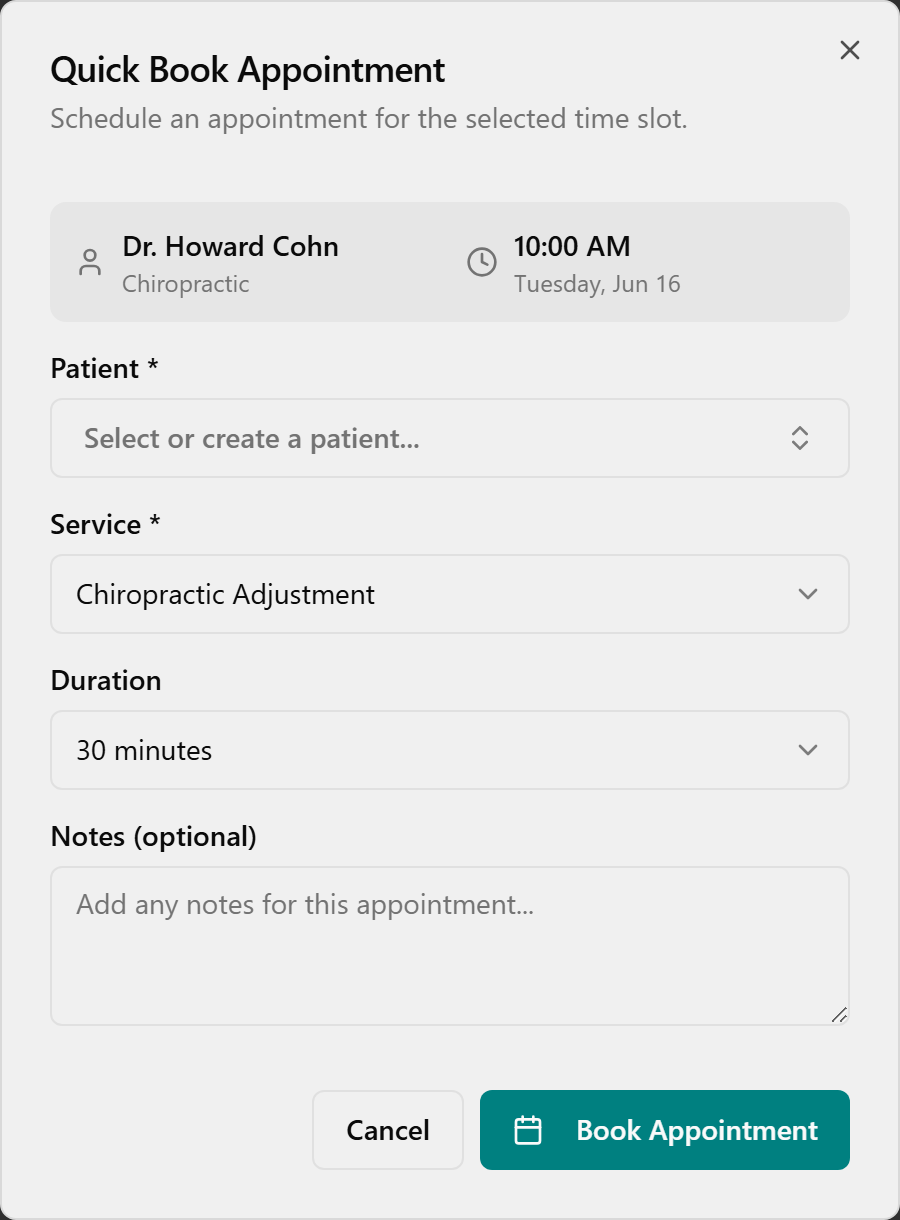
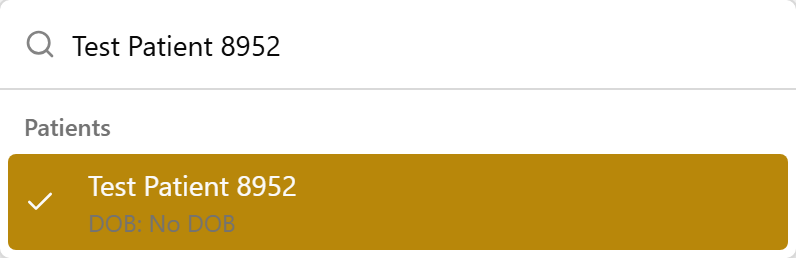
Click the Patient box and pick (or type to search) the patient.
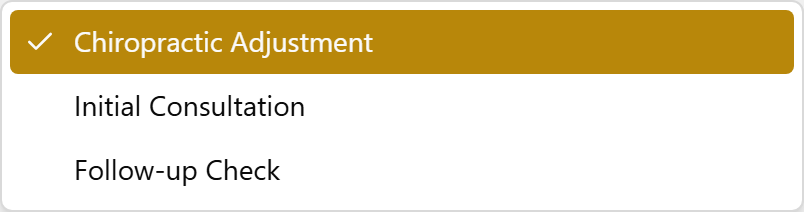
Under Service, choose the service — only services this practitioner offers are listed.
Set Duration (most services book in 10-min steps; Massage offers 30/60/90), add optional Notes, then click Book Appointment.
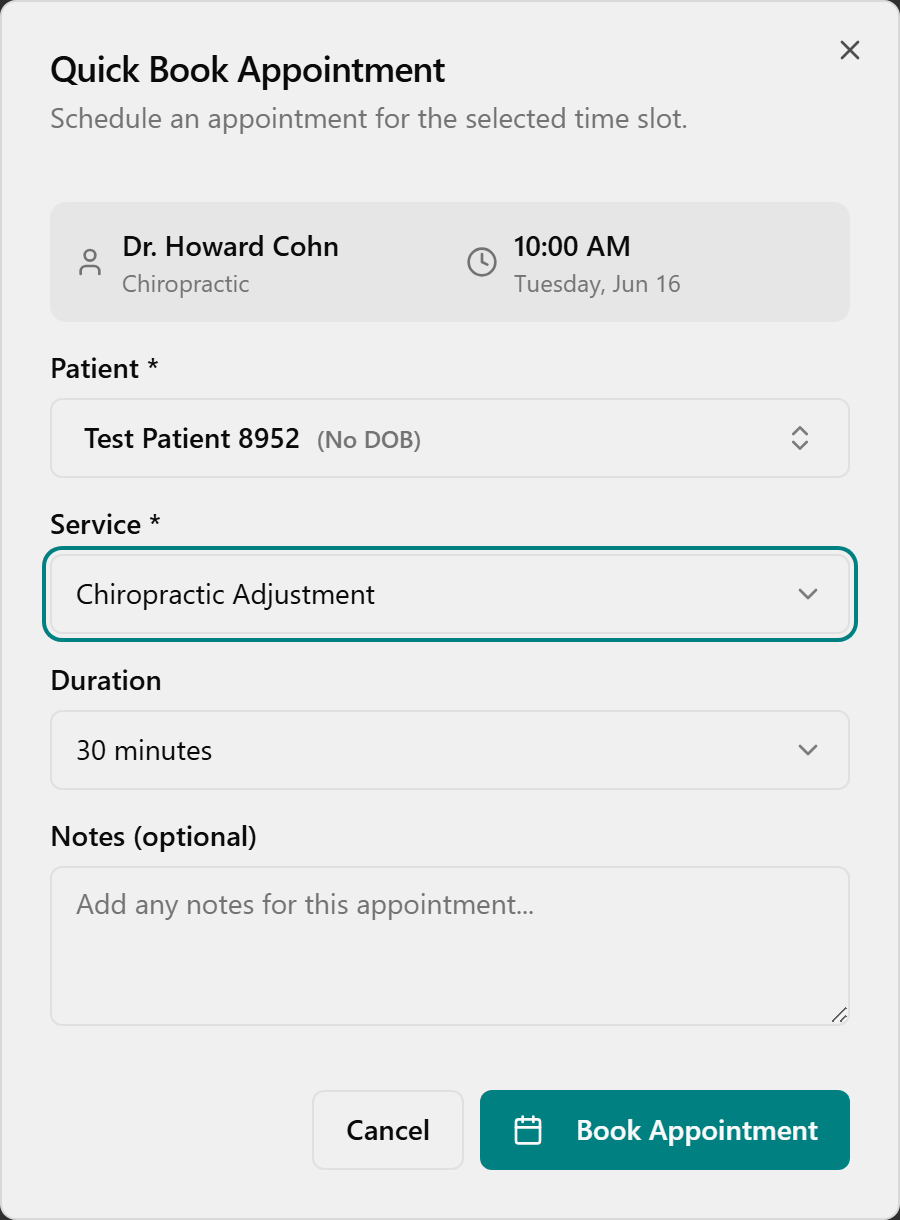
The new card appears in the slot and a green Appointment Booked message pops in the corner.
Demo step 2 — quick-add a new patient without leaving the flow. In the same dialog, type an unknown name in the Patient box; if they aren't found, click Create New Patient.
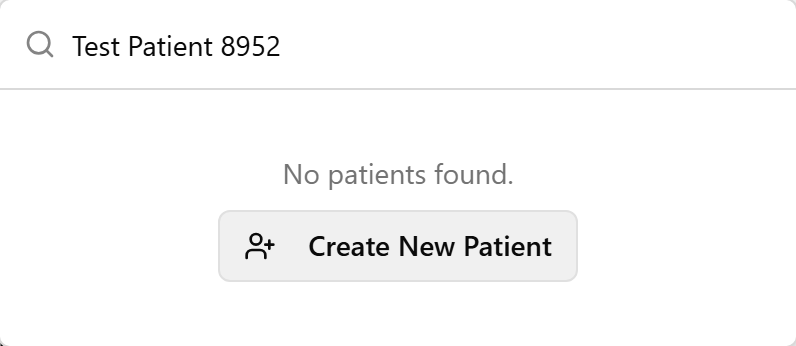
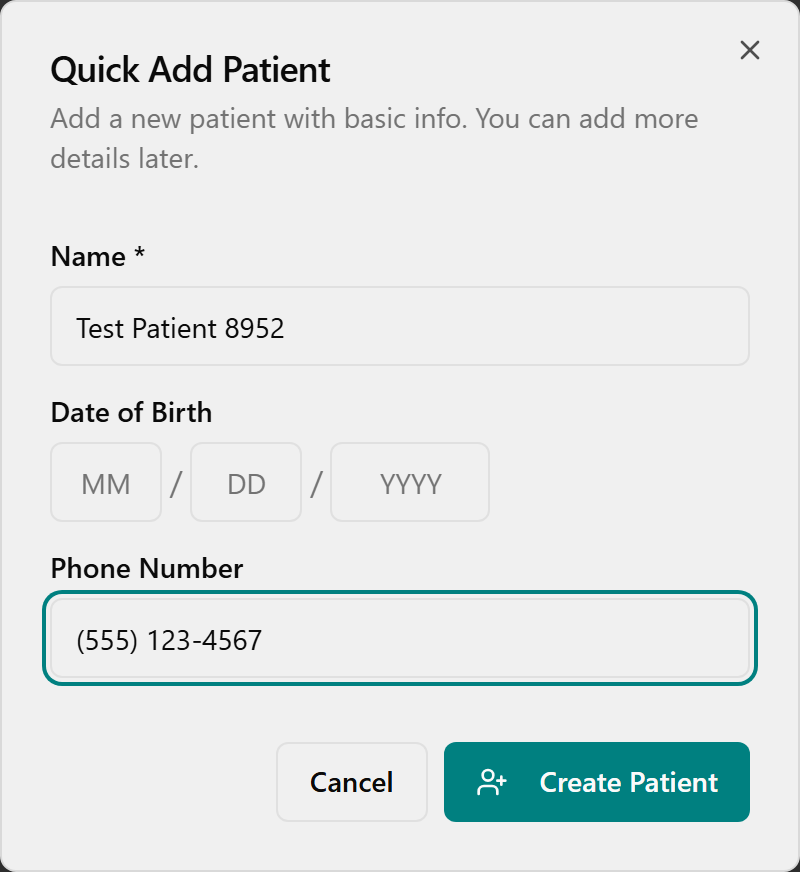
In Quick Add Patient, fill in Name (required) plus optional Date of Birth and Phone Number, then click Create Patient — they're auto-selected so you stay in the booking.
Demo step 3 — find an opening across several days. Click the Find Availability tab (Admin & Front Desk only). In Find Available Appointments, choose a Patient (required to actually book), optional Service / Practitioner / Duration, and a From Date / To Date.
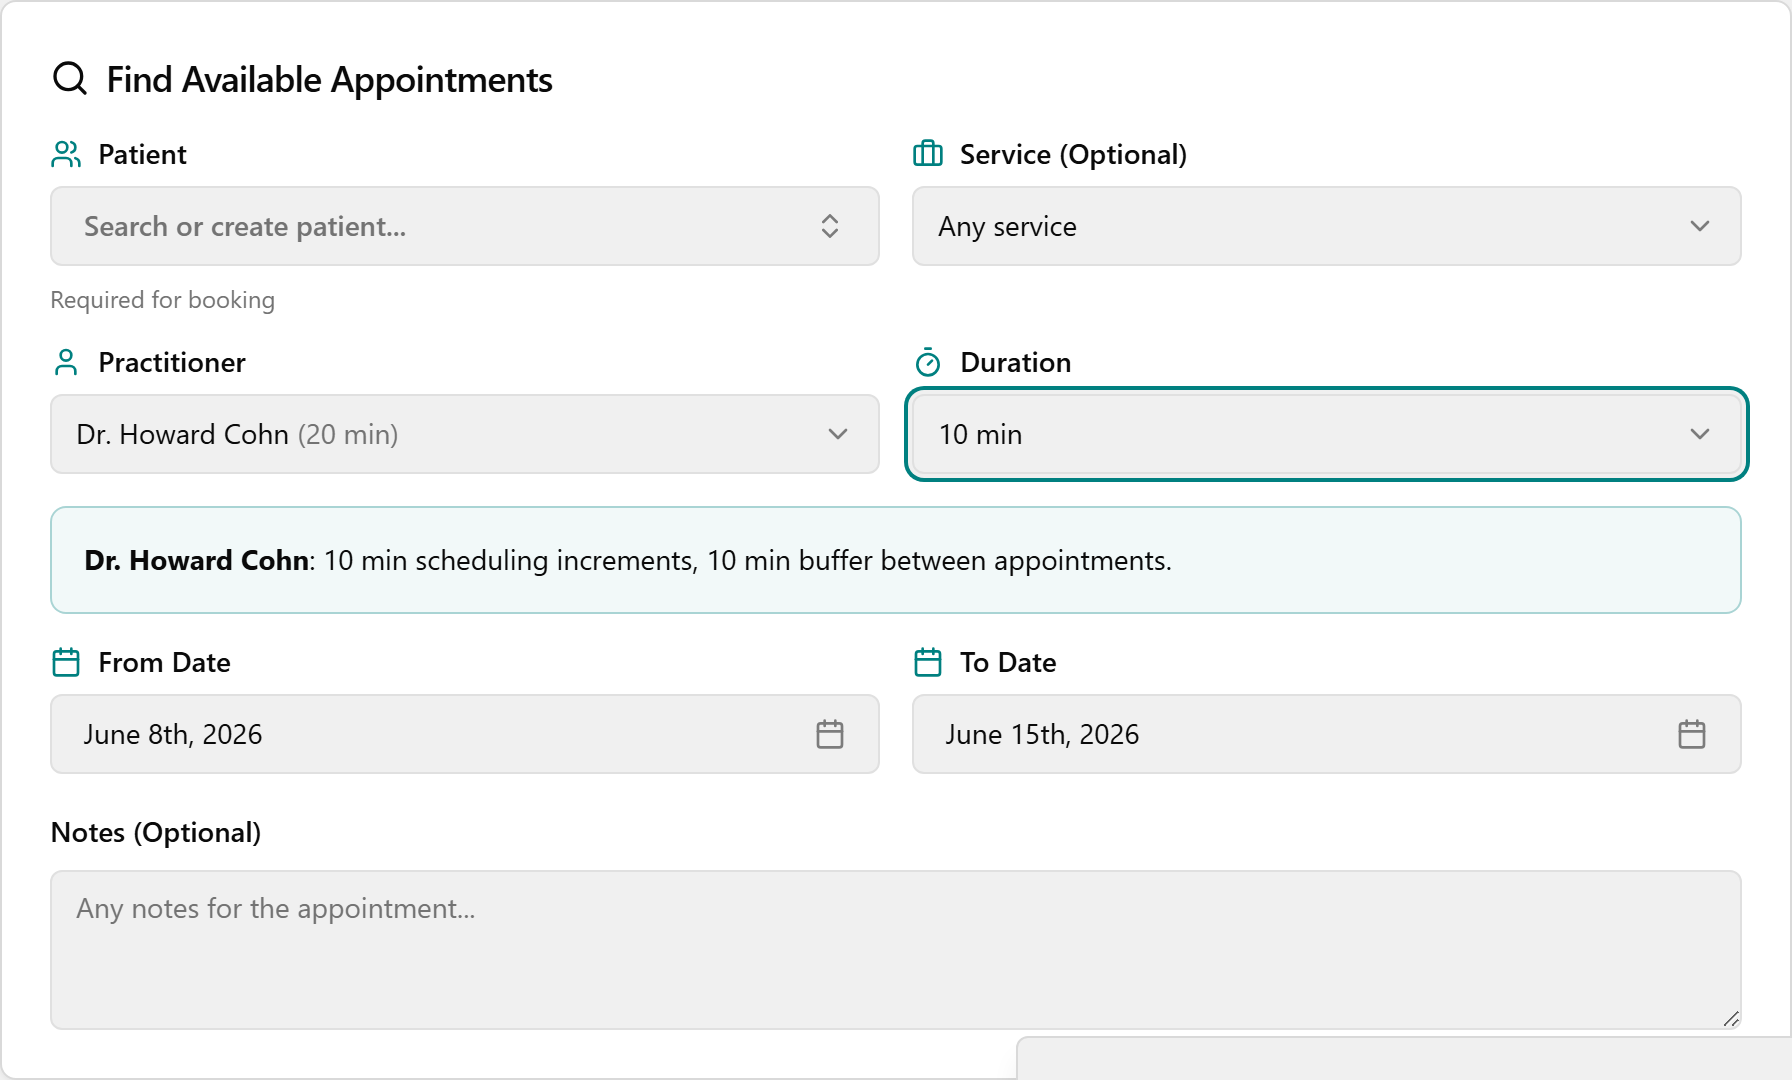
It searches automatically (no Search button). Under Available Slots, page with ‹ / › and click a time button to book it instantly.

Demo step 4 — moving one appointment, and the name-only extras (trim first if short).
To move ONE appointment: there is no drag-to-move and no edit-time — you Cancel + re-book. In Default click the red X-circle Cancel Appointment icon → Yes, Cancel, then re-book at the new time. ⚠️ Re-book immediately — the freed slot can be grabbed by someone else; the original shows as cancelled for the audit trail. (There's no separate No-Show button — Cancel is how you clear a slot; ask Jessica how your clinic records no-shows.)
Name-only, don't drill: Manual Override (Specific Time) → Book Manually in the Find Availability tab books an exact time even if it isn't open (can double-book). Right-click an empty slot drops a gray 10-min Buffer block (in Compact, choose Add 10-min Buffer; click the gray block to remove). The pencil on a card adds a Note → Save. The left-menu Reschedule Tool is only for a provider out the whole day — see Segment 8's note.
👉 Reference:
03-front-desk-guide §Bookingand§Find Availability.
0:29–0:33 — Find a patient + quick-add a new one (4 min)
Objective: Search the master directory and quick-add a walk-in. This is the same patient search that appears at booking and checkout, so getting comfortable here pays off everywhere.
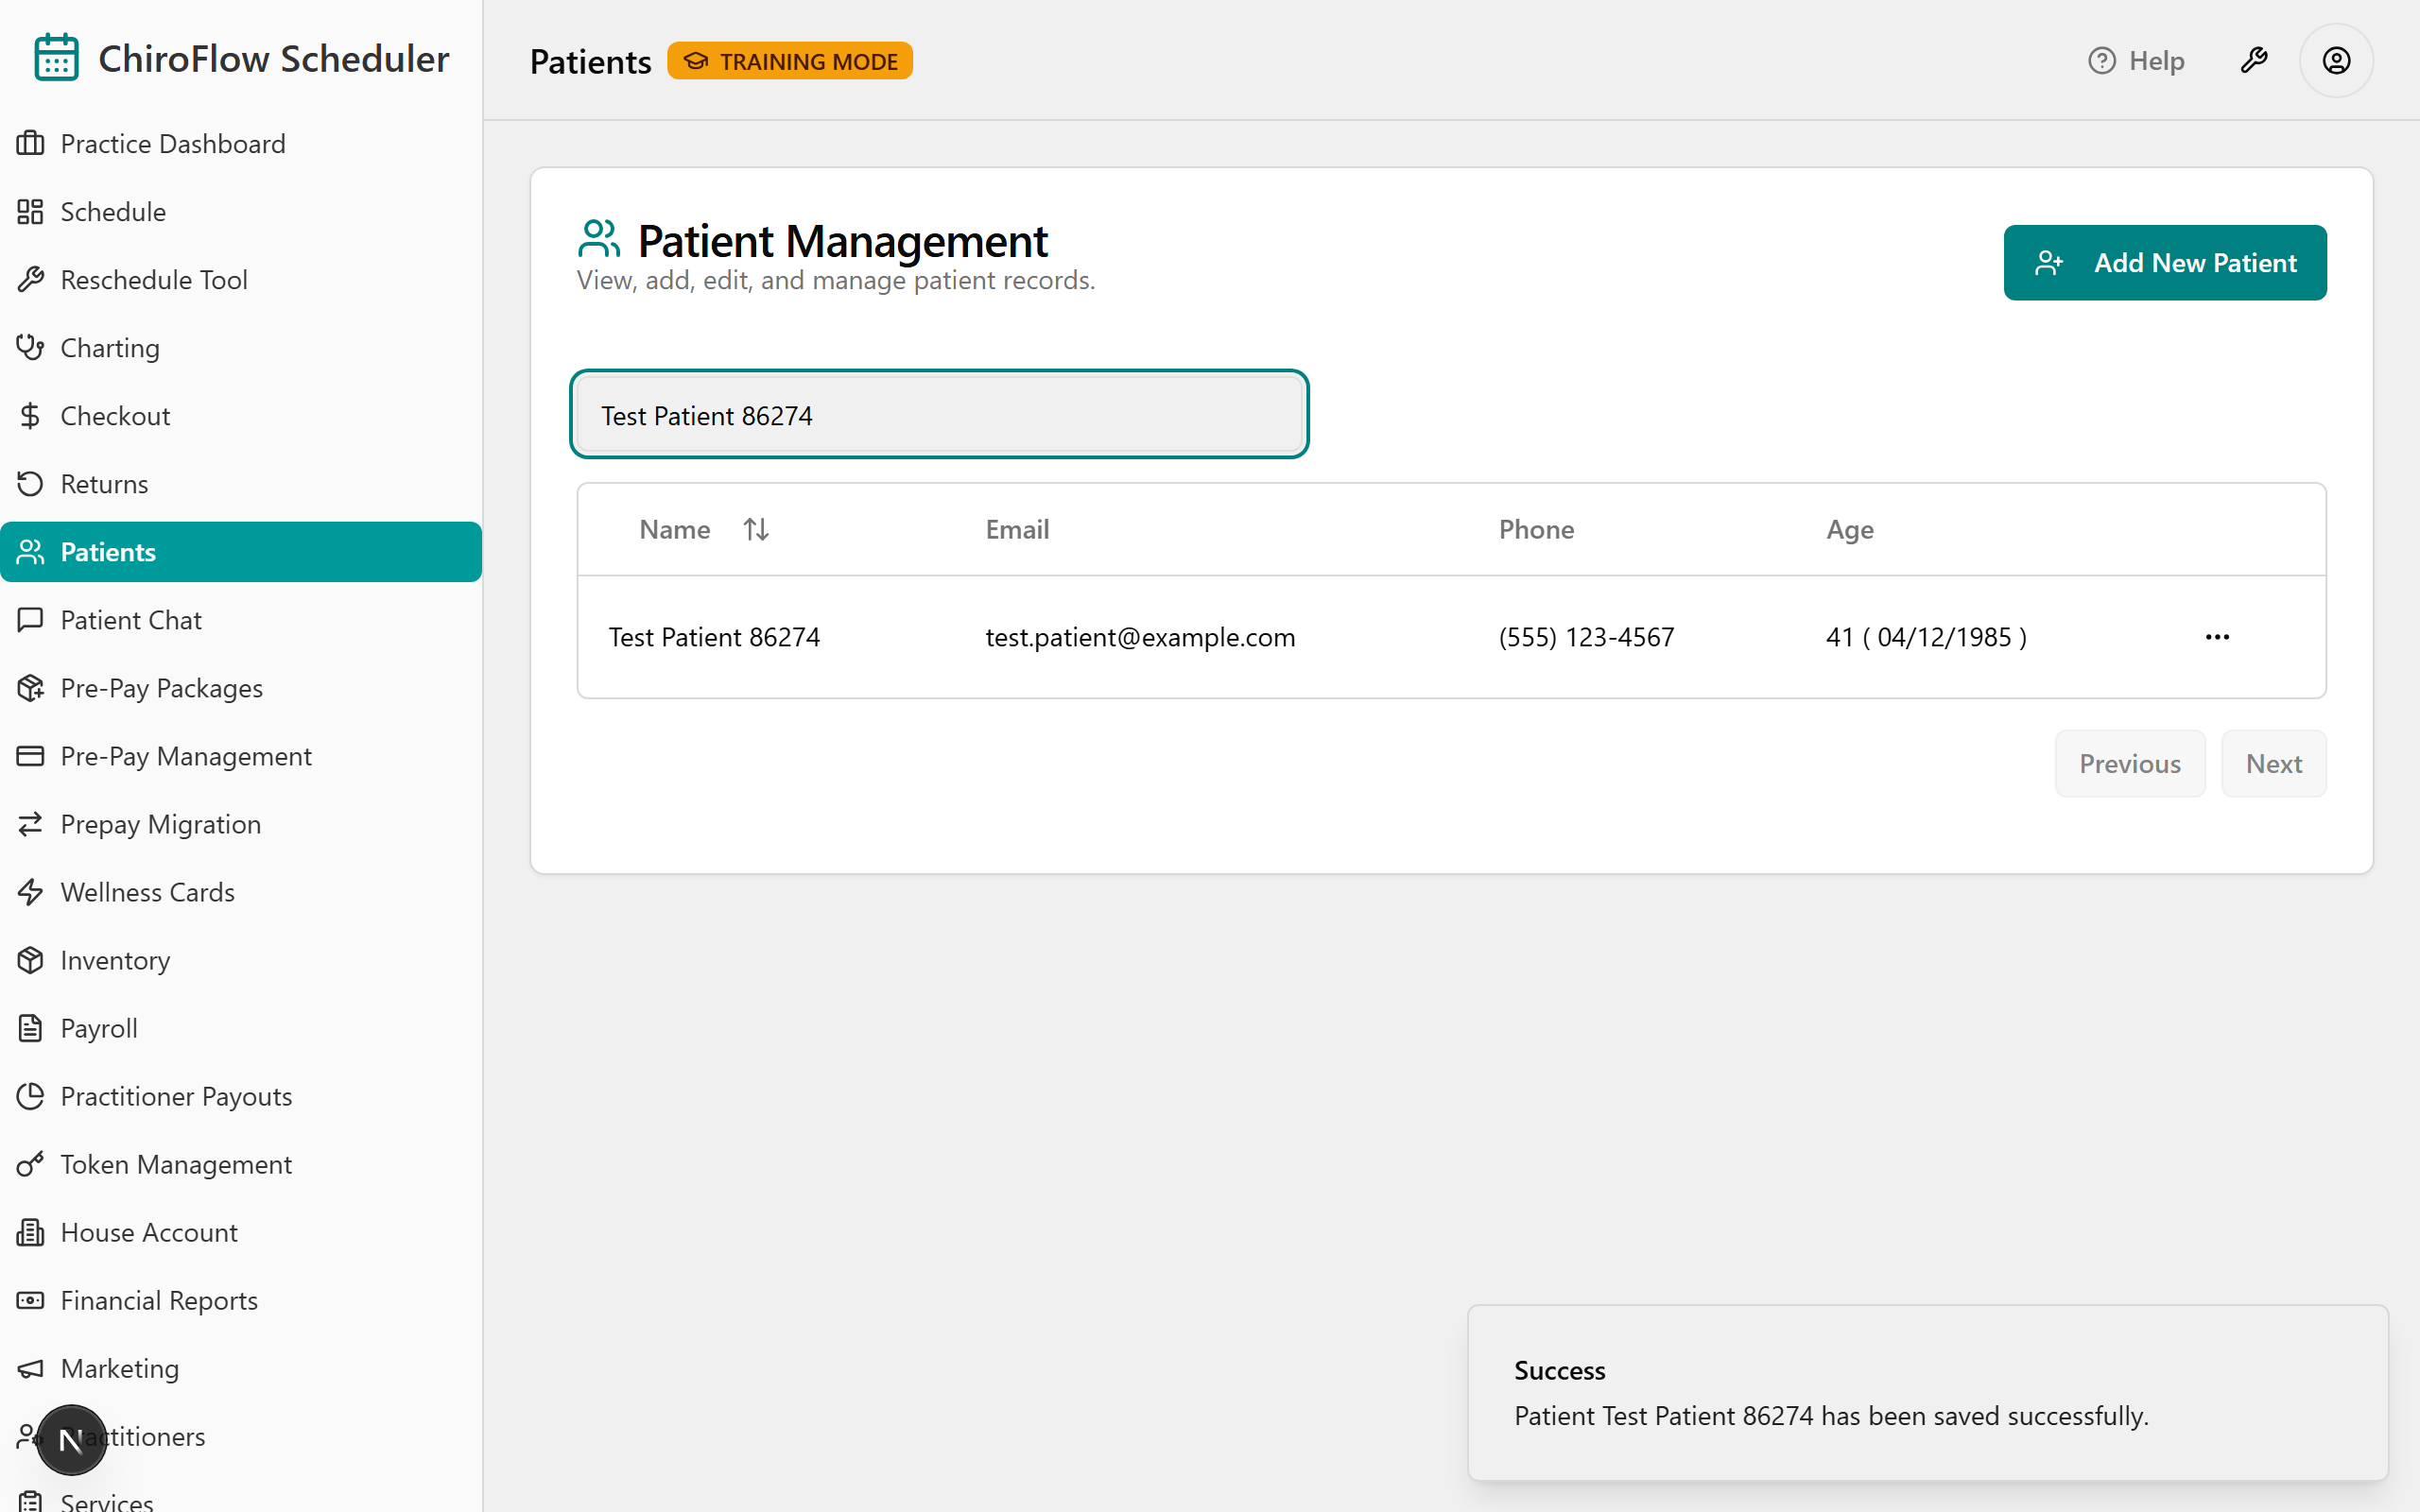
Demo step 1 — find a patient. Open Patients from the left menu, click into Filter by name…, and type any part of a real name — the table narrows live. (Type a real name to prove the whole TPS list migrated.)
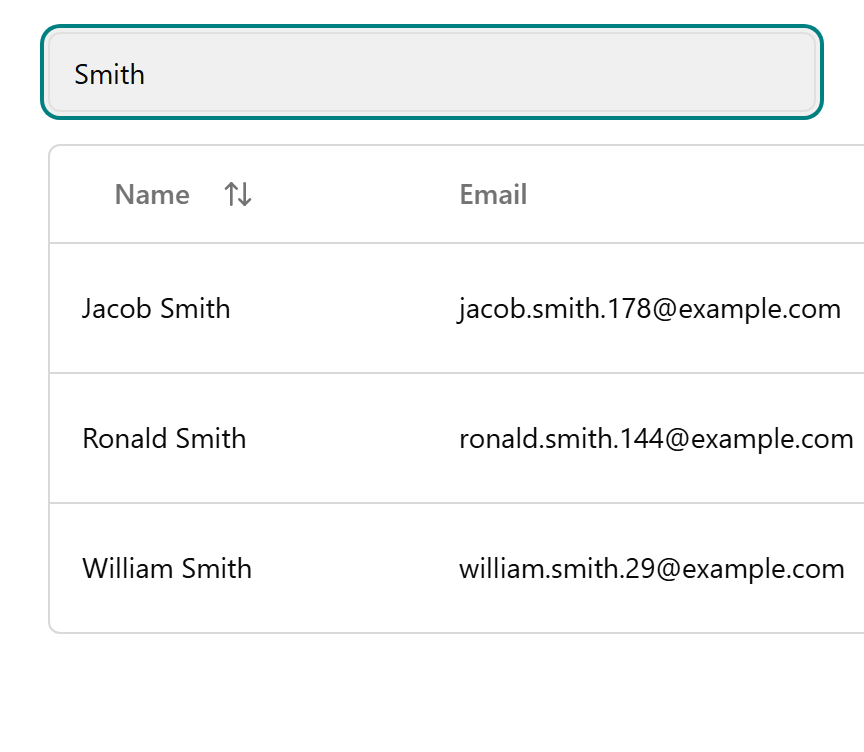
Mention: click the Name header to sort A–Z / Z–A; page with Previous / Next. (Only the Name column is searchable — the filter does not match phone or email.)
Demo step 2 — add a full record. Click Add New Patient (top-right) to open the Add New Patient dialog. Enter Legal Name (required, 2+ chars), plus optional Schedule Name, Email, Phone Number, Date of Birth (MM / DD / YYYY), Address, Notes, and Schedule Notes (Staff Only).
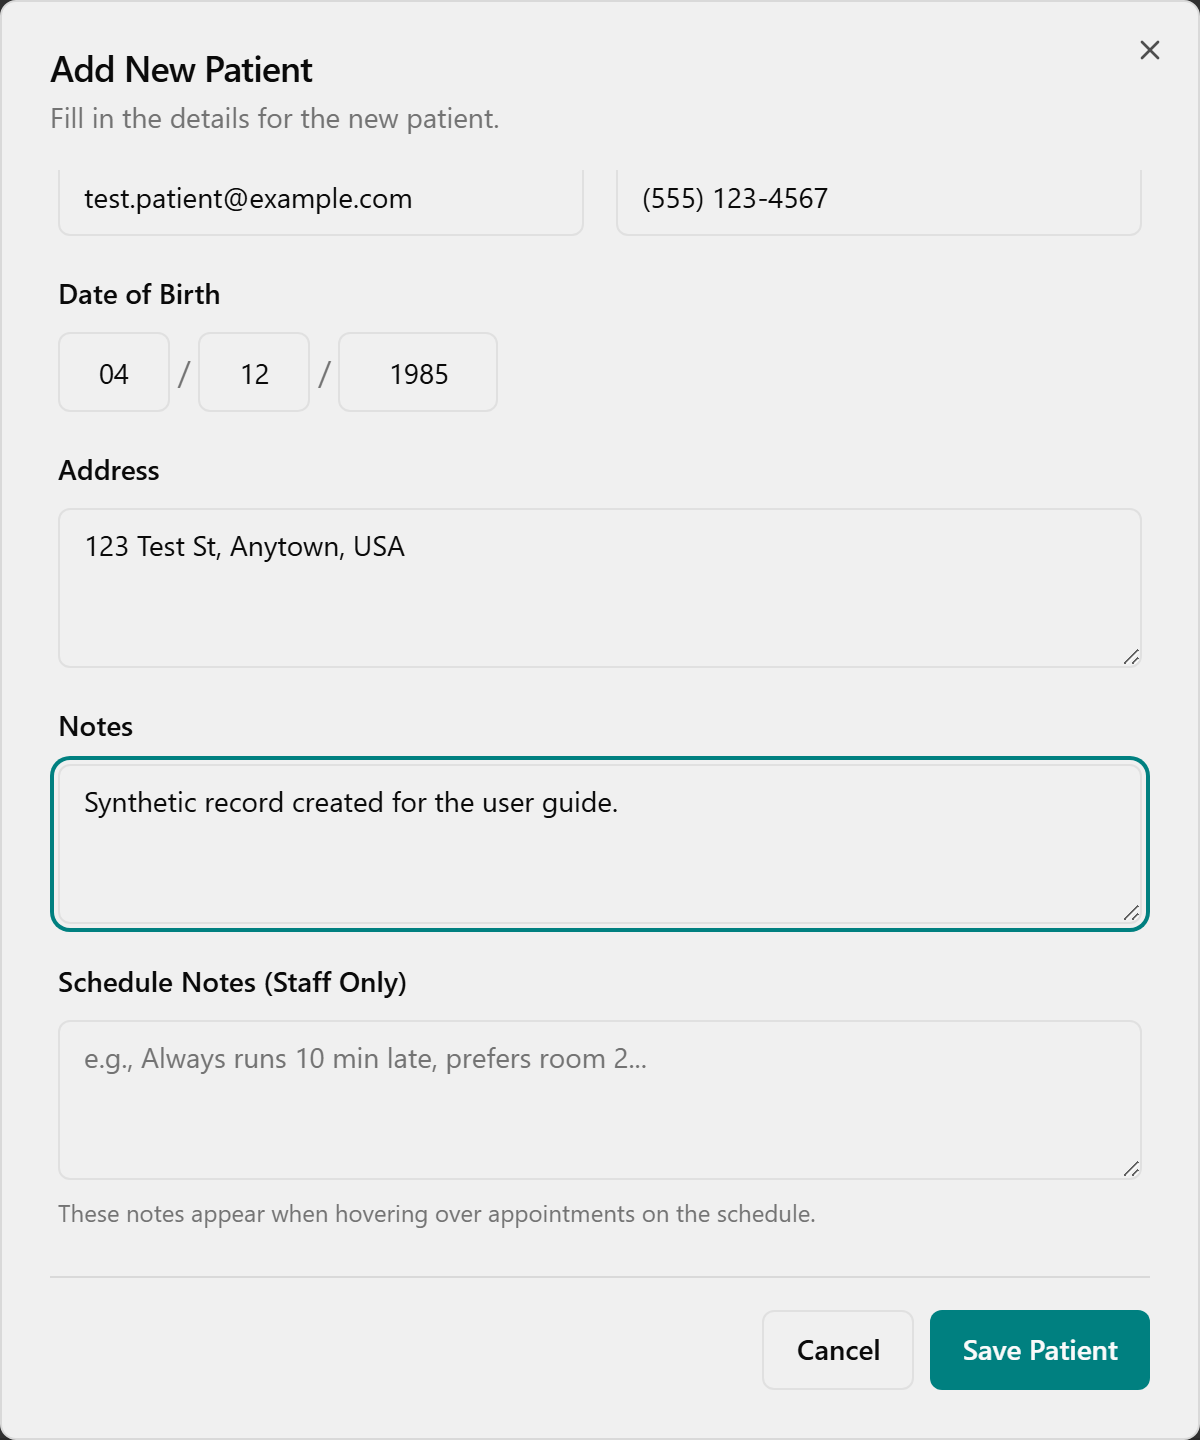
Click Save Patient — a toast confirms and the row appears.
Demo step 3 — mention edit / chat / delete (don't drill). The row's three-dots ⋯ menu opens Edit (pre-filled → Save Patient), View Chat History (read existing threads only — no SMS promise), and Delete.
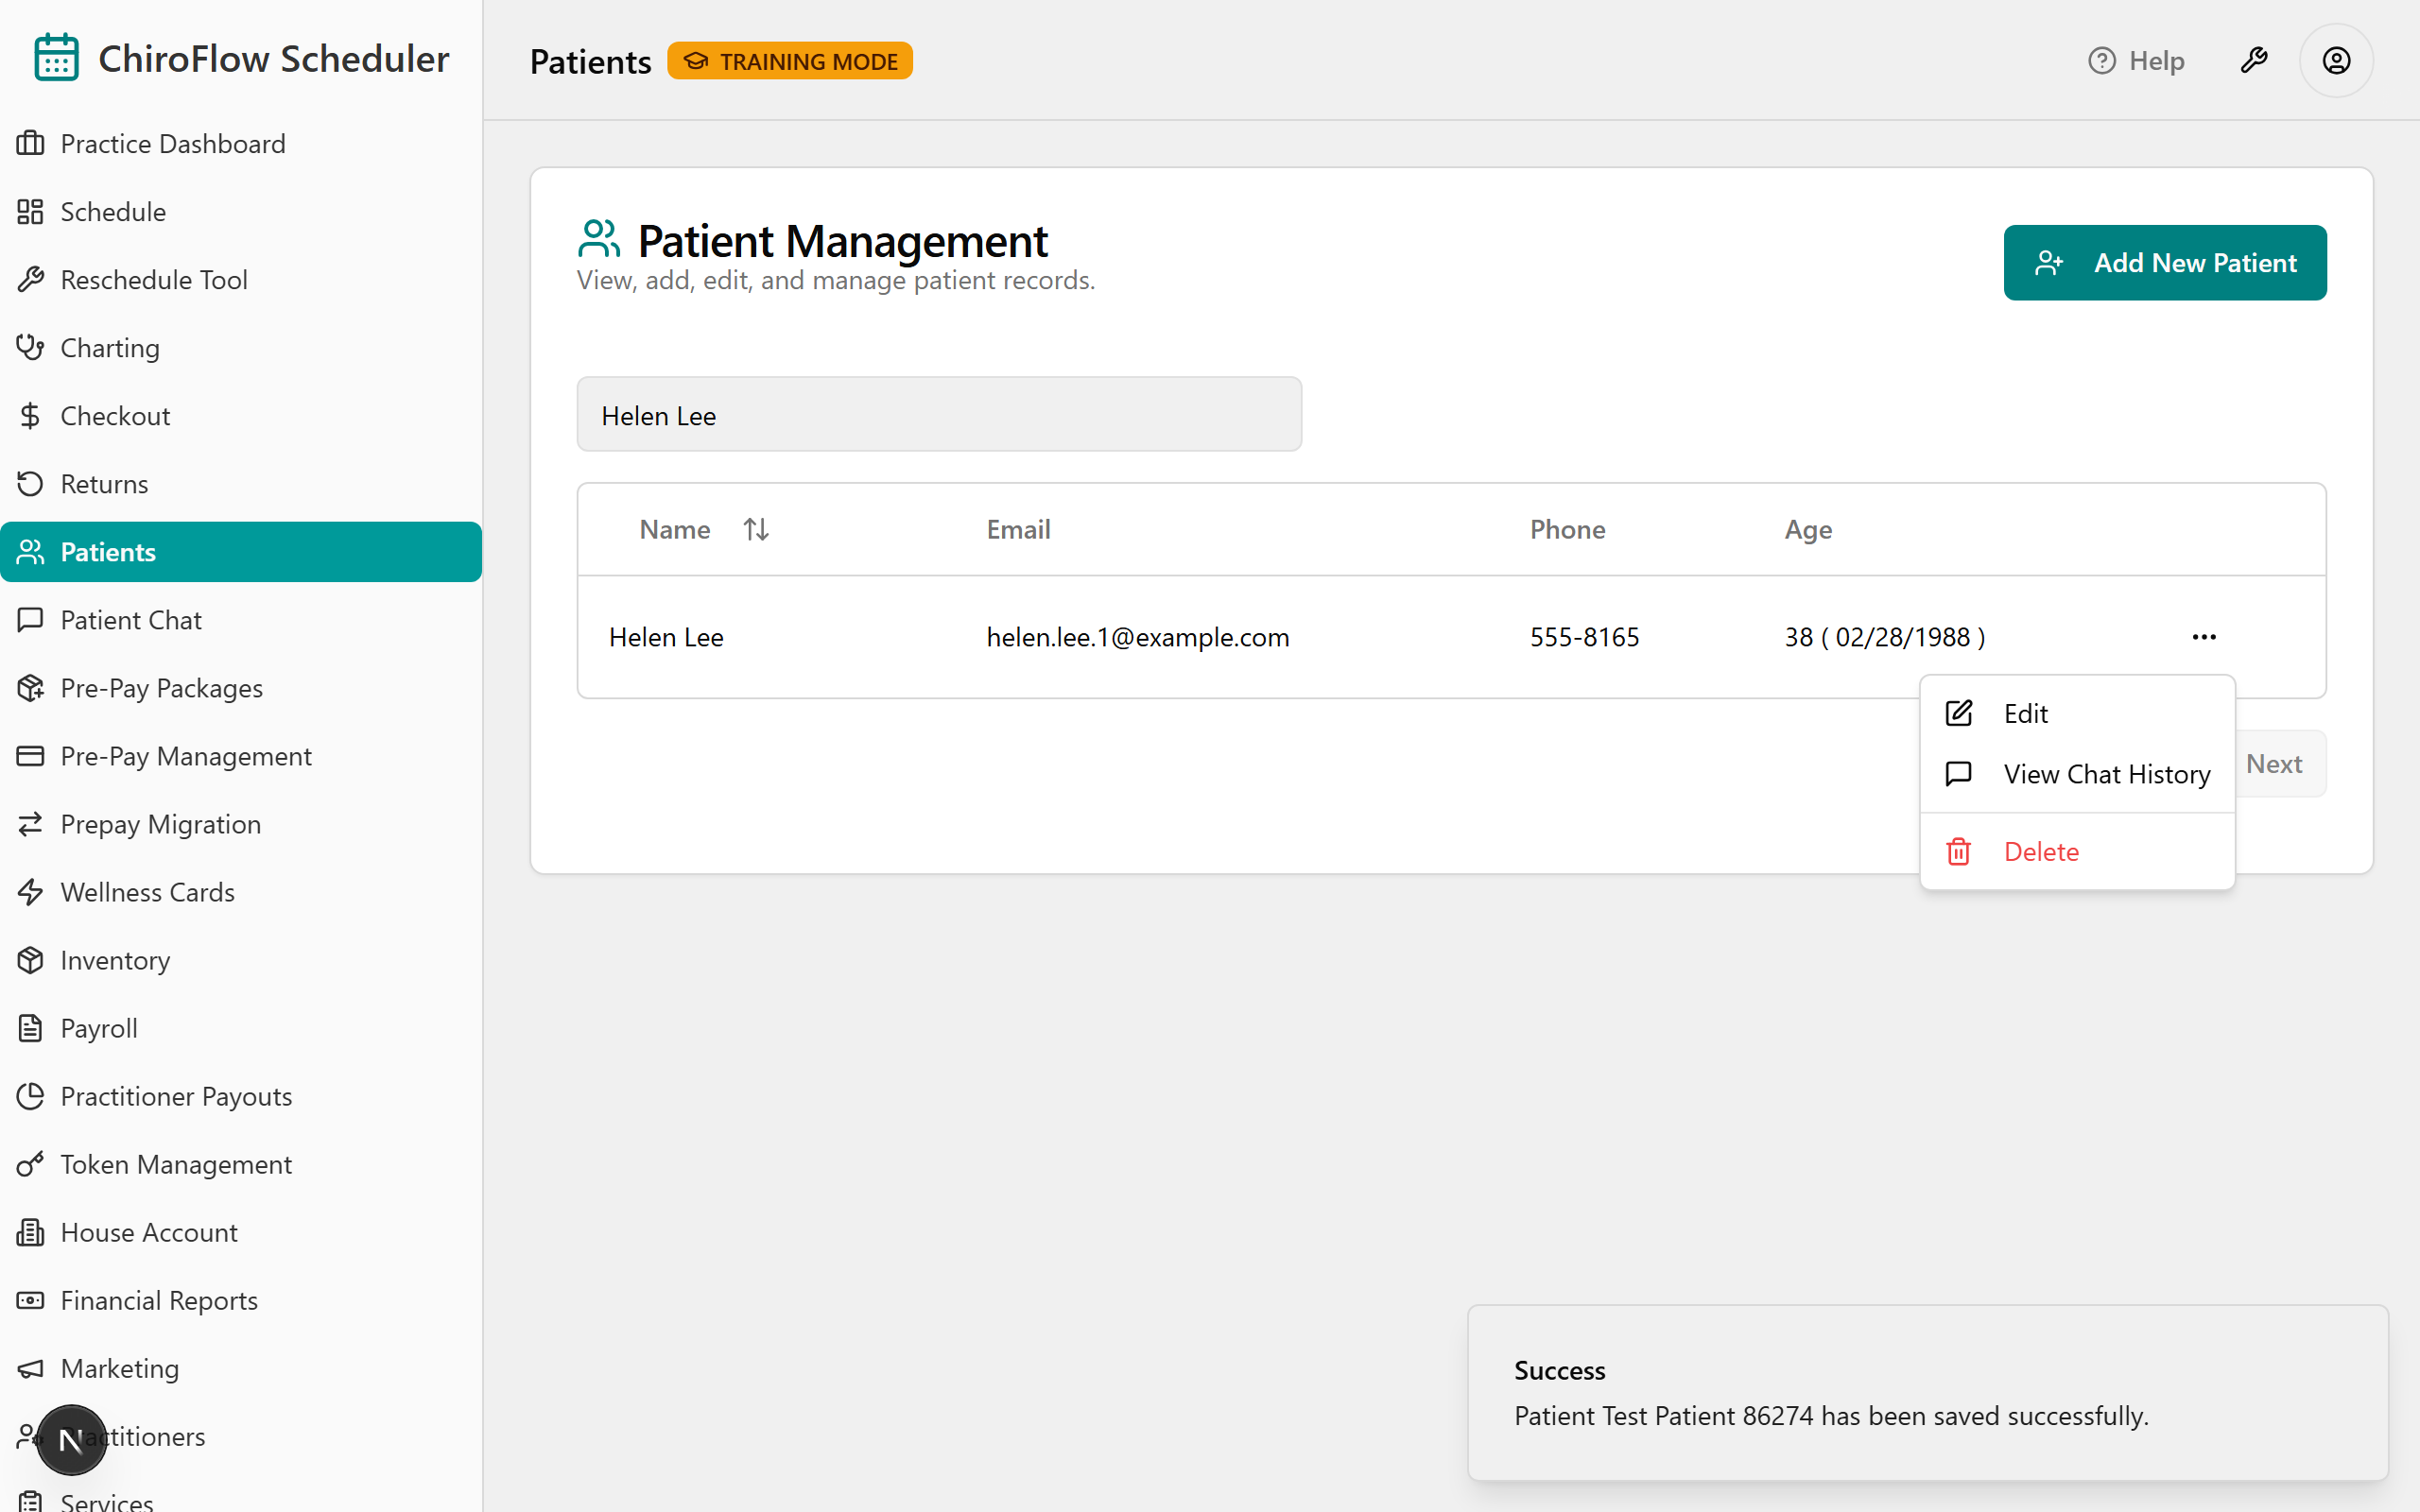
💡 Say: "Your whole patient list came across — type a name and watch it appear, and you can add a brand-new walk-in without leaving what you're doing. Two habits: always search before you create (OneBOSS won't warn about duplicates), and Delete is permanent — there's no undo, so when in doubt, ask Jessica."
👉 Reference:
03-front-desk-guide §Patients.
0:33–0:51 — ⭐ Checkout & Payments — the heart of the day (18 min)
🛑 Protect this block. If you're behind, cut later sections, not this one. This is where money and mistakes happen. Have the room follow on the Checkout payment-types card (
07-cards, Card 2) — tell them it's their go-live safety net.
Objective: Run a full checkout end-to-end — review the auto-calculated charge, add supplements, choose the right credit/payment path, and apply the two highest-risk rules.
🧭 Teach the day-1 "80% path" first, then mention the rest. Everyday flow: auto-charge → apply one credit (if any) → take card/cash → read the confirmation toast.
Say to open: "This is the money moment, and your TPS instincts carry straight over — you already know how to take a payment. OneBOSS just gives it one clean screen that does the math for you."
Live demo script (narrate every click)
1 · Get there from the Schedule (the primary flow). On a pink (checked-in) card, double-click — OneBOSS marks the visit Complete and opens Patient Checkout in one move. (If you prefer two steps: in Default click the purple check-circle Complete icon so the card turns green, then continue.) (If a patient has 2+ visits today, finish all of them first — checkout opens combined as Checkout All / Consolidated Checkout.)
2 · Take payment from the green card (if you didn't double-click). Click the purple dollar-sign Check Out icon (Default), or right-click → Check Out (Compact).
3 · Read the Charge Summary aloud. The Patient Checkout dialog opens ("Finalize charges for [patient]'s visit"). The price is auto-calculated and may briefly show Calculating….
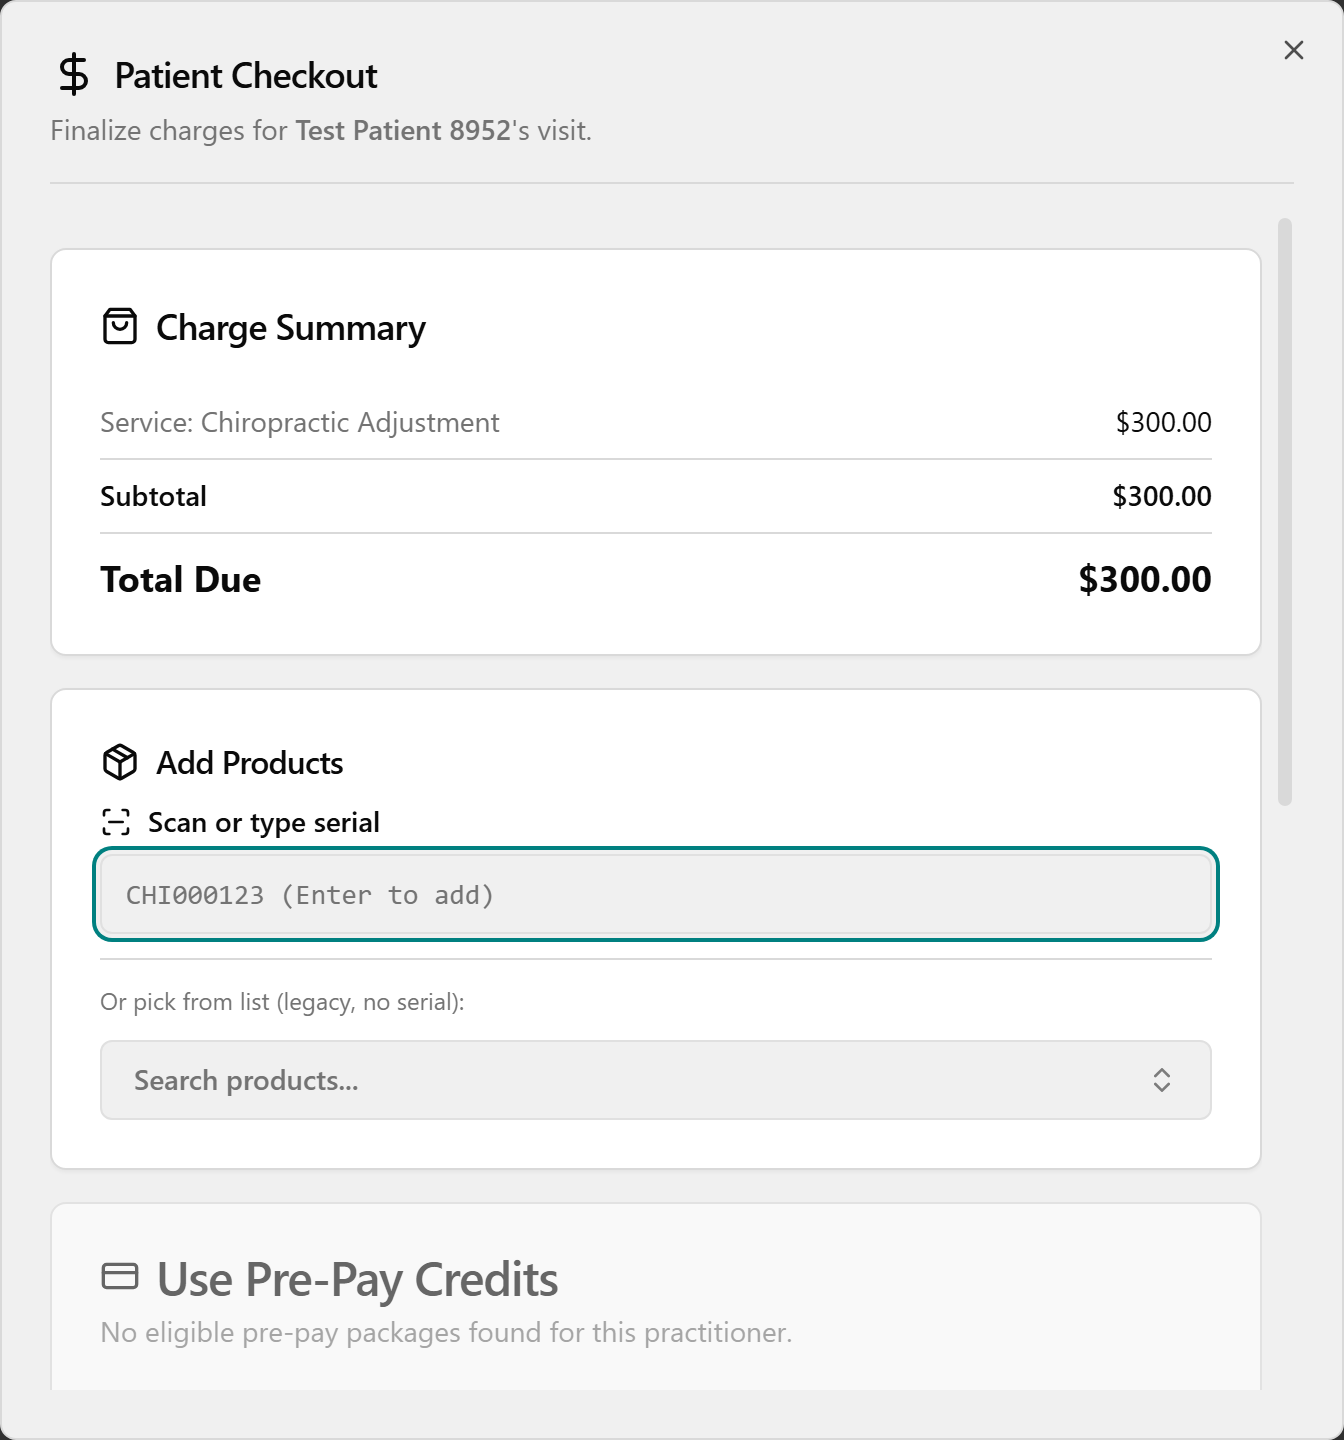
4 · Add a supplement (optional). In Add Products, click Scan or type serial, scan the bottle's barcode or type the serial (e.g. CHI000123) and press Enter — one scan = one bottle. No barcode? Click Search products…, pick the item, and set quantity with − / +. Remove an item with the X on its chip.
5 · Walk each payment path — the heart of the hour.
Pre-Pay (package wallet): in Use Pre-Pay Credits, click the patient's package. It covers the visit and supplements, so Amount Due Today shows $0.00 ("Fully covered by pre-pay credits") and no terminal payment is needed.
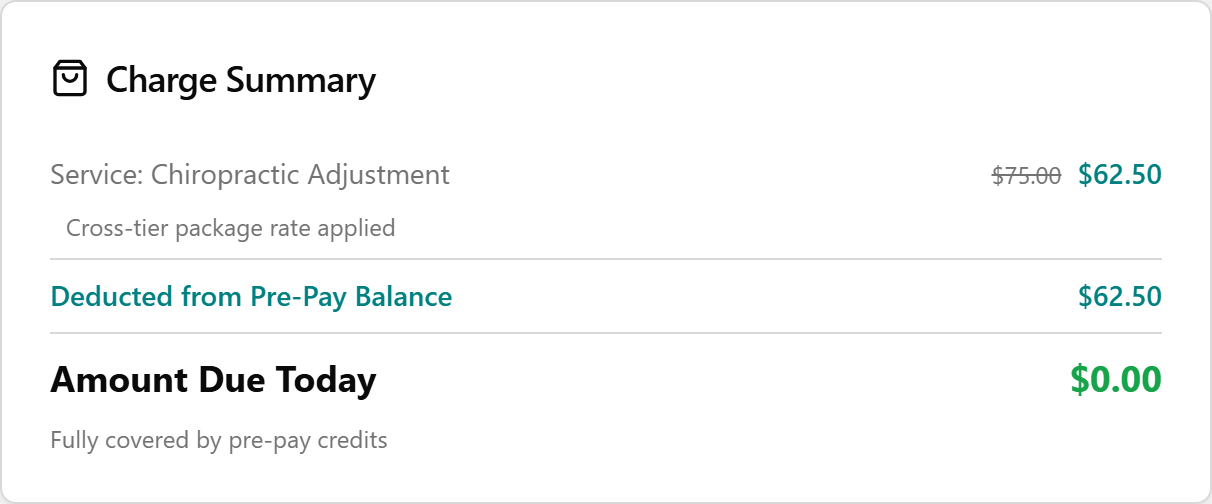
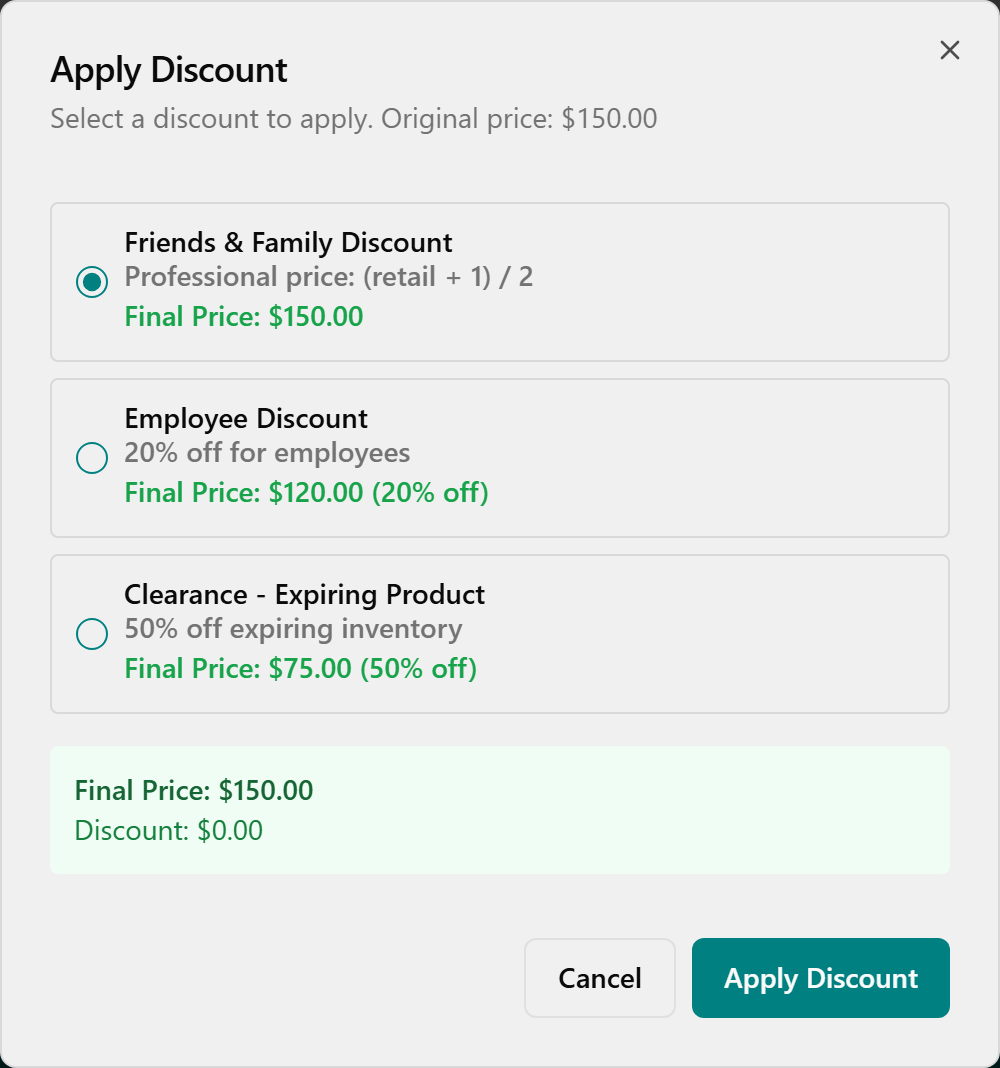
Discount / CHI Cash (lower the total instead of fully covering it): for a discount, click Apply Discount, pick one in the Apply Discount dialog (each shows its Final Price), and click Apply Discount. For store credit, click Use CHI Cash in the CHI Cash Credit card, enter an Amount to Use, and click Apply. Each applied credit shows as a green line in the Charge Summary.
Card / Cash / Check (the remaining balance): in the Payment Method card (watch the Terminal Online / Offline indicator), click Card, then Pay with Card (amount). When you see Present card on terminal, have the patient tap/insert/swipe. On success you'll see Payment Approved with the card type, last 4 digits, and auth code; if it fails, click Try Again. For cash or check, choose Cash or Check and collect the amount.
6 · Finish. Click Complete Checkout and wait for the Checkout Complete confirmation — it spells out the final amount and how it was paid. (For card payments, Complete Checkout stays disabled — "Pay at Terminal First" — until the terminal approves.)
The two rules to drill (say these twice)
- 🔴 Pre-Pay is ALL-OR-NOTHING. Selecting a package covers the whole visit ($0.00 due) and hides the Discount and CHI Cash cards. If the wallet can't cover it, don't select it — collect another way or suggest a re-up. (Code-confirmed: choosing pre-pay zeroes the total and gates the other options.)
- 🔴 The card only turns green/completed once payment has actually processed — unpaid stays pink. And avoid "Record as Card (no terminal)" unless there's truly no terminal: it isn't a real charge, can't be voided in-app, and a later return can't auto-refund the card. Run the card on the terminal.
Alternate entry point + reversals (mention, screenshot once)
Same dialog from the Checkout page: open Checkout (left menu) → stay on Ready for Checkout → find the row (use Search patients…) → click Checkout at the end of the row. It opens the exact same Patient Checkout dialog, so all the payment steps are identical. A patient appears here only after the visit is marked completed.

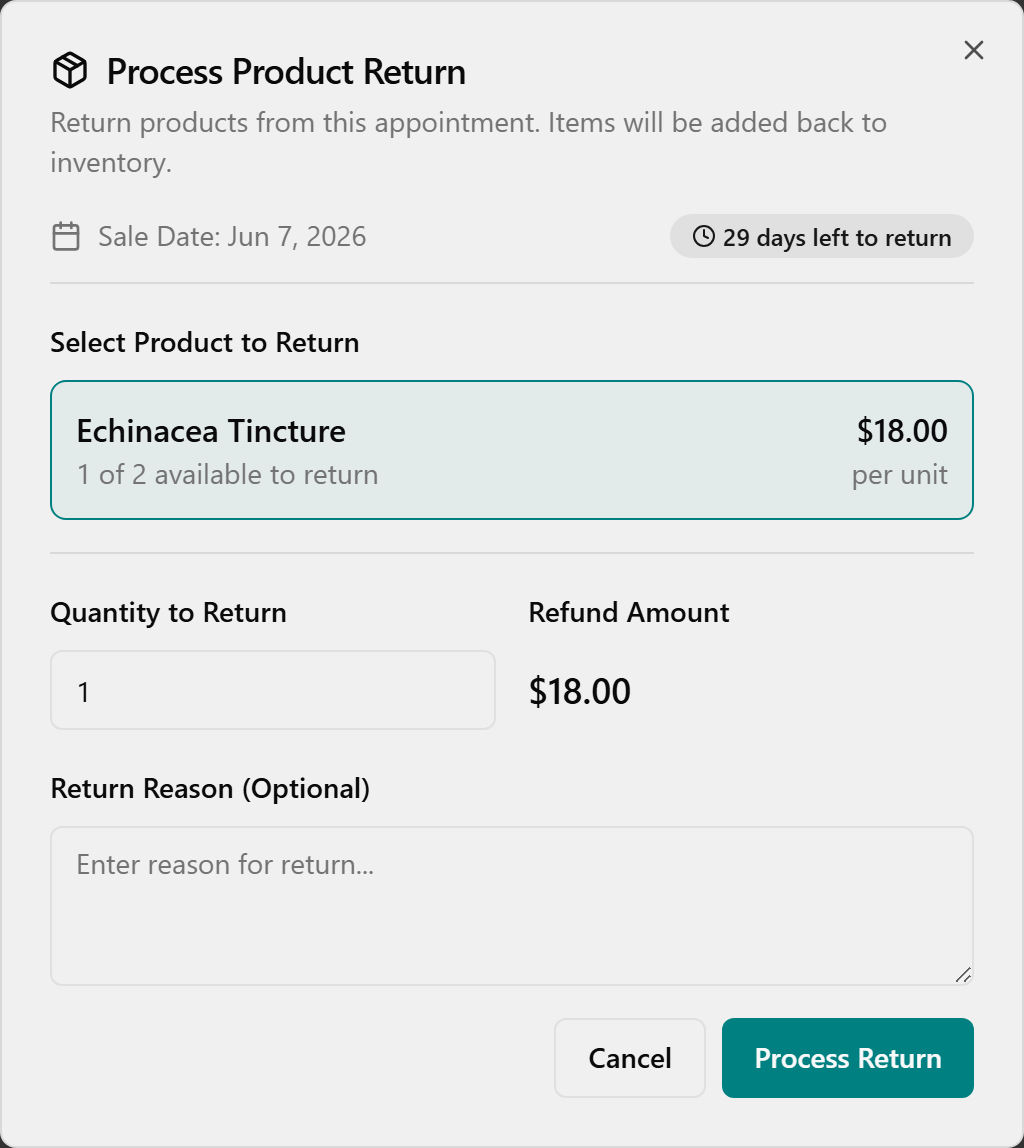
Reverse a past checkout (within 30 days): on the Checkout History tab, click the red Void (same-day terminal Credit Card payments only) and confirm in Void Card Payment?, or click the orange Return to open Process Product Return — pick the product, set Quantity to Return, add an optional reason, leave Refund to card checked for a card sale, and click Process Return.
Then a 3–5 minute guided rep (if a live system is available)
With ~5 staff this is the perfect size for a round-robin: hand the keyboard/mouse around and have each person drive one checkout (or one step of one), covering card and prepay between them while the others watch and coach. No live system? Do a second demo and have each person narrate the next step back to you. Small group = make it interactive here; this is the segment worth the reps.
👉 Reference:
03-front-desk-guide §Checkoutand Card 2 (Checkout Payment Types) in07-cards. (The "Split" record label — prepay/CHI Cash first, then a method — is a back-office detail; teach the practical "apply credit first, then pay the rest.")
0:51–0:58 — Pre-Pay Packages — sell, share & manage (≈7 min) ⏱ may run over — do not cut
Objective: Sell a Pre-Pay package, add family members who can draw from it, look up a balance, and know that a "re-up" means selling another package.
🧭 Where this lives: Pre-Pay Management (left menu) — its own screen, separate from checkout. Selling a package is its own action; spending a package happens at checkout (Segment 6).
Say to open: "Selling a package is its own quick screen, not buried in checkout — pick the package, pick the patient, add the family, done. Your patients' existing prepay balances already migrated, so day one looks populated."
Demo — sell a package (no screenshot on disk for this flow; narrate it live).
- Open Pre-Pay Management → click New Purchase (top-right) → the Purchase Pre-Pay Package dialog opens.
- Optionally use Filter by Category (Care $75, Care $100, Massage Therapy, Acupuncture, Wellness Therapy), then under Select Package click the card you want — the price auto-fills. (Confirm the live package list/prices in the app — they come from config and may change before go-live.)
- Open Purchaser (Patient) and choose the payer — they're added to the authorized list automatically and can't be removed.
- Leave Expiration Period as-is (greyed out — the package sets it).
- Optionally, under Authorized Users, type in Search patients to add… and click a family member to let them spend from this package too.
- Click Complete Purchase. (It stays disabled until you've picked a package, a purchaser, AND at least one authorized user — so trainees don't think the button is broken. Pre-pay packages are non-refundable.) The package is immediately active and now shows at checkout under Use Pre-Pay Credits.
Demo — find a balance. Type part of a name in Search patient…, then click the patient's row to expand the package table (Package, Category, Balance, Status, Authorized).
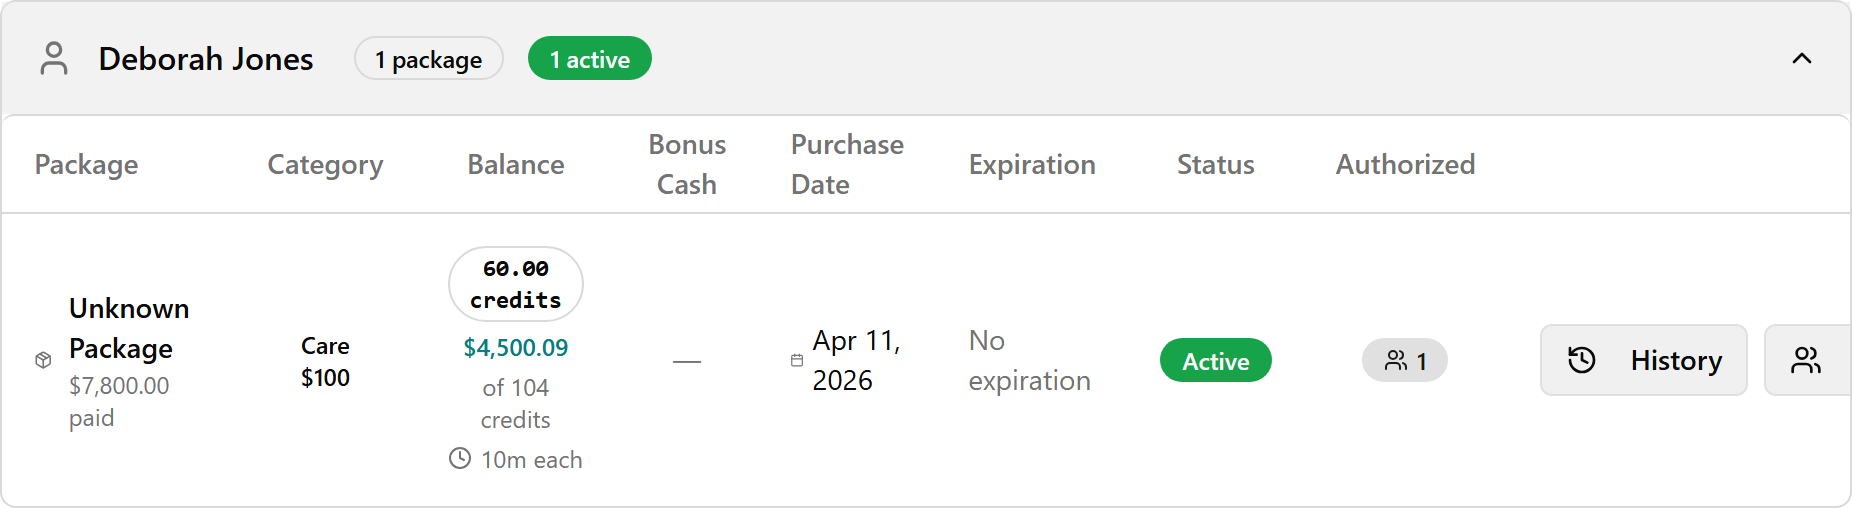
Read the Balance column (hover to see how much has been used); hover the Authorized badge to see everyone allowed to use it. Packages are grouped under the purchaser, even when shared.
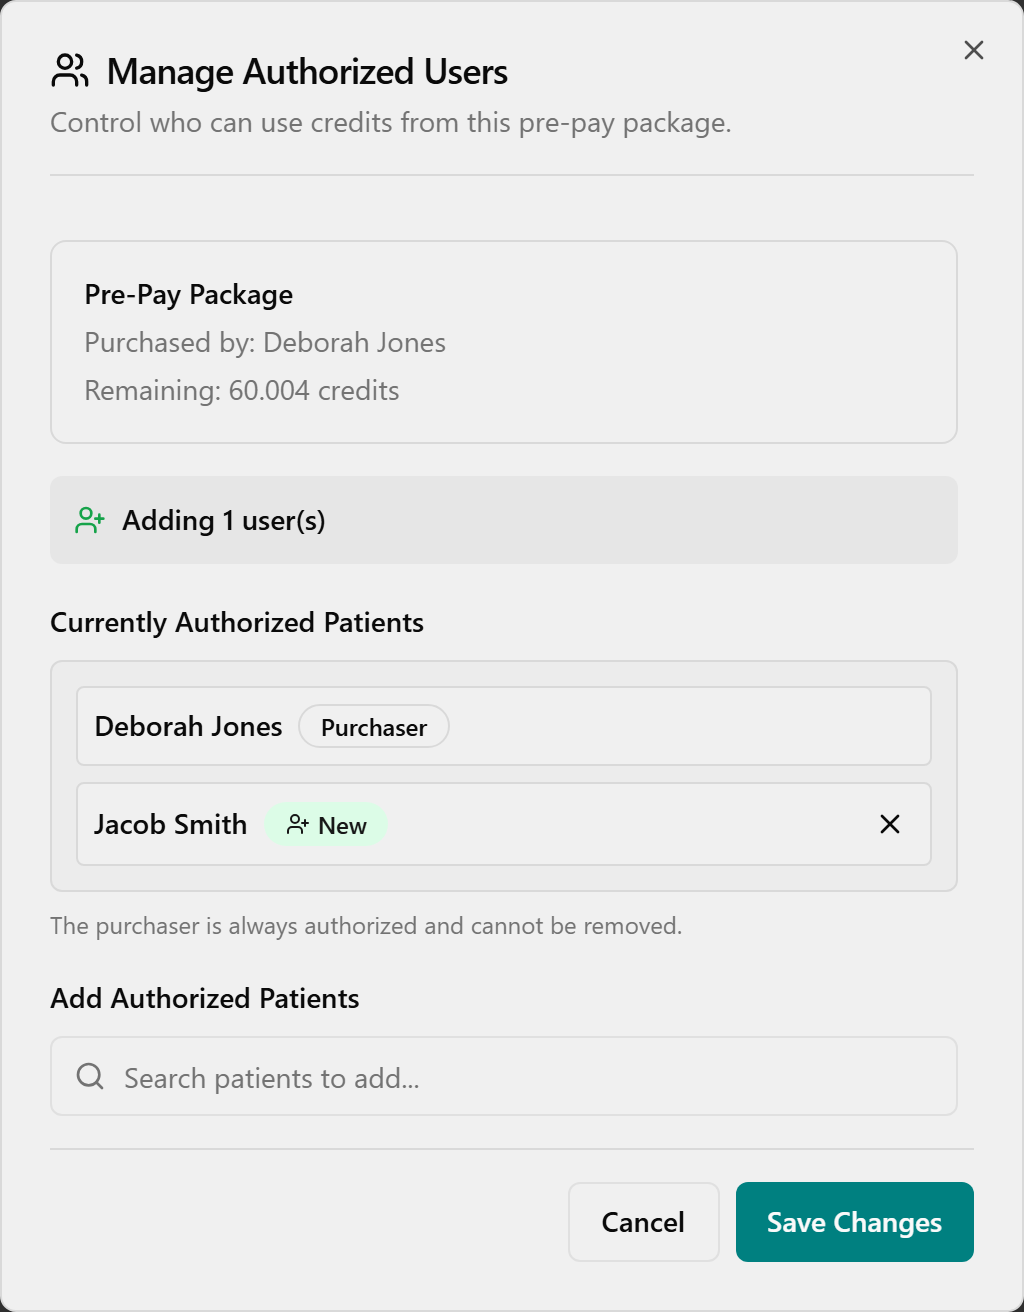
Demo — share / manage who can use it. With the row expanded, click Manage Users on the package → the Manage Authorized Users dialog. Add someone via Search patients to add… (they get a green New badge); remove with the "X" (the Purchaser can't be removed); click Save Changes.
Demo — view history. With the row expanded, click History in the Actions column → the Usage History panel slides in with summary cards (Purchaser, Amount Paid, Current Balance, Purchased) and a Transaction Log of each draw.
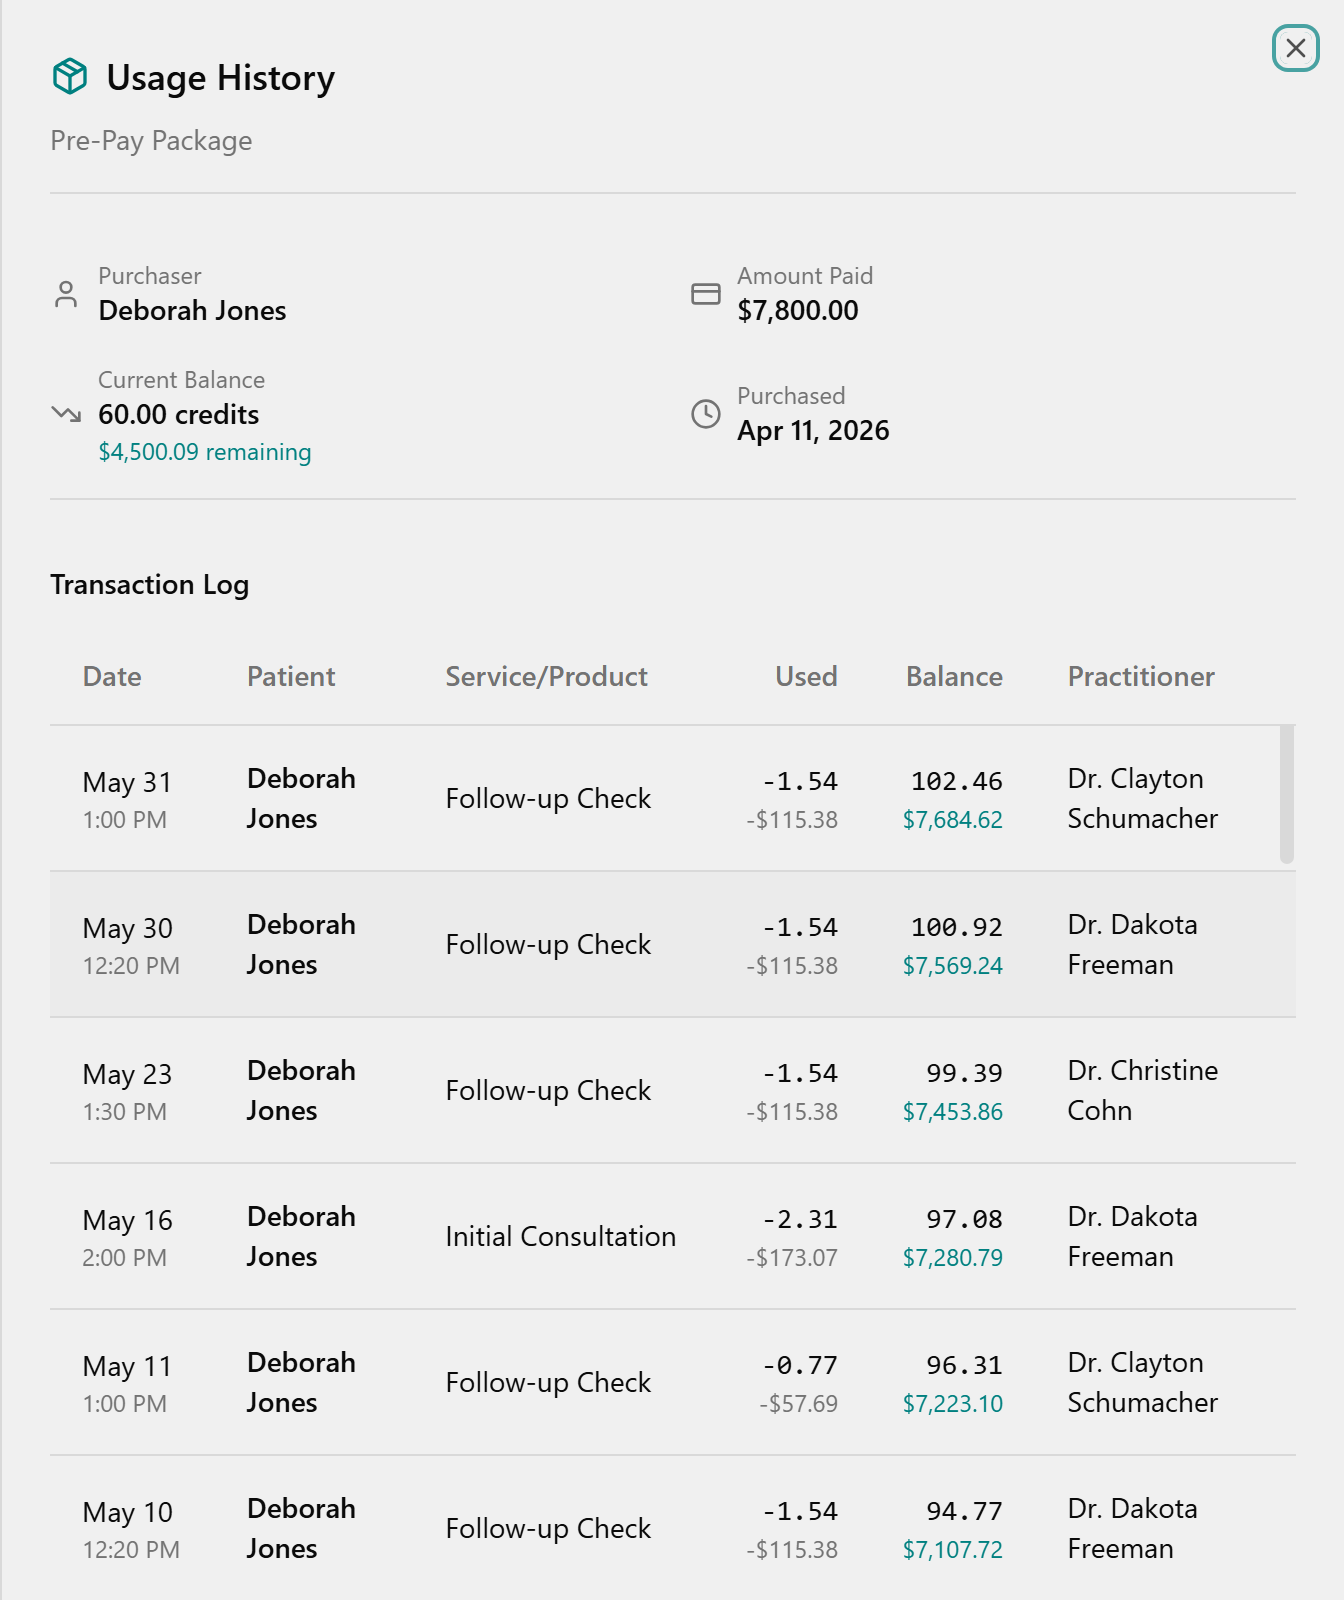
Re-up when it runs low: there is no top-up button — to re-up, just sell another package (New Purchase again). Each package is tracked separately and they stack under the patient.
💡 Cohn callouts: Family linking is real — purchaser and treated patient can differ; add family as Authorized Users and checkout handles it. Spending follows the all-or-nothing rule from Segment 6. Cross-tier pricing: a higher-tier package used with a lower-priced doctor is charged at the cheaper rate (a "Cross-tier pricing" note appears at checkout) — the patient isn't overcharged. Bonus cash may ride along with a package and can be restricted (e.g. to Wellness Therapy) — confirm current bonus rules in the app. CHI Cash: front desk spends it and sees the balance, but only Jessica can add it. Legacy TPS credit may read "staged" until Jessica/Admin signs it off at Prepay Migration — front desk doesn't map it; it just becomes spendable after sign-off. (Confirm the "staged" wording live — the three documented Status filters are Active / Depleted / Expired.) Defining the catalog, prices, and bonus cash lives on the separate Pre-Pay Packages page — that's an Admin task, not front desk.
👉 Reference:
frontdesk-1hr-agenda §7; in-app sourceprepay-management.ts.
0:58–1:03 — Wellness Cards + Returns (5 min · compress first if behind)
Objective: Know wellness cards are their own quick screen, and process a product return inside the 30-day window.
Wellness Cards (the digital punch card) — quick mention + sell screenshot
Say: "Wellness Cards are the digital replacement for the old paper punch card — a fixed 10 sessions for $500 ($50 each). Selling one is its own screen, NOT Pre-Pay Management — there's no category, no authorized users, no expiration choice, because every card is the same fixed package."
Demo — sell (on the Wellness Cards page). Open Wellness Cards → click New Wellness Card (top-right) → in Purchase Wellness Card, open the Patient dropdown and choose the patient; the summary box shows the fixed Therapies: 10 / Price: $500 / Value per therapy: $50 (read-only).
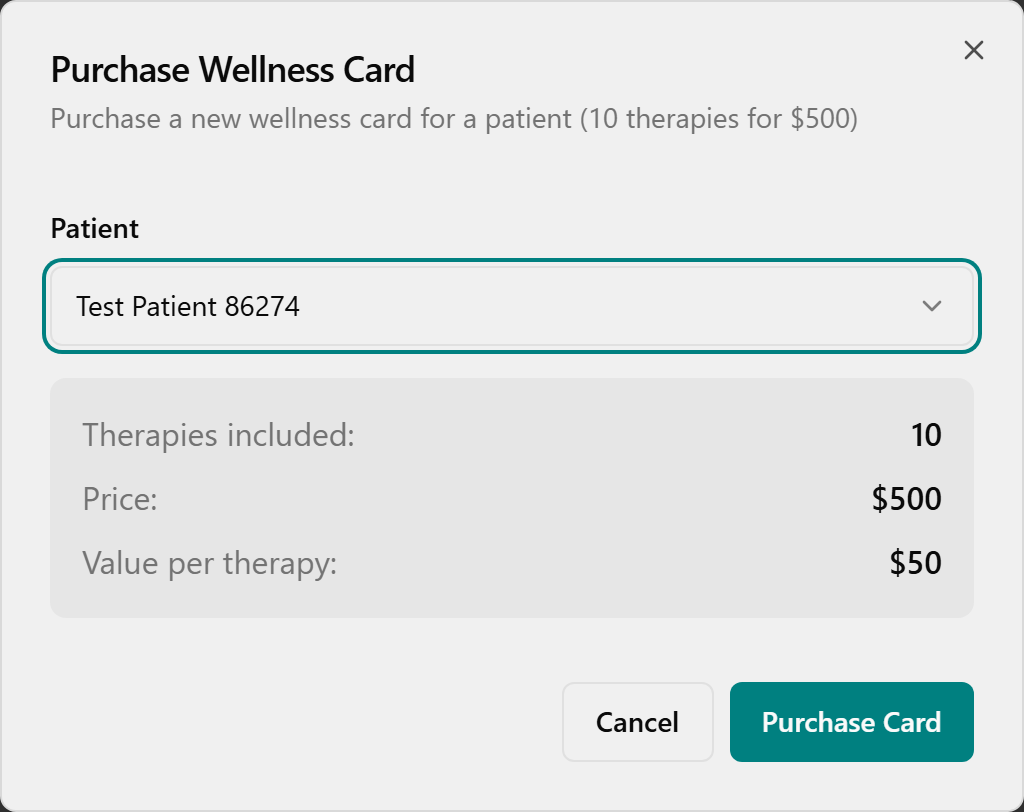
Click Purchase Card → confirm the green Success toast "Wellness card purchased for [patient]."

Mention only: search a patient and expand the row to see balances (Therapies e.g. "7 / 10", Value, Status); the History action shows each redemption; the Management tab shows total outstanding Liability. Redeeming is automatic at checkout — when you check out a therapy for a patient with an active card, a Wellness Card section appears (oldest card first, or Pay without wellness card), and completing checkout deducts one therapy. (Supplements are still paid separately.)
👉 Reference:
03-front-desk-guide §7.5.
Returns (30-day window, no undo)
Say: "Returns used to mean digging up the old ticket and adjusting inventory by hand — now you find it or scan it and the system restocks, refunds, and fixes commission for you. Just look twice before you click, because there's no undo."
Demo. Open Returns → stay on Process New Return → find the sale (or type into Search by patient…) → check the Time Left badge is still inside the 30-day window → click Process Return.
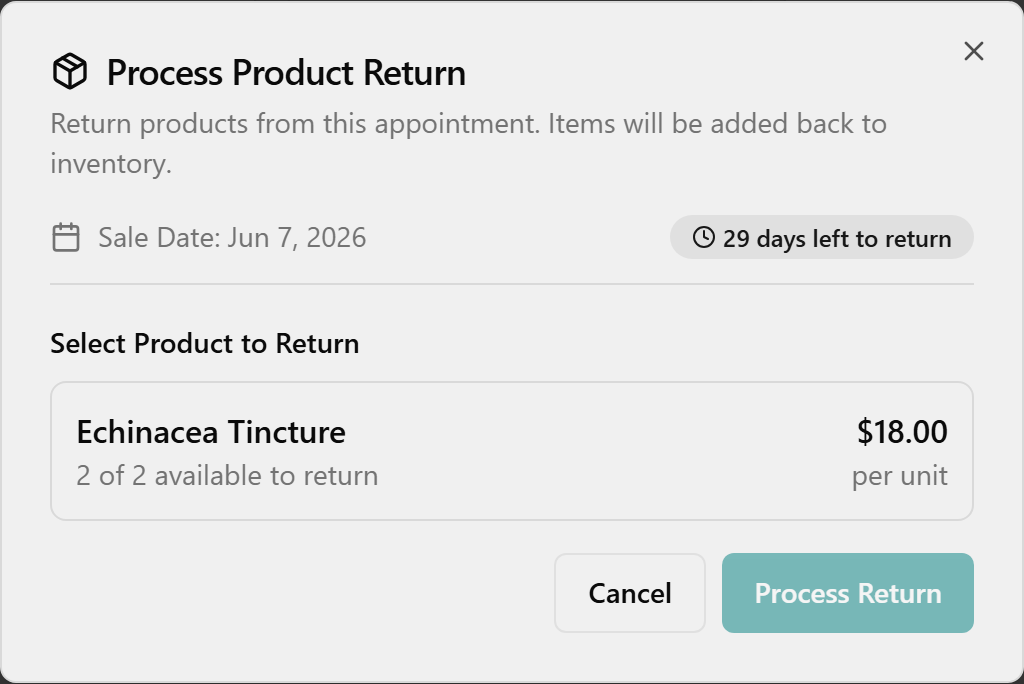
Under Select Product to Return, click the product; in Quantity to Return, type the count (Refund Amount updates); add an optional Return Reason; for a card sale, leave Refund to card checked (cash shows no checkbox).
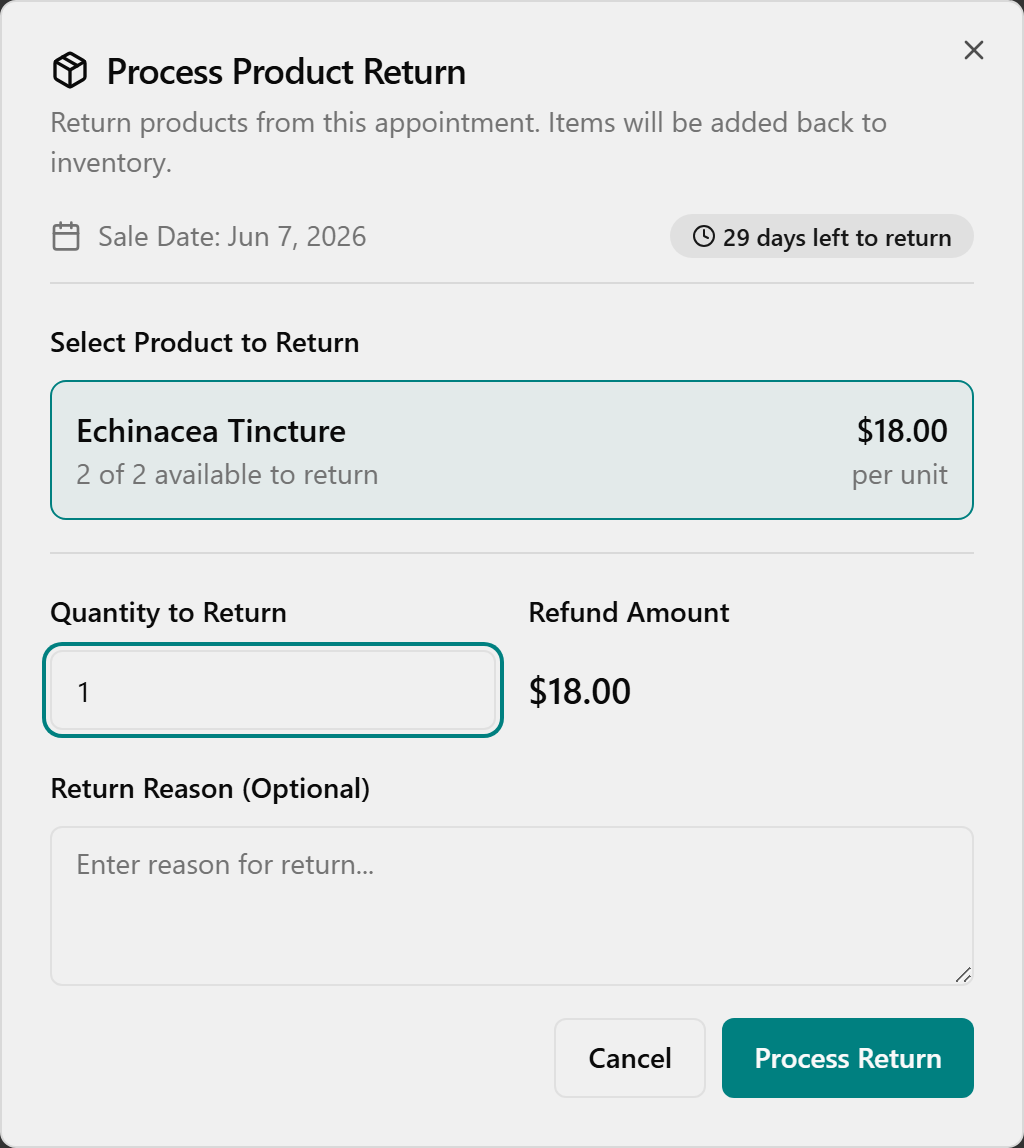
Double-check product and quantity (no undo), click Process Return, and wait for the green Return Processed toast.

Mention only: you can also reach the same dialog from Checkout → Checkout History → orange Return; and the Return History tab shows every refund and any commission Clawback (change the date range via the calendar button to look further back).

⚠️ Firm 30-day window and NO undo — past 30 days a sale drops off the list and is blocked; those older returns stay in TPS, read-only. (Refund destination: card sale → card, cash → handed back; the "prepay → wallet" path is unverified in app — confirm before promising. The Resellable vs Damaged choice appears only on the scan path.)
👉 Reference:
03-front-desk-guide §Returns; refund/void detail in09-faq.
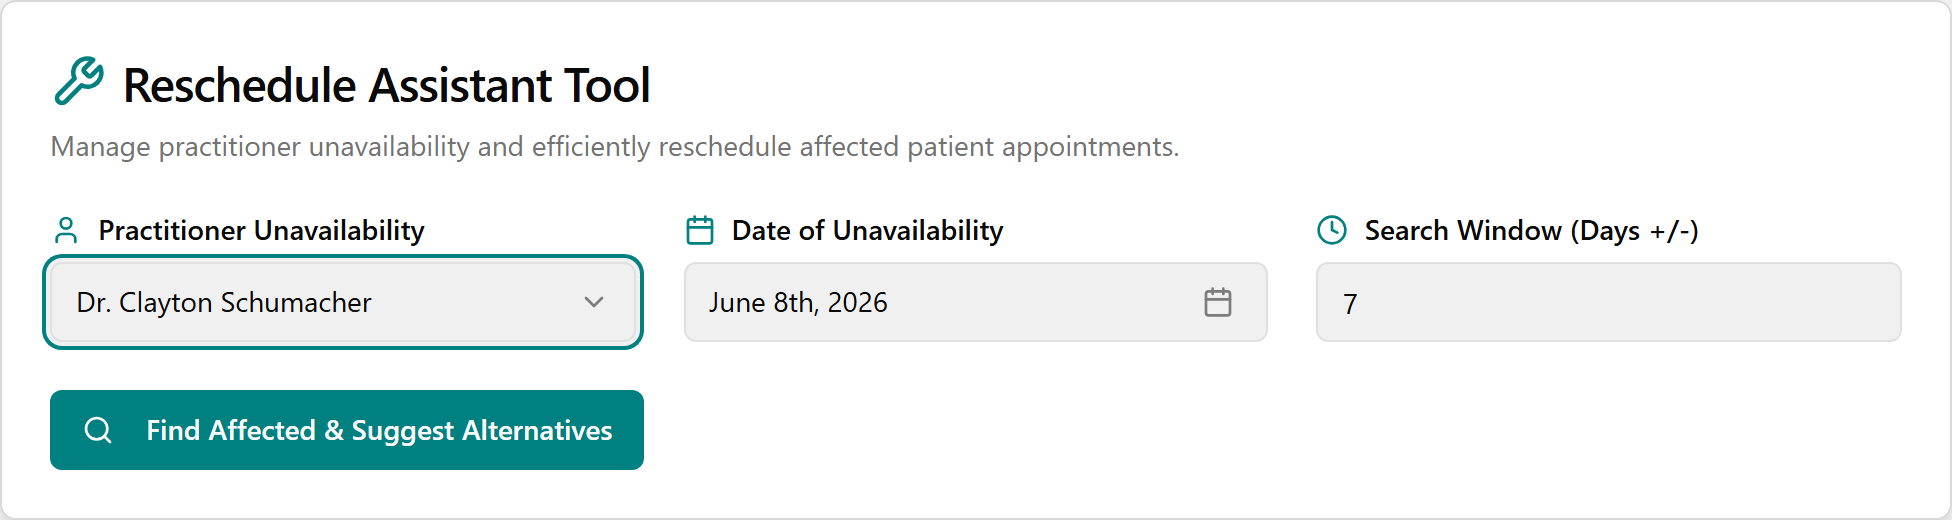
🧭 Mention-only — the Reschedule Tool. It exists in the left menu for one situation only: a practitioner is out for a whole day and you need to move every patient booked with them. "In TPS a provider's day out meant manual phone-tag down the whole column → in OneBOSS the Reschedule Tool lists every affected patient and proposes new times to confirm one by one." It is not for nudging a single appointment (that's Cancel + re-book). The core loop — pick the practitioner and date, Find Affected & Suggest Alternatives, then for each patient phone them, pick a slot, Confirm Reschedule — is self-study; don't drill it.
1:03–1:07 — Wrap — go-live, survival card & who to call (4 min · non-negotiable)
Objective: Everyone leaves knowing the cutover timeline, the Day-1 basics, and exactly who to call.
Say / do:
- Timeline (in motion): inventory count June 11–12 → cutover/validation June 12–14 → OneBOSS LIVE Sunday June 14 → on-site War Room support June 15–19.
- Day-1 basics: start every patient on the Schedule; search before you create; Revert fixes mistakes; old history lives in TPS read-only.
- Who to call (point to the survival card with real numbers filled in): Jessica (Clinic Director) for day-to-day + CHI Cash / commissions / refunds / voids; Kimberly for inventory / labels / spoilage; War Room for app errors.
- Rapid-fire readiness (hands up): Where do you start every patient? → Schedule. Fix a wrong status? → Revert. Add a supplement at checkout? → scan the bottle. Old history after June 14? → TPS read-only.
- Open Q&A — take 2–3 questions; park the rest on a visible list (and any "(confirm in app)" items), assign owners, and promise written answers in
09-faq; most resolve during War Room week.
Close: "Everything we touched today is something you already do — OneBOSS just gives it a clearer home and does the math for you. You don't need to memorize this; you need to know it's all in these guides — and that you can't break anything you can't undo."
👉 Reference:
10-go-live(survival card, support contacts) and06-crosswalk/09-faqfor "where's my TPS thing."
Parking lot — intentionally OUT of scope this hour
If these come up, name them, point to the owner/guide, and move on — don't drill them:
- Clinical charting / SOAP notes (later this summer; doctors trained separately).
- Management/owner functions: financial reports, Practitioner Payouts / commissions, Audit Log, and adding/authorizing CHI Cash (Jessica only).
- Inventory / receiving / labels / spoilage (Kimberly / Purchasing).
- Legacy prepaid-credit mapping / sign-off (Admin / Jessica task).
- Staff Schedule View / shift statuses — separate from patient appointments; the only "No Show" status lives there.
- Insurance / benefits, cash-drawer reconciliation, printed/emailed receipts — confirm in app / may not be built.
- Reschedule Tool deep-dive, Manual Override double-booking, and 10-min buffers — mention only.
Cut-if-short priority list (when you're running behind)
Never cut: Check-in (0:13–0:21), Checkout & Payments (0:33–0:51), Pre-Pay Packages (0:51–0:58), and the 4-min Wrap.
Cut first → self-study: Reschedule Tool (already mention-only) · Patient edit/chat/delete details · Wellness Card balances/history/liability (keep the sell screenshot) · the "where's my TPS X" round (just point to 06/09).
Compress: Find Availability + the name-only items in Segment 4 (Manual Override, Buffer, Notes) · Returns to a 90-second mention ("it's here, 30-day window, no undo, see the card").
If you have MORE than an hour later (or a follow-up)
Add, in order: hands-on reps for each payment type · prepay/wellness-card management deep-dive · the Reschedule Tool full flow · Patient Chat / SMS. Pull these straight from 03-front-desk-guide.
Success check (last 30 seconds, optional)
Thumbs up/down: "Could you check a patient in, book a slot, take a card payment, and sell a pre-pay package on Monday?" Any thumbs-down → flag that person for a buddy on go-live day.
Built against the OneBOSS source on feature/tps-migration-v2 and the consolidated Cohn front-desk-1hr training package. Spots marked "(confirm in app)" depend on the running clinic build — walk them once in the training login before printing handouts.